
33.4: Procedures
- Page ID
- 29309
You will observe the effects of refraction in several systems.
Spear the Penny
-
Place one penny on the bottom of the plastic tub; it should be near the center. Fill the tub about half full with water.
-
Balance the straw at the edge of the plastic tub, keeping the entire straw in air, and use it as a sighting tool to see the penny. Do not allow the straw to go into the water. When you see the penny through the straw, tape or hold the straw in place. Use your fingers to send the wood skewer through the straw in an attempt to spear the penny. If you repeat shooting a skewer through the straw, use a dry skewer. Record whether you successfully speared the penny or missed the penny. If you missed the penny, record the approximate distance in centimeters between your skewer and the penny.

Bending Ruler
-
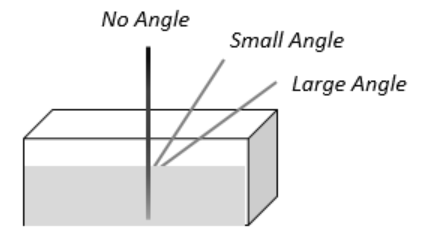
Place the ruler into the water, vertically, such that part of the ruler is in the water and part of the ruler is in the air; this is the “no angle” position. Allow the ruler to rest on the bottom of the plastic tub. Slowly move the ruler such that the angle is changed to a “small angle” and then a “large angle", and observe the shape of the ruler. Sketch the appearance of the ruler when it is at an angle, for both the small and large angle positions. Record the angle (small or large) at which the ruler appears most bent at the air/water line. Remove the ruler from the tub of water.
Note
The grey bow (water) should be fully in the rectangle (tub),
Where is the Penny
-
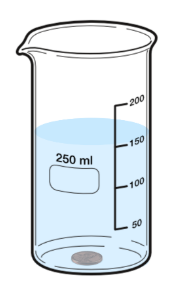
Add 150 mL of water to the 250 mL beaker. Place the white sheet of paper on the table close to you, and set the beaker on the paper. Place one penny on the bottom of the beaker, and position the penny so that it is in the center; you may want to use the skewer to center the penny.
-
Position yourself such that you are eyelevel with the water in the beaker. While looking at the penny through the water, slowly change your angle of observation, moving from a parallel line of sight to a vertical line of sight. Record your observations, the changes that occurred in the appearance of the penny as your line of sight changed. Also record the greatest number of penny images you were able to see.

-
Move your beaker of water with the penny to a ledge where you have several meters to back away from it. Place the piece of white paper under the beaker and make sure the penny is in the exact center of the beaker.

-
Position yourself so that your eyes are level with the water in the beaker, and look at the penny through the side of the beaker such that the light is traveling from the penny through water, beaker, and air, to you. Take a few steps backwards, away from the beaker, and then position yourself so that your eyes are level with the beaker again. Continue to take steps backwards and observe the beaker, until the penny has disappeared or you have run out of room. Each person on the team should try this. Record whether the penny changed appearance and/or disappeared as you walked backwards away from the beaker. Also record which team member (shortest or tallest) observed the penny disappear with the least distance from the beaker.
Angles of Refraction
-
Draw a table in which to record the angle of incidence and the angle of refraction for six positions/angles that you will choose. Do not fill in data until you have read the instructions for obtaining that data.
|
Angle of Incidence |
Angle of Refraction |
Light Reflected (Yes or No) |
|---|---|---|
|
0º |
||
|
20º |
||
-
Add water to the midline of the Laser Refraction Tank. Position the laser at the bottom such that a vertical beam of light may travel from the bottom of the tank, through the water, to the top of the tank. Turn on the laser and record whether there is any refraction of the vertical light ray.

-
Position the laser at 20º for the angle of incidence. Determine and record the angle of refraction in your refraction angles data table. Also record whether any light is reflected (yes or no) back into the water. Choose four additional angles and repeat the process.
-
Determine and record the angle of incidence required for the refraction to send the light beam back into the water, such that no light travels into the air. This is the angle of total internal reflection, for water.
Images with Lenses
-
Draw a table in which to record information about each lens image. Read the instructions for obtaining the data.
|
Lens/Combination |
Apparent Size |
Orientation |
|---|---|---|
|
Plano Concave Lens |
||
|
Double Concave Lens |
||
|
Plano Convex Lens |
||
|
Double Convex Lens |
||
-
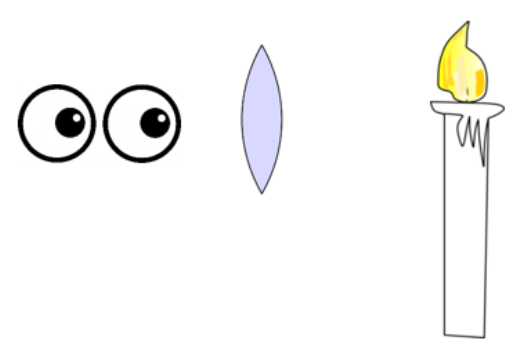
Use your aluminum foil to create a candle stand and place your candle on the table. Light the candle with a match. Use each of the hand held lenses and choose two different pairs of lenses, to view an image of the candle; you will need to position the lenses somewhere between you and the candle such that you have a clear, focused image. List the lens combinations you choose, in your table. Record data for each system in your lens image data table.
-
Apparent size of image (same, smaller, or larger) compared to the size of candle
- Orientation of image (same or upside down)
-
-
Hold the double convex lens at arm’s length and aim it toward a window at some outdoor scene. Hold the blank index card in the other hand, positioned between the lens and your eyes. Move the card back and forth until you can see a clear image on the index card. Describe how the image compares to the outdoor scene.

-
Replace the double convex lens with the double concave lens, while viewing the outdoor scene. Record whether an image appears on the index card. Describe your observations.
-
Place the double convex lens on this written text. Look down through the lens at the text. Continue to look through the lens as you slowly raise the lens from the paper toward your eyes. Describe any changes in the appearance of the letters that occur. Repeat this process with the double concave lens.
-
Draw a circle on the index card that is a little smaller in diameter than the double convex lens. Cut out the circle.
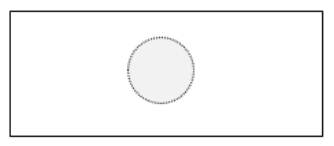
-
Hold the card at arm’s length in front of you and look through the hole at some distant scene (out the window or on the other side of the room). Hold the double convex lens against the hole and look toward same scene. Record whether your field of view (how much you were able to see through the hole) changed; record whether the field of view was the same, smaller, or larger. Repeat the process with the double concave lens.
Clean-up
- Discard water outside (water plants)
- Wash and completely dry your beaker and the plastic tub