
3.3: Rotation and Revolution
- Page ID
- 31551

\( \newcommand{\vecs}[1]{\overset { \scriptstyle \rightharpoonup} {\mathbf{#1}} } \)
\( \newcommand{\vecd}[1]{\overset{-\!-\!\rightharpoonup}{\vphantom{a}\smash {#1}}} \)
\( \newcommand{\dsum}{\displaystyle\sum\limits} \)
\( \newcommand{\dint}{\displaystyle\int\limits} \)
\( \newcommand{\dlim}{\displaystyle\lim\limits} \)
\( \newcommand{\id}{\mathrm{id}}\) \( \newcommand{\Span}{\mathrm{span}}\)
( \newcommand{\kernel}{\mathrm{null}\,}\) \( \newcommand{\range}{\mathrm{range}\,}\)
\( \newcommand{\RealPart}{\mathrm{Re}}\) \( \newcommand{\ImaginaryPart}{\mathrm{Im}}\)
\( \newcommand{\Argument}{\mathrm{Arg}}\) \( \newcommand{\norm}[1]{\| #1 \|}\)
\( \newcommand{\inner}[2]{\langle #1, #2 \rangle}\)
\( \newcommand{\Span}{\mathrm{span}}\)
\( \newcommand{\id}{\mathrm{id}}\)
\( \newcommand{\Span}{\mathrm{span}}\)
\( \newcommand{\kernel}{\mathrm{null}\,}\)
\( \newcommand{\range}{\mathrm{range}\,}\)
\( \newcommand{\RealPart}{\mathrm{Re}}\)
\( \newcommand{\ImaginaryPart}{\mathrm{Im}}\)
\( \newcommand{\Argument}{\mathrm{Arg}}\)
\( \newcommand{\norm}[1]{\| #1 \|}\)
\( \newcommand{\inner}[2]{\langle #1, #2 \rangle}\)
\( \newcommand{\Span}{\mathrm{span}}\) \( \newcommand{\AA}{\unicode[.8,0]{x212B}}\)
\( \newcommand{\vectorA}[1]{\vec{#1}} % arrow\)
\( \newcommand{\vectorAt}[1]{\vec{\text{#1}}} % arrow\)
\( \newcommand{\vectorB}[1]{\overset { \scriptstyle \rightharpoonup} {\mathbf{#1}} } \)
\( \newcommand{\vectorC}[1]{\textbf{#1}} \)
\( \newcommand{\vectorD}[1]{\overrightarrow{#1}} \)
\( \newcommand{\vectorDt}[1]{\overrightarrow{\text{#1}}} \)
\( \newcommand{\vectE}[1]{\overset{-\!-\!\rightharpoonup}{\vphantom{a}\smash{\mathbf {#1}}}} \)
\( \newcommand{\vecs}[1]{\overset { \scriptstyle \rightharpoonup} {\mathbf{#1}} } \)
\(\newcommand{\longvect}{\overrightarrow}\)
\( \newcommand{\vecd}[1]{\overset{-\!-\!\rightharpoonup}{\vphantom{a}\smash {#1}}} \)
\(\newcommand{\avec}{\mathbf a}\) \(\newcommand{\bvec}{\mathbf b}\) \(\newcommand{\cvec}{\mathbf c}\) \(\newcommand{\dvec}{\mathbf d}\) \(\newcommand{\dtil}{\widetilde{\mathbf d}}\) \(\newcommand{\evec}{\mathbf e}\) \(\newcommand{\fvec}{\mathbf f}\) \(\newcommand{\nvec}{\mathbf n}\) \(\newcommand{\pvec}{\mathbf p}\) \(\newcommand{\qvec}{\mathbf q}\) \(\newcommand{\svec}{\mathbf s}\) \(\newcommand{\tvec}{\mathbf t}\) \(\newcommand{\uvec}{\mathbf u}\) \(\newcommand{\vvec}{\mathbf v}\) \(\newcommand{\wvec}{\mathbf w}\) \(\newcommand{\xvec}{\mathbf x}\) \(\newcommand{\yvec}{\mathbf y}\) \(\newcommand{\zvec}{\mathbf z}\) \(\newcommand{\rvec}{\mathbf r}\) \(\newcommand{\mvec}{\mathbf m}\) \(\newcommand{\zerovec}{\mathbf 0}\) \(\newcommand{\onevec}{\mathbf 1}\) \(\newcommand{\real}{\mathbb R}\) \(\newcommand{\twovec}[2]{\left[\begin{array}{r}#1 \\ #2 \end{array}\right]}\) \(\newcommand{\ctwovec}[2]{\left[\begin{array}{c}#1 \\ #2 \end{array}\right]}\) \(\newcommand{\threevec}[3]{\left[\begin{array}{r}#1 \\ #2 \\ #3 \end{array}\right]}\) \(\newcommand{\cthreevec}[3]{\left[\begin{array}{c}#1 \\ #2 \\ #3 \end{array}\right]}\) \(\newcommand{\fourvec}[4]{\left[\begin{array}{r}#1 \\ #2 \\ #3 \\ #4 \end{array}\right]}\) \(\newcommand{\cfourvec}[4]{\left[\begin{array}{c}#1 \\ #2 \\ #3 \\ #4 \end{array}\right]}\) \(\newcommand{\fivevec}[5]{\left[\begin{array}{r}#1 \\ #2 \\ #3 \\ #4 \\ #5 \\ \end{array}\right]}\) \(\newcommand{\cfivevec}[5]{\left[\begin{array}{c}#1 \\ #2 \\ #3 \\ #4 \\ #5 \\ \end{array}\right]}\) \(\newcommand{\mattwo}[4]{\left[\begin{array}{rr}#1 \amp #2 \\ #3 \amp #4 \\ \end{array}\right]}\) \(\newcommand{\laspan}[1]{\text{Span}\{#1\}}\) \(\newcommand{\bcal}{\cal B}\) \(\newcommand{\ccal}{\cal C}\) \(\newcommand{\scal}{\cal S}\) \(\newcommand{\wcal}{\cal W}\) \(\newcommand{\ecal}{\cal E}\) \(\newcommand{\coords}[2]{\left\{#1\right\}_{#2}}\) \(\newcommand{\gray}[1]{\color{gray}{#1}}\) \(\newcommand{\lgray}[1]{\color{lightgray}{#1}}\) \(\newcommand{\rank}{\operatorname{rank}}\) \(\newcommand{\row}{\text{Row}}\) \(\newcommand{\col}{\text{Col}}\) \(\renewcommand{\row}{\text{Row}}\) \(\newcommand{\nul}{\text{Nul}}\) \(\newcommand{\var}{\text{Var}}\) \(\newcommand{\corr}{\text{corr}}\) \(\newcommand{\len}[1]{\left|#1\right|}\) \(\newcommand{\bbar}{\overline{\bvec}}\) \(\newcommand{\bhat}{\widehat{\bvec}}\) \(\newcommand{\bperp}{\bvec^\perp}\) \(\newcommand{\xhat}{\widehat{\xvec}}\) \(\newcommand{\vhat}{\widehat{\vvec}}\) \(\newcommand{\uhat}{\widehat{\uvec}}\) \(\newcommand{\what}{\widehat{\wvec}}\) \(\newcommand{\Sighat}{\widehat{\Sigma}}\) \(\newcommand{\lt}{<}\) \(\newcommand{\gt}{>}\) \(\newcommand{\amp}{&}\) \(\definecolor{fillinmathshade}{gray}{0.9}\)We are going to use the Earth-Moon system model once again, but this activity gets the children thinking about our scientific model in a different way; it also helps students understand the difference between rotation (a body spinning around on an internal axis), and revolution (one body circling around another). These two motions are generally independent of each other; our Earth, for instance, rotates 365.25 times (days) for each single revolution around the Sun (year); this is not a whole-number ratio. Planets are generally not synchronized, that is to say their rotation time and revolution time do not divide evenly into one another. Our Moon (indeed most moons) are exceptions to this and have synchronized orbits, as we shall see.
Science and Engineering Practices
- Asking questions and defining problems.
- Developing and using models.
- Planning and carrying out investigations.
- Analyzing and interpreting data.
- Using mathematics.
- Constructing explanations.
- Argument from evidence.
Crosscutting Concepts
- Systems and system models.
Next Generation Science Standards
- Forces and interactions (K-5, 6-8, 9-12).
- Space systems (K-5, 6-8, 9-12).
- The Earth-Moon system (6-8, 9-12).
- Gravitation and orbits (6-8, 9-12).
For the Educator
Facts you need to know
- From here on Earth, we only see one side of the Moon, commonly called the near side. The only way to see the Moon’s far side, is to fly there in a space craft and take photos!
- Rotation and Revolution are different! Things rotate on their axis the way a carousel spins on its central axis. To revolve, you must circle around a point outside your body. A tetherball revolves around the pole and the Earth revolves around the Sun.
- All planets and moons both rotate and revolve; just as the Earth rotates on its axis once a day, and revolves around the Sun once a year.
- The Moon is interesting because it rotates only once on its axis each time it revolves around the Earth. Rotation and Revolution take the same amount of time – about 28 days. This is called synchronous rotation, and it is the reason that we only see one side of the Moon from Earth!
Teaching and Pedagogy
The concepts of rotation and revolution are often difficult, not just children, but adults often struggle with them. It is not that the concepts are inherently difficult, but I suspect that because we fail to introduce children to them at all, this sets them up to struggle later in life. Studies show that we must be exposed to novel concepts several times before we begin to internalize them; even more exposure and practice is needed to master a concept. These early exposures to the ideas of rotation and revolution will be critical for your student’s later success in science. In keeping with the philosophy of many exposures to achieve mastery, we will return to these ideas again as you work through this book.
We are going to use the Earth and Moon model we built in Activity #3. You can use either the larger or smaller size model, but this activity generally works better outside using the larger size model
It may help your students visualize what is going on if you color your moon model before you work with it. Hang the moon model from the string (it should look like you are hanging it from the North Pole.) Draw a line where the equator should be and color the southern hemisphere dark grey, and the northern hemisphere white. The white half will represent the near side of the Moon, and the darker half represents the Moon’s far side.
With the model in place in the playground, ask the students what the cord between the model Earth and model Moon represents? The cord represents the force of gravity that holds the Moon in orbit of course, but the students may need to be guided to this idea. In general, if the students can stand 5-10 meters (15-30 ft.) away from the model, it will be easier to see what is happening.
As you can see in the illustration below, rotation occurs when a body such as the Earth spins around an internal axis. Virtually all objects in space spin around their own internal axis; for the Earth, this creates the night and day cycle. Revolution occurs when one object orbits around another. The Moon for instance, revolves around the Earth once per month.

Student Outcomes
What will the student discover?
- One side of the Moon always faces the Earth.
- Students may decide that this is caused by the string which attaches the Earth and Moon models together. Remind the students that it is actually the Force of Gravity which locks the Moon in a 1:1 synchronous orbit around the Earth.
- The Moon rotates or spins on its axis just once for each rotation around the Earth.
- It is sometimes helpful to have a student hold the Moon over their head and walk the Moon model around the Earth. You will clearly see that the student faces a different direction each time they move ¼ the way around the orbit!
- The Moon’s ratio of rotations : revolutions = 1:1.
- This 1:1 ratio is typical of very large planets with relatively small moons. This is more common than you might think! The moon Charon always faces the same side toward it planet Pluto! Several moons of Jupiter and Saturn are locked in orbit in this same way.
What will your students learn about science?
- Playing with models and exploring what they can tell you about the world around you is powerful science! Working with models is very powerful. The famous scientists James Watson and Frances Crick used models to discover the shape of the DNA molecule – and won a Nobel Prize for their efforts.!
- Models can help explain what we see in Nature. Sometimes we see something, but we don’t understand how it works. Always seeing the same side of the Moon is like that – we’ve all looked at the Moon in the sky hundreds of times, but few people wonder why do we always see the same side? Playing with models can help us understand what is happening, and help us plan new experiments!
- Models can help show us where to look for new ideas, and help us form good questions to ask as we continue exploring! Once we see the same side of the Moon always faces us, we begin to ask other questions. Is it always exactly the same? Can we see the Moon tip or wobble at all? We will deal with these, and other questions, as we move through this book!
Conducting the Activity
Materials
We will use the Earth-Moon model that we constructed in Activity #3. It should be modified as discussed in the Teaching and Pedagogy section above.
Exploring the Earth-Moon Model
With the model in place in the playground, ask the students what the cord between the model Earth and model Moon represents? The cord represents the force of gravity that holds the Moon in orbit of course, but the students may need to be guided to this idea.
- Explore how the cord in our model is similar to gravity – and different from it. This is another way to help children realize the difference between a scientific model or theory and nature itself. Our model has several difference and similarities to nature – how many can you find?
- Gravity is not a physical cord of course; it is a force, similar to magnetic force. We can feel gravity, and like a magnet, the force gets stronger as we get closer to Earth (Most of us never get far enough away from the planet to notice this, however!) Gravity is also elastic! Unlike our cord, gravity can stretch to hold a moon in orbit at almost any distance around a planet. (Use orbiting satellites to give students a sense of this. Most satellites orbit much closer to the Earth than the Moon is, but some orbit much farther away!)
- After moving the Moon in orbit around the Earth one or two times, ask the students if the Moon rotates on its axis as it revolves around the Earth in space. Two points of view are helpful here.
- Ask some students to stand close to the Earth’s position as someone moves the Moon around its orbit – can they ever see the far side?
- Ask other students to stand well outside the Moon’s orbit as it moves around the Earth – can they see the far side?
- If the students are having difficulty with this, try moving this indoors onto a table-top. Prepare a T-ball or tennis ball colored black on one side and white on the other. Set a globe, or even a soccer ball or basketball on the center of the table – this is the Earth. The smaller black and white ball will be the Moon, keep the white side always facing the Earth – this is the near side of the Moon which we always see; the far side which we never see is black in this model.
- Slowly move the Moon around the Earth, keeping the white side facing Earth at all times. Students will quickly see that the Moon must revolve on its axis once per orbit. To drive the point home, keep the white face pointed toward one particular wall at all times and orbit the Earth again – both the near and far sides would visible from Earth if the Moon didn’t rotate at all! This 1 rotation per orbit motion is called a synchronous orbit – it is caused by the strong gravity of the planet. Many moons in our solar system have this interesting feature! We will explore how and why this works in our next activity!
Discussion Questions
- We know that one side of the Moon forever faces the Earth. Is there any other speed the Moon could spin on its axis and still have this be true?
- Answer No. Try this with your table top model. Spin the Moon just a bit faster than one rotation per revolution and we begin to see some of the far side. Spin the Moon slower and the same thing happens! Only by spinning exactly once around its axis for every one orbit around the Earth can the Moon keep its near side facing Earth and the far side forever hidden!
- How does this exact one to one ratio work? Is it all coincidence or is there something causing it and controlling the Moon’s rate of spin upon its axis?
- Answer: In fact, this deep scientific question plagued men and women of science for centuries. The answer was only discovered after we traveled to the Moon and sent explorers there to observe and gather data! We will see exactly what they discovered, and how this works, in our next activity!
Supplemental Materials
Going Deeper
If your students are studying ratios, the orbits of the planets provide wonderful material for this. If you use a search engine (Google, Yahoo, etc.) and type in: “What is the rotation and revolution period for the Earth,” you will find what you are looking for.
Try dividing the revolution time by the rotation time. For Earth this will give you 365.26 days / 1 day for a ratio of 365.26: 1. If you do this, you must be sure the numbers are in the same units.
Example: Jupiter’s revolution time is given as 11.86 years, while its rotation time is given as 0.41 days.
To make the units the same, multiply 11.86 years by 365.26 (the number of days in a year.) This gives Jupiter’s revolution time as 4,332 days.
Now divide revolution by rotation: 4332 / 0.41 = 10,566 : 1
In other words, Jupiter has 10,566 ‘days’ per year! Look up the facts for other planets and moons in our solar system, you will be astonished at what you learn!
Being an Astronomer
Our model has told us something about the Moon, but is it really true? This idea given to us by the model (one side of the Moon always faces the Earth) is called an hypothesis. An hypothesis is an idea that we use to try to understand how the universe works – but it must be tested!
Astronomers test ideas like this by making observations. Observations can be made by looking at the sky with just your eye, or by looking through a telescope or pair of binoculars; some scientists even use cameras to take accurate photographs which can be studied later!
Try observing the Moon for a month! If you start after new moon, you will find the Moon in the sky just after sunset. After the full moon passes, the Moon is best observed in the early morning sky. Winter is a good time to do this because the Sun does not rise too early in the morning, and the sky gets dark early in the evening.
Look at the Moon’s surface every chance you get. Can you verify that you always see the same side? How can you be sure? Write your ideas down in a journal, then make sketches of what you see.
Teacher’s Note: Help the students by showing them a globe. The globe has many features, but they are always in the same places – the continents never move around! The Moon has regular features too, some are bright and others are dark. If students look for these familiar features, they should be able to verify that they see only one side of the Moon.
Following Up
There is more than one way to observe the Moon! Do an internet search for images of the Moon. Look at each one and see if you can find common features to verify our hypothesis.
You can also search for images of the far side of the Moon. The far side looks nothing like the familiar near side. A comparison of the two images side by side should convince even the most skeptical student that they have never seen the Moon’s far side!
Activity 6: The Lop-Sided Moon
The mystery of the Moon’s synchronous orbit is very profound, it has puzzled astronomers and scientists for thousands of years. Even today, when you point out that we only ever see the near side of the Moon, many people will insist that this means that the Moon does not rotate on its axis. The precise match of rotation time to revolution time seems almost miraculous; in fact, it is no such thing. Although the mechanism remained mysterious until the 1970’s, it is quite simple – the Earth’s gravity controls the Moon’s rotation and keeps one side forever pointed toward our planet, and one side forever hidden from us. This activity will show your students both clearly and simply how this works.
Academic Standards
Science and Engineering Practice
- Asking questions and defining problems.
- Developing and using models.
- Planning and carrying out investigations.
- Constructing explanations.
Crosscutting Concepts
- Cause and effect.
- Systems and system models.
- Structure and function.
Next Generation Science Standards
- Forces and interactions (K-5, 6-8, 9-12).
- Space systems (K-5, 6-8, 9-12).
- Earth shaping processes (K-5, 6-8, 9-12).
- The Earth-Moon system (6-8, 9-12).
- Gravitation and orbits (6-8, 9-12).
For the Educator
Facts you need to know
- Like the Earth, the Moon has a dense core of metal and rock.
- The Moon’s core is not centered, Earth’s gravitational pull has shifted the lunar core so that it is off-center and closer to the Earth.
- The Moon’s off-center core locks the Moon into a synchronous orbit, causing one side of the Moon to always face the Earth.
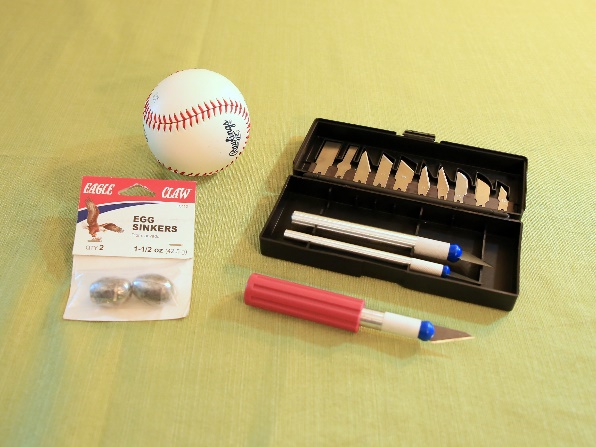 Equipment you will need:
- A rubber T-ball
- A hobby knife
- Fishing weights
- Instant glue
Teaching and Pedagogy
This series of activities begins to explore gravity as a fundamental force that shapes our universe. The shape of the Moon, how it moves in orbit, the way one side always faces our planet, even the peculiar 1:1 ratio of rotation and revolution that we call a synchronous orbit – none of these things can be understood without understanding gravity first!
The first person to understand the intimate relationship between gravity and the motion of the Moon was Isaac Newton. The famous story of Newton being struck on the head by a falling apple was actually the moment he discovered that the Moon and the apple both fall because of the same force – gravity! Newton was the first to realize that gravitational force extends far out into space and effectively rules the cosmos!
Newton was perhaps the smartest man ever to have lived; he invented the mathematics we call calculus to help him understand the action of gravity and the motion of the Moon in orbit around the Earth. But we needn’t dive deep into mathematics to understand the fundamental action of gravity and how it controls the Earth-Moon system; this activity will give students a powerful, conceptual knowledge that will serve them well as they begin to explore mathematics later in life!
You will need several items for this activity – some of the model building must be done by an adult, or by older students with professional adult.
Student Outcomes
What will the student discover?
- The Moon is not a uniform body – its core is not located at the center of the Moon.
- Earth’s gravity affects the Moon in more ways than one. The Moon’s rotation on its axis is powerfully affected as well as the Moon’s orbit.
- The Moon’s synchronous orbit causes the near side to continuously face the Earth while the far side always faces away from us.
What will your students learn about science?
- The universe is a complex place, there is always something new to learn and to explore. Even so, just a few fundamental forces and principles such as gravity control virtually everything there is! Because this is true, models (and other objects!) here on Earth are controlled by, and function much the same as distant objects across the solar system.
- The idea of fundamental forces makes it possible for us to make models on Earth that can tell us about the structure, motion, and function of objects so far away we may never be able to reach them. It also gives us confidence that when we make a scientific model here on Earth, the same fundamental forces and processes are at work in the classroom or the laboratory as they are in deepest space. While our models (and our understanding of them!) aren’t always correct, we can have confidence in the scientific process in general.
- We also learn that the universe and our solar system is a complex place! It often takes more than one scientific model to understand something as complex and wonderful as the Earth-Moon system. Science always welcomes new models, new ideas, and new questions. Even so, no one will believe you just because you are smart, or famous, from a big important country, or because you have lots of friends who all think you are right! Science tells us that only experiments can tell us which idea is right. Men and women make models and theories, but Nature decides which ideas are correct.
Conducting the Activity
Materials
- A 4-inch, light colored rubber ball (Yes, another T-ball baseball!) – $3.
- A ½-inch lead fishing weight.
- An eye dropper (For older students, one eye dropper per group works well).
- Red food coloring (Optional – red drink mix powder or any red drink works for this).
- 4-inch square of aluminum foil.
- A clear piece of plastic (an overhead transparency works well) or 12-inch square of clear plastic wrap.
- Kitchen hot pad.
- Hobby knife.
- Classroom paints and markers.
This activity requires some preparation by the teacher beforehand, as in our other activities, students will paint and decorate the model before working with it. Depending on the age of your students, you may wish to make more than one lop-sided Moon model. For children in grades 3-6, this works well as a group activity with 2-3 students per group. This is also a discovery type activity, you should not share your preparation of the materials with the students before they begin – they will figure things out soon enough!
Building the Lop-Sided Moon Model
 How much your students can do assembling this model is up to the instructor’s individual judgement, your class’s age, familiarity with tools, and maturity must be taken into account. I have taken a conservative approach and reserved all tasks with tools for the teacher.
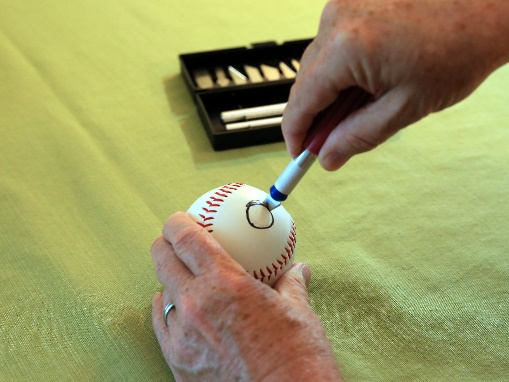
- [Teacher] Take the hobby knife and carefully cut out a hollow in the rubber ball just large enough to completely hide the lead fishing weight. If you cannot find any fishing weights, a stack of three 3/8” nuts from any hardware store will do.
- [Teacher] Our next step is to use hot glue to secure the weight inside the ball. Have the square of foil and the kitchen hot pad ready – you may wish to coat the foil with butter, Vaseline, or non-stick cooking spray before you begin!
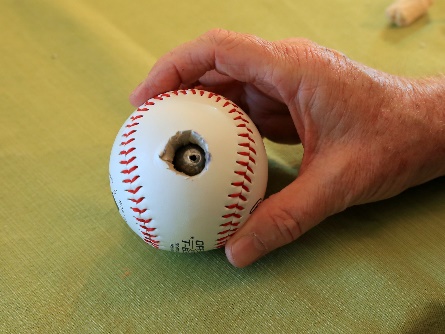
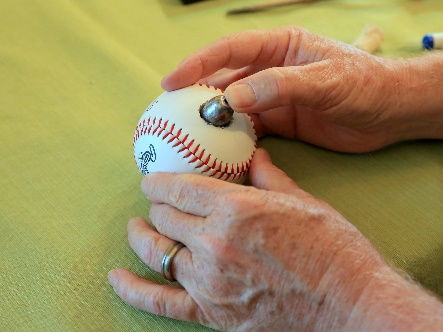 [Teacher] Put a little hot glue in the bottom of the cavity and carefully press the weight inside – the weight must be completely inside the ball for this to work properly. Add more hot glue until the cavity is completely full, then put the square of foil on top and press it down with the kitchen hot pad for a minute or two until the glue hardens completely. You should now have a smooth spot that matches the curvature of the ball quite well, and the weight is sealed inside where the students cannot touch it.
Safety Note: Don’t ignore the hot pad! Hot glue can easily burn you and the foil will not protect your hand from the heat!
- [Teacher] I recommend painting the ball flat-white before giving it to the students to decorate. Mark a dot where the weight is as one ‘pole’, place another mark on the opposite side. These points are not poles per se, rather they are antipodes; one marks the point on the Moon closest to the Earth on the near side, the other marks the point on the Moon farthest from the Earth on the far side.
- Have the students draw a bold, red ‘equator’ line halfway between the two antipodes you have marked. This will represent the boundary between the near and far sides of the Moon.
- Students can then decorate their Moon with craters, rays, and maria as they did before. The exact pattern of craters does not matter – let them be as creative as they wish!
Exploring the Lop-Sided Moon Model
- Now it’s time to play! Students will quickly notice that there is something odd about the new Moon model. It doesn’t roll straight, and it wobbles when bounced or thrown! Ask them what is wrong with the model and they will quickly tell you that the ball is lop-sided or off balance!
- Now ask everyone to roll the Moon model gently on the floor or a table top, you can even try spinning it like a top if you wish. Each time the Moon model will stop in roughly the same position – heavy side down! Have the students label the weighted (downward) side as the near side, and the upward facing side as the far side.
- Ask the students which way the near side faces, and they will quickly say “Down!” But what is down? You may point out to them that the near side always faces the Earth – just as with our real Moon. Why does this happen, children? “Gravity!” Because the Moon model is lop-sided, one side is heavier than the other and the pull of gravity causes this side to always face the Earth. A fact we discovered with an earlier model is now explained with our new model!
- Now it is time for the eye droppers and colored water. Since you will be using food coloring, plenty of newspapers to cover the desks will be in order! Have the students take up some of the colored water and try to hang the biggest droplet they can without letting it fall. What shape is this? A tear drop shape, of course – no one will likely be surprised by this. Now ask them why the water drop isn’t round? The answer is gravity once again – gravity stretches the drop from a perfectly round shape into the familiar tear drop shape. Why does the droplet’s shape always point the same direction? The answer of course is: heavy side down, just like our model of the Moon.
- A clever student may point out that the Moon doesn’t look like a tear drop! Quite right! Now it’s time to use the sheet of plastic (an overhead transparency works very well for this.) Have one student look upward through the plastic sheet while another student makes a hanging droplet of colored water above their head. What shape does the droplet look now? Round! We are now looking up at the droplet exactly as we look up at the Moon far above our heads in the sky![1]Discussion Questions
- If the Earth’s moon is locked into a synchronous orbit by gravity, what do you think we will find when we look closely at other moons in our solar system?
- Answer Gravity works the same for all things and in all places! NASA has sent long-duration space probes to Mars, Jupiter, Saturn; keeping these spacecraft in orbit around these planets long enough to make detailed studies of their many moons. Every moon in our solar system has its rotational motion controlled by the gravitation of its planet! Although we haven’t seen every moon in our solar system, from what we know today this seems to be a universal effect.
- What would it look like if you were an astronaut on the Moon, looking back at the Earth in the night time sky?
- Answer: Since the near side of the Moon always faces the Earth, any observer on the Moon would simply see the Earth hanging in one place in the sky. It would spin on its axis and change phases every month just as our Moon does, but it would never move across the sky! The Earth is also four times larger than the Moon, so it would appear 4x larger than the Moon does to us. It would be easy to see oceans, continents, and weather patterns spinning across the globe!
Supplemental Materials
Going Deeper
The idea that just one side of the Moon always faces the Earth is sometimes hard for children to accept. The Earth spins on its axis every day, shouldn’t the Moon do the same? One way for children to see for themselves is to observe the Moon carefully over time. The pattern of dark spots or maria on the lunar surface gives us a clue to what we are actually seeing. If students take a look at a globe of the Earth, it becomes clear that Earth looks very different depending on which side of the globe we are looking at. The same is true of the Moon!
Have students look carefully at the pattern of maria on the Moon as it runs from new moon to full moon. Although the Moon crosses the sky, the pattern of marks and dark maria we see never changes; we never see the far side at all. You can do this with a globe in the classroom – point the Americas toward the students, no matter how you tilt the globe from side to side, the pattern of continents and oceans always remains the same – you are not showing them the opposite side of the globe! Their own observations of the lunar surface should convince them that they never actually see the far side of the Moon.
You can go farther and look up images of the Moon’s far side on the internet. It looks quite different! There are very few dark maria on the lunar far side, and the four that are there are quite small and unlike the extensive seas of frozen lava that create the dark markings on the lunar near side!
Being an Astronomer
This is an interesting activity for older, or more advanced students. While a telescope is quite useful, this activity can actually be done by exploring photographs of the Moon on the internet!
Let’s explore the idea of Libration – the slight wobble that the Moon experiences as it orbits the Earth. You might think that since one side of the Moon always faces the Earth, you could only see 50% of the lunar surface. In fact, because of the libration or wobble of the Moon, you can see almost 60% of the Moon if you are a careful and patient observer.
- Begin with your lop-sided Moon model and a cafeteria tray (you can also use a cookie sheet for this). Place the Moon on the tray, and gently shake the tray back and forth as you watch the Moon from directly above.
- If you wish, a classmate can take a video with a smart phone while you shake the tray. As you watch, you will notice that the wobble in your model allows you to see past the line dividing the near side from the far side from time to time.
- If you have access to a telescope, take a look at the Moon at 50-100x magnification and pay particular attention to the edges of the lunar disk – even a very small and modest telescope will work for this. Some of the terrain you see at the very edge of the Moon is likely to be part of the Moon’s far side!
- If you do not have a telescope that you can use, check on the internet to see if there is an astronomy club in your area. These clubs often have observing nights that are open to the public. Club members all bring their own telescopes and binoculars, and almost everyone will be happy to point the telescope toward the Moon and show you the lunar surface! Some members may even have lunar maps with them that will tell you the names of some features! Remember to say ‘Thank you!’ after you’ve had your turn at the telescope!
- In fact, the distortion of the Moon’s shape is quite small. The near side does indeed bulge and ‘hang down’ toward the Earth, but only by a few kilometers. This distortion is so small that it took painstaking radar measurements from lunar orbit to detect it! Even so, the distortion is large enough for Earth’s gravity to be able to control the Moon’s rotation. ↵