
10.1: Modeling the Moon’s Surface in Clay


( \newcommand{\kernel}{\mathrm{null}\,}\)
Modeling the lunar surface in clay seems like a very tall order for younger children. I’ve often had my education students (and experienced teachers!) scoff at this activity and claim that such an art project is much too hard for students younger than high school age. These people couldn’t be more wrong.
When making a scientific model it is important to remember that we are not striving to create great art, or even mediocre art! Instead, we are striving to create an understandable representation; something that helps show what we know about a particular part of Nature, in this case, the lunar surface.
We help students achieve this by guiding them step by step to create their own models. The idea is to get them to put into physical form something they have learned about the lunar surface, such as the large mountains that exist at the center of large craters! We do not have to produce great art in order to produce better understanding and comprehension for our students!
Science and Engineering Practices
- Developing and using models.
- Analyzing and interpreting data.
- Constructing explanations.
- Obtain, evaluate, and communicate information.
Crosscutting Concepts
- Cause and effect.
- Systems and system models.
- Stability and change.
For the Educator
Facts you need to know
- Planets and moons are formed by a process called accretion. Basically, small pieces collide and stick together making larger pieces. Gravity (and other forces) help speed the process and the larger a piece is, the faster it tends to grow.
- The smaller, free orbiting pieces that haven’t become planets or moons yet are called meteoroids and asteroids[1]. Meteoroids are anywhere from the size of a grain of dust up the size of a large car or truck. Asteroids range from the size of a small building, to hundreds of miles wide; these meteoroids and asteroids are the basic building blocks from which planets are assembled – and the building process still continues today. The word asteroid means “star-like”. When the largest of these bodies were discovered in the early 1800’s, they appeared as small drifting stars in the telescopes of astronomers.
- When a small piece of material such as an asteroid collides with a planet or a moon, it is referred to as an impactor. These impactors strike at tens of thousands of miles per hour and can hit the surface with tremendous energy, enough energy to reshape the very surface (and interiors!) of worlds as large as the Earth.
Teaching and Pedagogy
Once the model is made, there is still quite a lot to be learned! The largest craters and maria the students made represent some of the oldest features on the Moon. These maria were formed more than three billion years ago when the Earth and Moon were quite newly formed. These huge impacts were some of the last major objects to strike the Moon, and they give us a clue as to how the entire Moon (and the rest of the planets) were formed. Smaller objects smashed together and stuck to each other, creating a new larger object. The original impacts were wiped out as one asteroid after another struck the growing moon – but some of the last major impacts were preserved because nothing larger has wiped them out in their turn… yet! The interior of the young Moon was much more molten than it is today, and the last impacts fractured the lunar crust and allowed floods of lava to reach the surface.
Just like the real Moon, our model landscape preserves a record of both the size, and timing of the impacts. Does one crater overlap another – it must have happened later in time! Are there craters on the lava flows filling a maria? This tells us the lava flow happened first. It’s not always easy to read the rugged lunar surface in real life, but your students can get an idea of how astronomers date the features of a planetary surface in chronological order. Rays tell us about time as well. These lines of powdery material are very transitory, they disappear in just a few million years. Only the newest craters on the 4-billion year old lunar surface have them. This might also be a good time to remind students of the difference between a few million and a billion – the Moon is really old!
Those lines we pressed into our model with string? This can be your student’s introduction to longitude (vertical lines marching east to west) and latitude (horizontal lines). Not only do the lines help your students draw an accurate map on paper, they can be used to find the location and document it on your map. On your clay model, choose a location to be point (0,0) You may wish to put a little toothpick with a sticky note flag there to mark the spot!
Horizontal (latitude) lines above this point are numbered +10, +20, +30, etc. The lines below this are -10, -20, -30, and so on. Vertical (longitude) lines to the right of this point are numbered +10, +20, +30, but lines to the left of this point are numbered 350, 340, 330, etc. Remind your students that longitude lines run around the whole globe – 360 degrees worth! Our piece of the lunar surface is just that – a piece and not the whole Moon!
Have your students use their system of latitude and longitude to find the location of the center of some of the major craters. You can have them record them on their maps, or just make a list of the names with the locations shown next to each name. Wait… did someone say GPS? Yes, that’s right! These latitude and longitude lines are precisely the same at the latitude and longitude measurements that help our GPS devices tell us where we are, and keep us on the correct road when we are travelling.
Student Outcomes
What will the student discover?
- Impactors can reshape the surface of a planet in sudden, and cataclysmically violent events. These tremendous impacts leave large scars on a planet’s surface we call craters.
- The largest impactors can punch deep into a planet’s interior, releasing floods of lava on the surface. Sometimes these lava floods fill the giant craters left by an asteroid impact. These seas of frozen lava are visible as dark features on the surface of our Moon; Galileo named them maria, from the Latin word for ‘seas’.
- Impactors leave records of their size and composition, their direction of travel, and the amount of energy of their impact in the craters that scar the surface of moons and planets. We can learn a great deal about these asteroids from studying the craters they leave behind, even if the impact happened billions of years ago!
What will your students learn about science?
- Science knowledge sometimes comes from the most unlikely places! Our current models about how large impactors can change not only a planet’s surface, but its climate and the evolution of life came from a father and son team, Luis and Walter Alvarez, who were studying layers of dinosaur fossils!
- Science sometimes gives us a call to action. Occasionally, scientific study reveals a process or action that may be a particular threat to both our civilization and our species. Such evidence is not to be taken lightly, nor is it to be acted upon without clear thought and careful planning. Scientific evidence tells us that a great asteroid impact destroyed the dinosaur species which had been the dominant form of life on Earth for over 250 million years and cleared the way for the development of mammals and eventually human life. Could such an impact happen again? Is there anything that we humans can do to prevent such a disaster?
- How do scientists study evidence that is millions, sometimes billions of years old and determine anything worthwhile and interesting in today’s world? Can ancient evidence really last for so many years? What conditions are necessary to preserve this evidence in any sort of useful form for the skilled scientists of today, and the young scientists of tomorrow?
Conducting the Activity
Materials
- A large block of light-colored modeling clay, enough to make a slab that is 6-inches square and ½-inch thick.
- A smaller block of dark-colored modeling clay. (The exact color will not matter, as long as the colors contrast well.)
- A piece of aluminum foil large enough for your slab of clay. Oil-based, non-drying clays can stain table tops, clothing, or papers with oily residue in a matter of hours if left in place.
- Various size marbles and beads.
- Some larger, smooth-surfaced balls such as baseballs, hard rubber handballs, etc. These should be between two and six inches in diameter.
- One 12-inch piece of string per group
- Construction paper and markers.
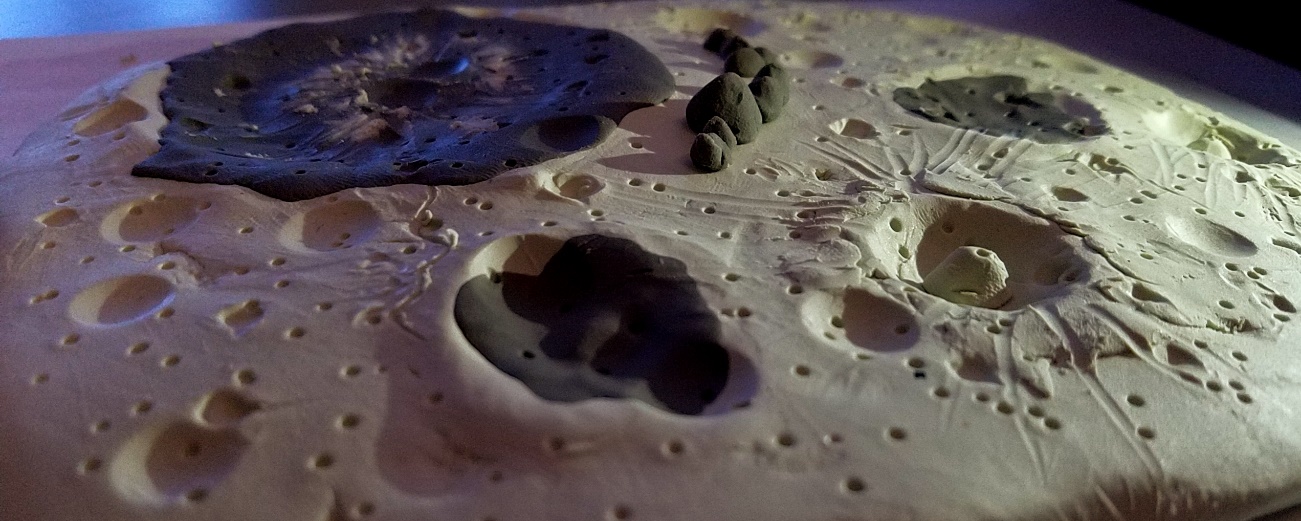
Building the Lunar Surface Model
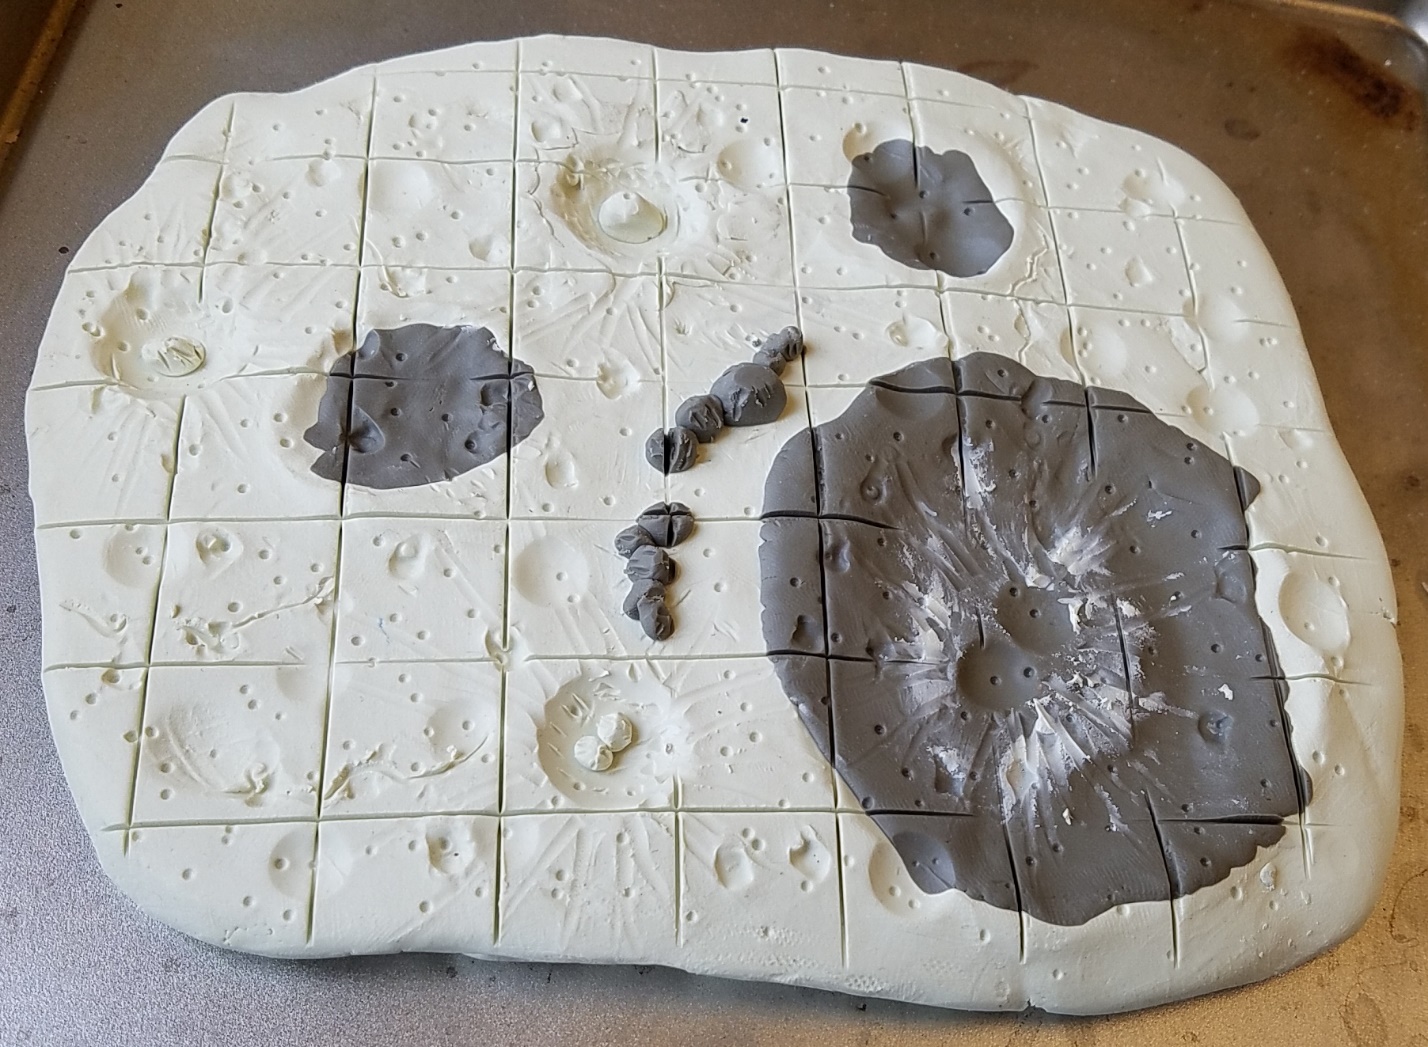
- Begin by flattening out the large block of clay into an even layer in the baking pan. When the layer is relatively flat, turn the pan over and tap the layer of clay out onto a sheet of construction paper. When turned upside down and dropped onto the construction paper, the surface of the clay may settle and will likely not be perfectly flat – don’t worry, that won’t affect our model at all.
- Now take the largest ball you have and press it firmly into down into the surface, you may even want to rock it back and forth just a bit. When you take it away, you should have a nice depression, perhaps with the edges raised just a bit. This will be a maria – but we aren’t done with it yet!
- Move to the next size smaller balls and make one or two more large craters. Be sure you press them firmly into the surface so that they are deep enough. You may notice that these depressions even overlap a bit – don’t worry, craters tend to do that!
- Now it is time to fill in your maria. Take the dark colored clay and roll out a 2-inch ball, then flatten it out to make it nice and thin. Make sure the piece you have is pressed out large enough to cover one of your large depressions all the way to the edges; if you don’t have enough clay, start again with a larger ball!
- Lay this thin piece of dark clay into the depression and press it in place. If it goes beyond the edges at some point, you can either trim the extra away with a plastic knife, or smooth it onto the surface – lava flows from maria do sometimes overflow their crater and flow out onto the lunar surface!
- Now you can start with marbles and beads, pressing small craters into the surface as you like. Make lots of them and don’t worry about using them in order – just tell the kids to have fun with this. Remind the students that it is perfectly alright for craters to overlap! Does anyone notice that new craters sometimes wipe out older ones? Don’t ignore the dark maria surface! Maria have almost as many craters covering them as the rest of the Moon does!
- Choose a few scattered craters to be “new” (no more than 100 million years old!). Use a pencil to lightly scratch ‘splatter marks’ – lines leading directly out from the edge of the crater like a sunburst. These lines are called rays and are actually made of powdered material blasted out of the crater when it was made.
Exploring the Lunar Surface Model
- Have the students use string to mark lines of latitude and longitude on the model; this works best if students work in pairs. Have one student stretch the string horizontally across the model while the other presses it lightly into the surface. Make these latitude lines one inch apart across the model. Now make an identical series of lines running vertically, again one inch apart. When finished, you should have a grid of latitude and longitude lines on your lunar landscape!
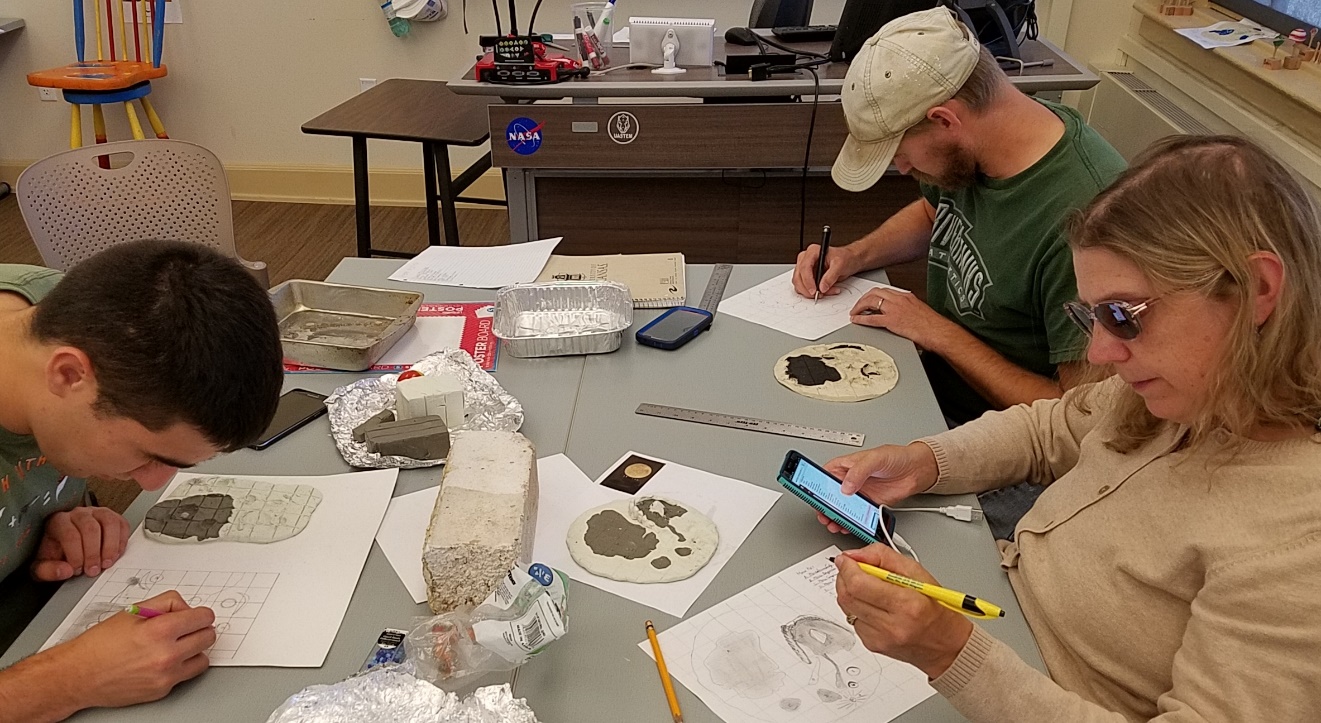
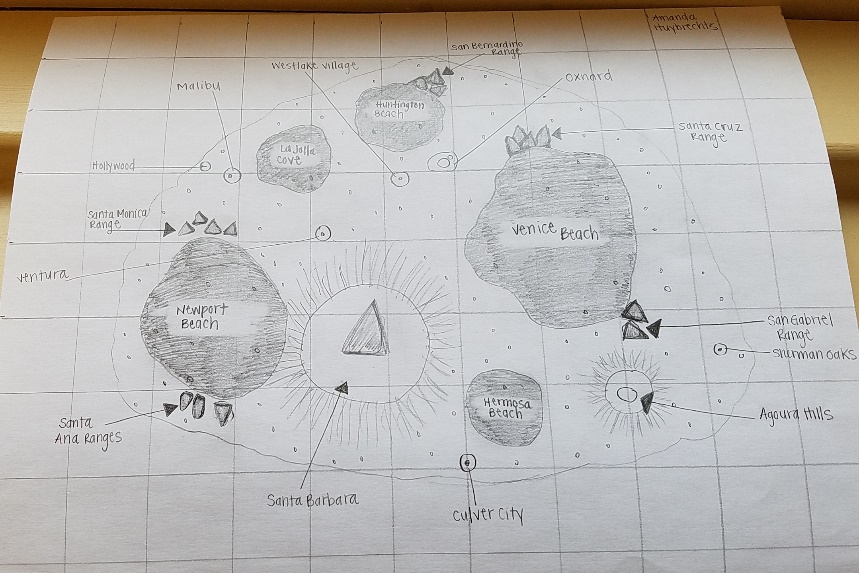 Have the students use construction paper and markers to make a map of the landscape they have made. Start with a series of latitude and longitude lines drawn in pencil with a ruler, then use the lines on the lunar landscape to map out the craters and maria you have made in colorful markers. Have the students name the larger craters on their maps using a theme. Will they choose U.S. Presidents? Rock bands? Favorite cartoon characters? Have fun with this!
- Crater diameter is a good rough indicator of impact energy. Generally speaking, when a crater doubles in size, the impact energy needed to create it is ten times as great. If you have craters 1cm, 2cm, and 4cm in size; the 2cm crater required 10 times the energy of the 1cm crater, while the 4cm crater needed 100 times the energy of the smallest crater! Rank your craters by size and make a bar graph of the impact energy needed to create them.
- The crater we see is usually ten times larger than the asteroid that created it. Choose the largest maria on your model and create a model asteroid that would be large enough to make such an impact. Display this giant impactor with your model.
 Dim the room lights, then try using a small flashlight to illuminate your model. Shine the light from the side and take a photo of your clay model this way. Can you see shadows filling craters? Are there long shadows from mountains reaching across the surface? Compare your model to a photo of the Moon taken near the terminator (the line separating light from darkness.) You will see many similarities between your photo of your model and the real Moon – this is one way that we know our model / hypothesis is accurate, because we use it to predict what we find in Nature!
- We have made yet another model of the Moon! How is this model different from the previous ones?
- Answer This model is intended to show surface features instead of phases.
- Answer This model shows only a part of the Moon close up instead of the entire thing from space.
- What does this model show us about the Moon?
- Answer The Moon’s surface was created over many millions of years. The process of asteroids impacting the surface (we used various size balls pressed into the clay to show this) created most of the surfaces features we can see.
- How are maria different from other craters on the Moon?
- Answer The maria are particularly big craters that were so deep that they filled with lava. This lava hardened into dark-colored stone which is why we see dark markings on the lunar surface today.
Supplemental Materials
Going Deeper
Mapping is an important technology, but reading a map is not as easy as it seems. Find a close-up photo of the Moon on the internet and print it out. Now let’s take a look at a lunar atlas, you will find an excellent one online at www.fullmoonatlas.com. Find the area that matches your photograph and see how many features you can recognize and name. This may not be as easy as it seems, your photograph and the atlas may be different magnifications, and the photos may be taken from different angles or under various lighting conditions.
Being an Astronomer
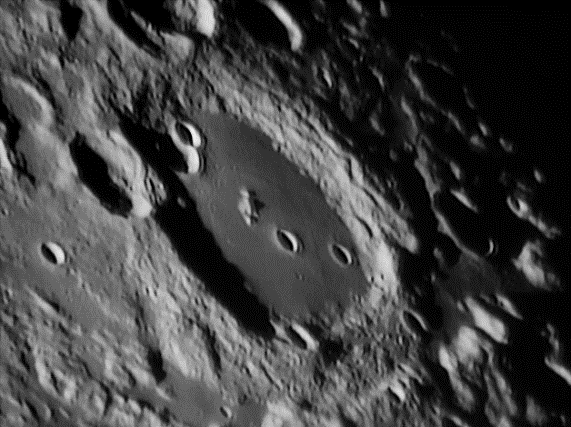
Time for another look at the Moon? Sure, why not, it’s always exciting! Whether you are looking at high-resolution photos from NASA, or through the eyepiece of a telescope, you can see a lot of detail on the lunar surface. Examine the areas near the terminator (the dividing line between light and darkness) to see the most detail. Can you find a maria region? These areas are distinctly darker than the surrounding highland regions of the Moon, and their smooth surfaces shows off later craters with great effect.
Can you see an area where lava has broken out of a crater and spilled across the lunar surface? If the telescope or photo is good enough, you can sometimes even see waves and ripples in the maria surface, frozen in place as the lava solidified billions of years ago. Small craters on the surface of the maria are also good candidates for showing off rays. The best way to find these features is to look at the lunar surface with low power (40-60x) and try to spot a bright ‘splash mark’. Zoom in on one of these ‘splash’ features at 80-150x and you will see a crater surrounded by rays of powdery and bright lunar dust blasted out of the crater by the enormous energy of the asteroid impact.
Another thing to look for is overlapping features. Can you see craters on top of a lava flow? Which came first!? Can you see small craters inside larger ones? This takes a good eye and some patience, but you can begin to see a timeline of events, carved out of the lunar surface by giant rocks, falling from space.
Being a Scientist
In astronomy, scientists often work from photographic evidence. Very few scientists have traveled to the Moon, and none have gone to Mars, yet we learn new things every day from scientists who study photographic evidence gathered by distant spacecraft.
This time, we will use a high-resolution photograph of the Moon – or a portion of its surface. Your students will construct a timeline from photographic evidence. Think of a large number of footprints in the snow outside a busy store; which footprints were their first? Which were placed later?
We can determine our timeline for craters (or footprints!) by looking for things that overlap. If one crater overlaps another, it must be newer. Have your students begin by looking at the largest craters first. Those that are overlapped the most must be older. Those craters which have nothing overlapping them must be newer.
Brightness is also an indication of newness. Craters that are bright and prominent are generally very new – less than 100 million years old! Craters that are dull and show no evidence of bright interiors or bright streaky rays around them must be older.
Erosion is another line of evidence. Is the crater rim fresh and shows a complete circle? This complete crater must be relatively new. Some craters show rims that are thinner and more worn down, sometimes they are even incomplete. These features indicate very old craters, often more than 2 billion years old.
Have your students make a timeline, showing major craters from youngest, to oldest. Have them present their findings to the class and cite the evidence that supports their ideas!
Following Up
Geology is much more than a science that names different kinds of rocks! Geology is a dynamic science, but it generally acts over enormous scales of time and wide geographical regions. One advantage of looking at the Moon from so far away is that we can see the entire surface in one view and zoom down into features that interest us without losing ourselves in irrelevant details.
The lunar surface lacks many things that we would miss if we were there, like air, water, weather, plants, and oceans, just to name a few. The Moon even lacks an active geology, there are no active volcanoes or earthquakes on the Moon. Some people might think they wouldn’t miss earthquakes, but quakes and volcanoes are part of an active geology which recycles minerals and materials that help to make life on Earth fertile and abundant.
Even so, it is the very things we might miss that make the Moon such an excellent place to study geology. With no air, water, weather, or active geology, the lunar service doesn’t change very much on any sort of human timescale. Even the most casual features on the Moon such as a crater the size of a baseball, or an astronaut’s footprints, will last for millions of years. With no wind to erase those footprints, or water to wash them away or fill them with silt, and not even an earthquake to cause a landslide to cover them up – what is left? The only active weathering that happens on the lunar surface is the steady rain of dust and rocks from outer space.
It would take a rock the size of an egg to obliterate an astronaut’s footprint, hundreds of such rocks strike the Moon every day, but the surface of the Moon is really quite large compared to a single footprint. If you want to see even a portion of that footprint erased, you are probably going to have to wait a very long time! But on the day it finally happens, a future geologist will be able to say for sure that the footprint happened first. Geology gives us timelines in stone!