
6.4: Center of Mass


- Last updated
- Feb 24, 2025
- Save as PDF

( \newcommand{\kernel}{\mathrm{null}\,}\)
- Explain the meaning and usefulness of the concept of center of mass
- Calculate the center of mass of a given system
- Apply the center of mass concept in two and three dimensions
Definition
In this section, we show how to generalize Newton’s Second Law so that it may describe the motion of an object that is not a point particle. Any object can be described as being made up of point particles; for example, those particles could be the atoms that make up regular matter. We can thus use the same terminology as in the previous sections to describe a complicated object as a “system” comprised of many point particles, themselves described by Newton’s Second Law. A system could be a rigid object where the point particles cannot move relative to each other, such as atoms in a solid1. Or, the system could be a gas, made of many atoms moving around, or it could be a combination of many solid objects moving around.
In the previous section, we saw how the total momentum and the total mechanical energy of the system could be used to describe the system as a whole. In this section, we will define the center of mass which will allow us to describe the position of the system as a whole.
Consider a system comprised of N point particles. Each point particle i, of mass m_i, can be described by a position vector, \vec r_i, a velocity vector, \vec v_i, and an acceleration vector, \vec a_i, relative to some coordinate system in an inertial frame of reference. Newton’s Second Law can be applied to any one of the particles in the system:
\begin{aligned} \sum_k \vec F_{ik} = m_i \vec a_i\end{aligned}
where \vec F_{ik} is the k-th force exerted on particle i. We can write Newton’s Second Law once for each of the N particles, and we can sum those N equations together:
\begin{aligned} \sum_k \vec F_{1k} + \sum_k \vec F_{2k} + \sum_k \vec F_{3k} +\dots &= m_1\vec a_1 + m_2 \vec a_2 + m_3 \vec a_3 + \dots\\[4pt] \sum \vec F = \sum_i m_i \vec a_i \end{aligned}
where the sum on the left is the sum of all of the forces exerted on all of the particles in the system and the sum over i on the right is over all of the N particles in the system. As we have already seen, the sum of all of the forces exerted on the system can be divided into separate sums over external and internal forces:
\begin{aligned} \sum \vec F = \sum \vec F^{ext} + \sum \vec F^{int} \end{aligned}
and the sum over the internal forces is zero3. We can thus write that the sum of the external forces exerted on the system is given by:
\sum \vec F^{ext}=\sum_{i} m_{i}\vec a_{i} \label{7.4.1}
We would like this equation to resemble Newton’s Second Law, but for the system as a whole. Suppose that the system has a total mass, M:
M = m_1 + m_2 + m_3 +\dots = \sum_i m_i \label{7.4.2}
we would like to have an equation of the form:
\sum \vec F^{ext}=M\vec a_{CM}
to describe the system as a whole. However, it is not (yet) clear what is accelerating with acceleration, \vec a_{CM}, since the particles in the system could all be moving in different directions. Suppose that there is a point in the system, whose position is given by the vector, \vec r_{CM}, in such a way that the acceleration above is the second time-derivative of that position vector:
\vec a_{CM} = \frac{d^2 }{dt^2}\vec r_{CM} \label{7.4.4}
We can compare Equations \ref{7.4.1} and \ref{7.4.4} to determine what the position vector \vec r_{CM} corresponds to:
\begin{aligned} \sum \vec F^{ext}&= \sum_i m_i \vec a_i = \sum_i m_i \frac{d^2 }{dt^2}\vec r_i \\[4pt] \sum \vec F^{ext}&=M\vec a_{CM} = M \frac{d^2 }{dt^2}\vec r_{CM}\\[4pt] \therefore M \frac{d^2 }{dt^2}\vec r_{CM}&= \sum_i m_i \frac{d^2 }{dt^2}\vec r_i\end{aligned}
Re-arranging, and noting that the masses are constant in time, and so they can be factored into the derivatives:
\begin{aligned} \frac{d^2 }{dt^2}\vec r_{CM} &= \frac{1}{M}\sum_i m_i \frac{d^2 }{dt^2}\vec r_i\\[4pt] \frac{d^2 }{dt^2}\vec r_{CM} &= \frac{d^2 }{dt^2}\left(\frac{1}{M}\sum_i m_i\vec r_i \right)\\[4pt] \therefore \vec r_{CM} &=\frac{1}{M}\sum_i m_i\vec r_i\end{aligned}
where in the last line we set the quantities that have the same time derivative equal to each other4. \vec r_{CM} is the vector that describes the position of the “center of mass” (CM). The position of the center of mass is described by Newton’s Second Law applied to the system as a whole:
\sum \vec F^{ext}=M\vec a_{CM}
where M is the total mass of the system, and the sum of the forces is the sum over only external forces on the system.
Although we have formally derived Newton’s Second Law for a system of particles, we really have been using this result throughout the text. For example, when we modeled a block sliding down an incline, we never worried that the block was made of many atoms all interacting with each other and the surroundings. Instead, we only considered the external forces on the block, namely, the normal force from the incline, any frictional forces, and the total weight of the object (the force exerted by gravity). Technically, the force of gravity is not exerted on the block as a whole, but on each of the atoms. However, when we sum the force of gravity exerted on each atom:
\begin{aligned} m_1\vec g+ m_2 \vec g + m_3\vec g + \dots = (m_1+m_2+m_3+\dots)\vec g = M\vec g\end{aligned}
we find that it can be modeled by considering the block as a single particle of mass M upon which gravity is exerted. The center of mass is sometimes described as the “center of gravity”, because it corresponds to the location where we can model the total force of gravity, M\vec g, as being exerted. When we applied Newton’s Second Law to the block, we then described the motion of the block as a whole (and not the motion of the individual atoms). Specifically, we modeled the motion of the center of mass of the block.
The position of the center of mass is a vector equation that is true for each coordinate:
\vec r_{CM} =\frac{1}{M}\sum_i m_i\vec r_i\nonumber
\therefore \vec r_{CM}= r_{CM_{x}} \hat i + r_{CM_{y}} \hat j + r_{CM_{z}} \hat k = \frac{1}{M}\sum_{i}m_{i} r_{i_{x}} \hat i + \frac{1}{M}\sum_{i}m_{i} r_{i_{y}} \hat j + \frac{1}{M}\sum_{i}m_{i} r_{i_{z}} \hat k \label{7.4.6}
The center of mass is that position in a system that is described by Newton’s Second Law when it is applied to the system as a whole. The center of mass can be thought of as an average position for the system (it is the average of the positions of the particles in the system, weighted by their mass). By describing the position of the center of mass, we are not worried about the detailed positions of the all of the particles in the system, but rather only the average position of the system as a whole. In other words, this is equivalent to viewing the whole system as a single particle of mass M located at the position of the center of mass.
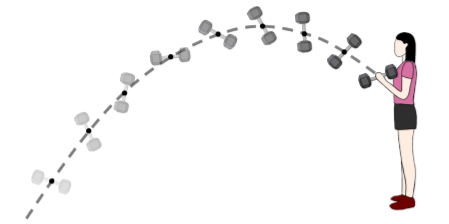
Consider, for example, a person throwing a dumbbell that is made from two spherical masses connected by a rod, as illustrated in Figure \PageIndex{1}. The dumbbell will rotate in a complex manner as it moves through the air. However, the center of mass of the dumbbell will travel along a parabolic trajectory (projectile motion), because the only external force exerted on the dumbbell during its trajectory is gravity.
If we take the derivative with respect to time of the center of mass position, we obtain the velocity of the center of mass, and its components, which allow us to describe how the system is moving as a whole:
\begin{aligned} \vec v_{CM} = \frac{d}{dt}\vec r_{CM}=\frac{1}{M}\sum_{i} m_{i}\frac{d}{dt}\vec r_{i}=\frac{1}{m}\sum_{i} m_{i}\vec v_{i}\end{aligned}
\therefore \vec v_{CM}=v_{CM_{x}} \hat i + v_{CM_{y}} \hat j + v_{CM_{z}} \hat k = \frac{1}{M}\sum_{i}m_{i}v_{i_{x}} \hat i + \frac{1}{M}\sum_{i}m_{i}v_{i_{y}} \hat j + \frac{1}{M}\sum_{i}m_{i}v_{i_{z}} \hat k
Note that this is the same velocity that we found earlier for the velocity of the center of mass frame of reference. In the center of mass frame of reference, the total momentum of the system is zero. This makes sense, because the center of mass represents the average position of the system; if we move “with the system”, then the system appears to have zero momentum.
Finally, we can also define the acceleration of the center of mass by taking the time derivative of the velocity:
\begin{aligned} \vec a_{CM}=\frac{d}{dt}\vec v_{CM}=\frac{1}{M}\sum_{i}m_{i}\frac{d}{dt}\vec v_{i} = \frac{1}{M}\sum_{i}m_{i}\vec a_{i}\end{aligned}
\therefore \vec a_{CM}=a_{CM_{x}} \hat i + a_{CM_{y}} \hat j + a_{CM_{z}} \hat k = \frac{1}{M}\sum_{i}m_{i}a_{i_{x}} \hat i + \frac{1}{M}\sum_{i}m_{i}a_{i_{y}} \hat j + \frac{1}{M}\sum_{i}m_{i}a_{i_{z}} \hat k
Finding the Center of Mass
To calculate the center of mass in actual situations, we recommend the following procedure:
The center of mass of an object is a position vector. Thus, to calculate it, do these steps:
- Define your coordinate system. Typically, the origin is placed at the location of one of the particles. This is not required, however.
- Determine the x, y, z-coordinates of each particle that makes up the object.
- Determine the mass of each particle, and sum them to obtain the total mass of the object. Note that the mass of the object at the origin must be included in the total mass.
- Calculate the x-, y-, and z-components of the center of mass vector, using Equation \ref{9.30}, Equation \ref{9.31}, and Equation \ref{9.32}.
- If required, use the Pythagorean theorem to determine its magnitude.
Examples
Here are a few examples that will give you a feel for what the center of mass is.
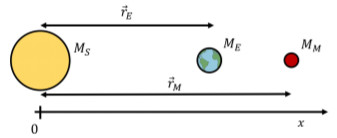
In astronomy, a syzygy is defined as the event in which three bodies are all lined up along a straight line. For example, a syzygy occurs when the Sun (mass M_S=2.00\times 10^{30}\text{kg}), Earth (mass M_E=5.97\times 10^{24}\text{kg}), and Mars (mass M_M=6.39\times 10^{23}\text{kg}) are all lined up, as in Figure \PageIndex{2}. How far from the center of the Sun is the center of mass of the Sun, Earth, Mars system during a syzygy?
- Solution
-
Since this is a one-dimensional problem, we can define an x axis that is co-linear with the three bodies, and find only the x coordinate of the position of the center of mass. We are free to choose the origin of the coordinate system, so we choose the origin to be located at the center of the Sun. This way, the position of the center of mass along the x axis will directly correspond to its distance from the center of the Sun.
The Sun, Earth, and Mars are not point particles. However, because they are spherically symmetric, their centers of mass correspond to their geometric centers. We can thus model them as point particles with the mass of the body located at the corresponding geometric center. If r_E=1.50\times 10^{11}\text{m} (r_M=2.28\times 10^{11}\text{m}) is the distance from the center of the Earth (Mars) to the center of the Sun, then the position of the center of mass is given by:
\begin{aligned} x_{CM} &= \frac{1}{M}\sum_i m_i x_i\\[4pt] &=\frac{M_S(0)+M_Er_E+M_Mr_M}{M_S+M_E+M_M}\\[4pt] &=\frac{(2.00\times 10^{30}\text{kg})(0)+(5.97\times 10^{24}\text{kg})(1.50\times 10^{11}\text{m})+(6.39\times 10^{23}\text{kg})(2.28\times 10^{11}\text{m})}{(2.00\times 10^{30}\text{kg})+(5.97\times 10^{24}\text{kg})+(6.39\times 10^{23}\text{kg})}\\[4pt] &=5.21\times 10^{5}\text{m}\end{aligned}
The center of mass of the Sun-Earth-Mars system during a syzygy is located approximately 500\text{km} from the center of the Sun.
Discussion
The radius of the Sun is approximately 700000\text{km}, so the center of mass of the system is well inside of the Sun. The Sun is so much more massive than either of the Earth or Mars, that the two planets hardly contribute to shifting the center of mass away from the center of the Sun. We would generally consider the masses of the two planets to be negligible if one wanted to model how the solar system itself moves around the Milky Way galaxy.
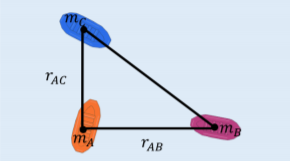
Alice (mass m_A), Brice (mass m_B), and (mass m_C) are stranded on individual rafts of negligible mass on a lake, off of the coast of Nyon. The rafts are located at the corners of a right-angle triangle, as illustrated in Figure \PageIndex{3}, and are connected by ropes. The distance between Alice and Brice is r_{AB} and the distance between Alice and is r_{AC}, as illustrated. Alice decides to pull on the rope that connects her to , while Brice decide to pull on the rope that connects him to Alice. Where will the three rafts meet?
- Solution
-
We consider the system comprised of the three people and their rafts and model each person and their raft as a point particle with the mass concentrated at the center of the raft. The forces exerted by pulling on the ropes are internal forces (one particle on the other), and will thus have no impact on the motion of the center of mass of the system. There are no net external forces exerted on the system (the forces of gravity are balanced out by the forces of buoyancy from the rafts). The center of mass of the system does not move when the people are pulling on the ropes, so they must ultimately meet at the center of mass.
We can define a coordinate system such that the origin is located where Alice is initially located, the x axis is in the direction from Alice to Brice, and the y axis is in the direction from Alice to Chloë. The initial positions of Alice, Brice, and are thus:
\begin{aligned} \vec r_A &= 0\hat x + 0\hat y\\[4pt] \vec r_B &= r_{AB}\hat x + 0\hat y\\[4pt] \vec r_C &= 0\hat x + r_{AC}\hat y\end{aligned}
respectively. The x and y coordinates of the center of mass are thus:
\begin{aligned} x_{CM} &= \frac{1}{M}\sum_i m_i x_i = \frac{m_A(0) + m_Br_{AB} + m_C(0)}{m_A + m_B + m_C}=\left(\frac{m_B}{m_A + m_B + m_C}\right)r_{AB}\\[4pt] y_{CM} &= \frac{1}{M}\sum_i m_i y_i = \frac{m_A(0) + m_B(0) + m_Cr_{AC}}{m_A + m_B + m_C}=\left(\frac{m_C}{m_A + m_B + m_C}\right)r_{AC}\\[4pt]\end{aligned}
which corresponds to the position where the three rafts will meet, relative to the initial position of Alice.
Discussion
By using the center of mass, we easily found where the three rafts would meet. If we had used Newton’s Second Law on the three rafts individually, the model would have been complicated by the fact that the forces exerted by Alice and Brice on the ropes change direction as the rafts begin to move, which would have required the use of integrals to determine the motion of each person.
Two thin circular disks made from the same material lie flat on a horizontal surface, with their outer edges in contact with each other. One disk has a larger radius (R) than the other (r), and have equal thicknesses. Find how far the center of mass of the two-disk system lies from the center of the larger disk.
- Solution
-
The disks are made from the same uniform material, so they have equal mass densities. That means that the mass of the larger disk is larger than that of the smaller disk by the same factor as the ratio of their areas. That is, if the larger disk has twice the area of the smaller one, then it has twice as much mass. We therefore have the following relationship between the masses and radii of the disks:
\dfrac{M}{m} = \dfrac{\pi R^2}{\pi r^2} \;\;\; \Rightarrow \;\;\; M=\dfrac{R^2}{r^2}\;m \nonumber
Let's choose the center of the larger disk as the origin, and have the center of the other disk lie on the +x-axis. The disks are uniform, so their individual centers of mass lie at their geometric centers, and we can compute the center of mass of the system by treating the disks as point masses located at these centers. The distance of the center of mass from the origin is what we are looking for, so:
x_{cm} = \dfrac{M x_1 + m x_2}{M+m} = \dfrac{M \left(0\right) + m \left(R+r\right)}{M+m} = \dfrac{m \left(R+r\right)}{\dfrac{R^2}{r^2}m+m}=\boxed{\dfrac{\left(R+r\right)r^2}{R^2+r^2}} \nonumber
We can double-check this answer by looking at an obvious special case: R=r. If the disks are identical, then the center of mass must be halfway between their centers, which is the point where they are in contact, a distance R from the center of the larger disk. Plugging in R for r indeed gives this answer.
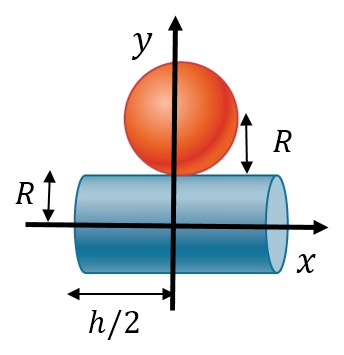
Find the center of mass of a sphere of mass M and radius R and a cylinder of mass m, radius r, and height h arranged as shown in Figure \PageIndex{3}. Express your answers in a coordinate system that has the origin at the center of the cylinder
- Solution
-
The center of mass can be found by:
\begin{split} x_{CM} = \frac{1}{M} \sum_{j = 1}^{N} m_{j} x_{j} \ldotp \end{split} and \begin{split} y_{CM} = \frac{1}{M} \sum_{j = 1}^{N} m_{j} y_{j} \ldotp \end{split}
In this case:
\begin{split} x_{CM} = \frac{1}{M_{sp}+M_{cy}} (M_{sp}x_{sp} + M_{cy} x_{cy}) = \frac{1}{M+m} \left(M (0) + m (0)\right) = 0 \ldotp \end{split}
\begin{split} y_{CM} = \frac{1}{M_{sp}+M_{cy}} (M_{sp}y_{sp} + M_{cy} y_{cy}) = \frac{1}{M+m} \left(M (2R) + m (0)\right) = \frac{2 R M}{M+m} \ldotp \end{split}
Using data from text appendix, determine how far the center of mass of the Earth-moon system is from the center of Earth. Compare this distance to the radius of Earth, and comment on the result. Ignore the other objects in the solar system.
- Strategy
-
We get the masses and separation distance of the Earth and moon, impose a coordinate system, and use Equation \ref{9.29} with just N = 2 objects. We use a subscript “e” to refer to Earth, and subscript “m” to refer to the moon.
- Solution
-
Define the origin of the coordinate system as the center of Earth. Then, with just two objects, Equation \ref{9.29} becomes
R = \frac{m_{c} r_{c} + m_{m} r_{m}}{m_{c} + m_{m}} \ldotp
From Appendix D,
m_{c} = 5.97 \times 10^{24}\; kg
m_{m} = 7.36 \times 10^{22}\; kg
r_{m} = 3.82 \times 10^{5}\; m \ldotp
We defined the center of Earth as the origin, so re = 0 m. Inserting these into the equation for R gives
\begin{split} R & = \frac{(5.97 \times 10^{24}\; kg)(0\; m) + (7.36 \times 10^{22}\; kg)(3.82 \times 10^{8}\; m)}{(5.98 \times 10^{24}\; kg) + (7.36 \times 10^{22}\; kg)} \\ & = 4.64 \times 10^{6}\; m \ldotp \end{split}
- Significance
-
The radius of Earth is 6.37 x 10⁶ m, so the center of mass of the Earth-moon system is (6.37 − 4.64) x 106 m = 1.73 x 10⁶ m = 1730 km (roughly 1080 miles) below the surface of Earth. The location of the center of mass is shown (not to scale).
Figure \PageIndex{5} shows a single crystal of sodium chloride—ordinary table salt. The sodium and chloride ions form a single unit, NaCl. When multiple NaCl units group together, they form a cubic lattice. The smallest possible cube (called the unit cell) consists of four sodium ions and four chloride ions, alternating. The length of one edge of this cube (i.e., the bond length) is 2.36 x 10⁻¹⁰ m. Find the location of the center of mass of the unit cell. Specify it either by its coordinates (rCM,x, rCM,y, rCM,z), or by rCM and two angles.
- Strategy
-
We can look up all the ion masses. If we impose a coordinate system on the unit cell, this will give us the positions of the ions. We can then apply Equation \ref{9.30}, Equation \ref{9.31}, and Equation \ref{9.32} (along with the Pythagorean theorem).
- Solution
-
Define the origin to be at the location of the chloride ion at the bottom left of the unit cell. Figure \PageIndex{6} shows the coordinate system.
Figure \PageIndex{7}: A single unit cell of a NaCl crystal. There are eight ions in this crystal, so N = 8:
\vec{r}_{CM} = \frac{1}{M} \sum_{j = 1}^{8} m_{j} \vec{r}_{j} \ldotp
The mass of each of the chloride ions is
35.453u \times \frac{1.660 \times 10^{-27}\; kg}{u} = 5.885 \times 10^{-26}\; kg
so we have
m_{1} = m_{3} = m_{6} = m_{8} = 5.885 \times 10^{-26}\; kg \ldotp
For the sodium ions,
m_{2} = m_{4} = m_{5} = m_{7} = 3.816 \times 10^{-26}\; kg \ldotp
The total mass of the unit cell is therefore
M = (4)(5.885 \times 10^{-26}\; kg) + (4)(3.816 \times 10^{-26}\; kg) = 3.880 \times 10^{-25}\; kg \ldotp
From the geometry, the locations are
\begin{split} \vec{r}_{1} & = 0 \\ \vec{r}_{2} & = (2.36 \times 10^{-10}\; m) \hat{i} \\ \vec{r}_{3} & = r_{3x} \hat{i} + r_{3y} \hat{j} = (2.36 \times 10^{-10}\; m) \hat{i} + (2.36 \times 10^{-10}\; m) \hat{j} \\ \vec{r}_{4} & = (2.36 \times 10^{-10}\; m) \hat{j} \\ \vec{r}_{5} & = (2.36 \times 10^{-10}\; m) \hat{k} \\ \vec{r}_{6} & = r_{6x} \hat{i} + r_{6z} \hat{k} = (2.36 \times 10^{-10}\; m) \hat{i} + (2.36 \times 10^{-10}\; m) \hat{k} \\ \vec{r}_{7} & = r_{7x} \hat{i} + r_{7y} \hat{j} + r_{7z} \hat{k} = (2.36 \times 10^{-10}\; m) \hat{i} + (2.36 \times 10^{-10}\; m) \hat{j} + (2.36 \times 10^{-10}\; m) \hat{k} \\ \vec{r}_{8} & = r_{8y} \hat{j} + r_{8z} \hat{k} = (2.36 \times 10^{-10}\; m) \hat{j} + (2.36 \times 10^{-10}\; m) \hat{k} \ldotp \end{split}
Substituting:
\begin{split} |\vec{r}_{CM,x}| & = \sqrt{r_{CM,x}^{2} + r_{CM,y}^{2} + r_{CM,z}^{2}} \\ & = \frac{1}{M} \sum_{j = 1}^{8} m_{j} (r_{x})_{j} \\ & = \frac{1}{M} (m_{1} r_{1x} + m_{2} r_{2x} + m_{3} r_{3x} + m_{4} r_{4x} + m_{5} r_{5x} + m_{6} r_{6x} + m_{7} r_{7x} + m_{8} r_{8x}) \\ & = \frac{1}{3.8804 \times 10^{-25}\; kg} \Big[ (5.885 \times 10^{-26}\; kg)(0\; m) + (3.816 \times 10^{-26}\; kg)(2.36 \times 10^{-10}\;m) \\ & + (5.885 \times 10^{-26}\; kg)(2.36 \times 10^{-10}\;m) + (3.816 \times 10^{-26}\; kg)(2.36 \times 10^{-10}\;m) + 0 + 0 \\ & + (3.816 \times 10^{-26}\; kg)(2.36 \times 10^{-10}\;m) + 0 \Big] \\ & = 1.18 \times 10^{-10}\; m \ldotp \end{split}
Similar calculations give rCM,y = rCM,z = 1.18 x 10⁻¹⁰ m (you could argue that this must be true, by symmetry, but it’s a good idea to check).
- Significance
-
As it turns out, it was not really necessary to convert the mass from atomic mass units (u) to kilograms, since the units divide out when calculating rCM anyway.
To express rCM in terms of magnitude and direction, first apply the three-dimensional Pythagorean theorem to the vector components:
\begin{split} r_{CM} & = \sqrt{r_{CM,x}^{2} + r_{CM,y}^{2} + r_{CM,z}^{2}} \\ & = (1.18 \times 10^{-10}\; m) \sqrt{3} \\ & = 2.044 \times 10^{-10}\; m \ldotp \end{split}
Since this is a three-dimensional problem, it takes two angles to specify the direction of \vec{r}_{CM}. Let \phi be the angle in the x,y-plane, measured from the +x-axis, counterclockwise as viewed from above; then:
\phi = \tan^{-1} \left(\dfrac{r_{CM,y}}{r_{CM,x}}\right) = 45^{o} \ldotp
Let \theta be the angle in the y,z-plane, measured downward from the +z-axis; this is (not surprisingly):
\theta = \tan^{-1} \left(\dfrac{R_{z}}{R_{y}}\right) = 45^{o} \ldotp
Thus, the center of mass is at the geometric center of the unit cell. Again, you could argue this on the basis of symmetry
Two crucial concepts come out of these examples:
- As with all problems, you must define your coordinate system and origin. For center-of-mass calculations, it often makes sense to choose your origin to be located at one of the masses of your system. That choice automatically defines its distance in Equation \ref{7.4.6} to be zero. However, you must still include the mass of the object at your origin in your calculation of M, the total mass Equation \ref{7.4.2}. In the Earth-moon system example, this means including the mass of Earth. If you hadn’t, you’d have ended up with the center of mass of the system being at the center of the moon, which is clearly wrong.
- In the salt crystal example, notice that there is no mass at all at the location of the center of mass. This is an example that illustrates that there does not have to be any actual mass at the center of mass of an object.
When a fireworks rocket explodes, thousands of glowing fragments fly outward in all directions, and fall to Earth in an elegant and beautiful display (Figure \PageIndex{8}). Describe what happens, in terms of conservation of momentum and center of mass.
The picture shows radial symmetry about the central points of the explosions; this suggests the idea of center of mass. We can also see the parabolic motion of the glowing particles; this brings to mind projectile motion ideas.
Solution
Initially, the fireworks rocket is launched and flies more or less straight upward; this is the cause of the more-or-less-straight, white trail going high into the sky below the explosion in the upper-right of the picture (the yellow explosion). This trail is not parabolic because the explosive shell, during its launch phase, is actually a rocket; the impulse applied to it by the ejection of the burning fuel applies a force on the shell during the rise-time interval. (This is a phenomenon we will study in the next section.) The shell has multiple forces on it; thus, it is not in free-fall prior to the explosion.
At the instant of the explosion, the thousands of glowing fragments fly outward in a radially symmetrical pattern. The symmetry of the explosion is the result of all the internal forces summing to zero (\sum_{j} \vec{f}_{j}^{int} = 0); for every internal force, there is another that is equal in magnitude and opposite in direction.
However, as we learned above, these internal forces cannot change the momentum of the center of mass of the (now exploded) shell. Since the rocket force has now vanished, the center of mass of the shell is now a projectile (the only force on it is gravity), so its trajectory does become parabolic. The two red explosions on the left show the path of their centers of mass at a slightly longer time after explosion compared to the yellow explosion on the upper right.
In fact, if you look carefully at all three explosions, you can see that the glowing trails are not truly radially symmetric; rather, they are somewhat denser on one side than the other. Specifically, the yellow explosion and the lower middle explosion are slightly denser on their right sides, and the upper-left explosion is denser on its left side. This is because of the momentum of their centers of mass; the differing trail densities are due to the momentum each piece of the shell had at the moment of its explosion. The fragment for the explosion on the upper left of the picture had a momentum that pointed upward and to the left; the middle fragment’s momentum pointed upward and slightly to the right; and the right-side explosion clearly upward and to the right (as evidenced by the white rocket exhaust trail visible below the yellow explosion).
Finally, each fragment is a projectile on its own, thus tracing out thousands of glowing parabolas.
Significance
In the discussion above, we said, “…the center of mass of the shell is now a projectile (the only force on it is gravity)….” This is not quite accurate, for there may not be any mass at all at the center of mass; in which case, there could not be a force acting on it. This is actually just verbal shorthand for describing the fact that the gravitational forces on all the particles act so that the center of mass changes position exactly as if all the mass of the shell were always located at the position of the center of mass.
Note this: in the absence of an external force, the velocity of the center of mass never changes.