6.3: Visible-Light Detectors and Instruments
( \newcommand{\kernel}{\mathrm{null}\,}\)
Learning Objectives
By the end of this section, you will be able to:
- Describe the difference between photographic plates and charge-coupled devices
- Describe the unique difficulties associated with infrared observations and their solutions
- Describe how a spectrometer works
After a telescope collects radiation from an astronomical source, the radiation must be detected and measured. The first detector used for astronomical observations was the human eye, but it suffers from being connected to an imperfect recording and retrieving device—the human brain. Photography and modern electronic detectors have eliminated the quirks of human memory by making a permanent record of the information from the cosmos.
The eye also suffers from having a very short integration time; it takes only a fraction of a second to add light energy together before sending the image to the brain. One important advantage of modern detectors is that the light from astronomical objects can be collected by the detector over longer periods of time; this technique is called “taking a long exposure.” Exposures of several hours are required to detect very faint objects in the cosmos.
Before the light reaches the detector, astronomers today normally use some type of instrument to sort the light according to wavelength. The instrument may be as simple as colored filters, which transmit light within a specified range of wavelengths. A red transparent plastic is an everyday example of a filter that transmits only the red light and blocks the other colors. After the light passes through a filter, it forms an image that astronomers can then use to measure the apparent brightness and color of objects. We will show you many examples of such images in the later chapters of this book, and we will describe what we can learn from them.
Alternatively, the instrument between telescope and detector may be one of several devices that spread the light out into its full rainbow of colors so that astronomers can measure individual lines in the spectrum. Such an instrument (which you learned about in the chapter on Radiation and Spectra) is called a spectrometer because it allows astronomers to measure (to meter) the spectrum of a source of radiation. Whether a filter or a spectrometer, both types of wavelength-sorting instruments still have to use detectors to record and measure the properties of light.
Photographic and Electronic Detectors
Throughout most of the twentieth century, photographic film or glass plates served as the prime astronomical detectors, whether for photographing spectra or direct images of celestial objects. In a photographic plate, a light-sensitive chemical coating is applied to a piece of glass that, when developed, provides a lasting record of the image. At observatories around the world, vast collections of photographs preserve what the sky has looked like during the past 100 years. Photography represents a huge improvement over the human eye, but it still has limitations. Photographic films are inefficient: only about 1% of the light that actually falls on the film contributes to the chemical change that makes the image; the rest is wasted.
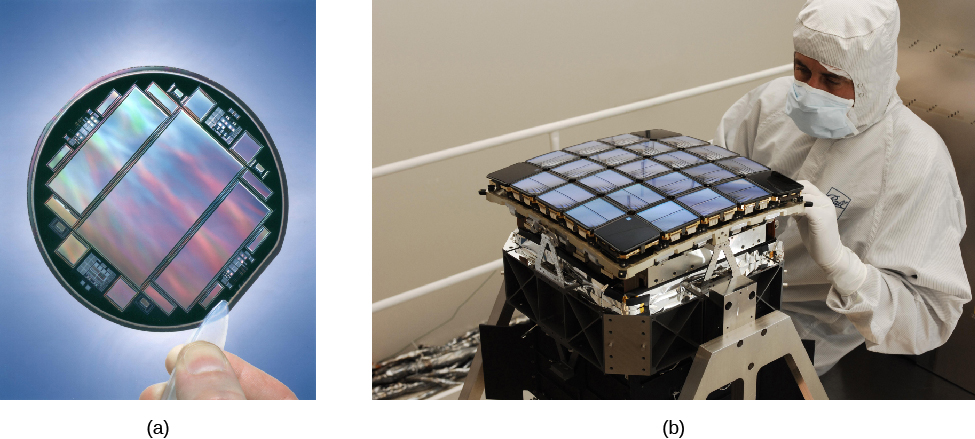
Astronomers today have much more efficient electronic detectors to record astronomical images. Most often, these are charge-coupled devices (CCDs), which are similar to the detectors used in video camcorders or in digital cameras (like the one more and more students have on their cell phones) (Figure 6.3.1). In a CCD, photons of radiation hitting any part of the detector generate a stream of charged particles (electrons) that are stored and counted at the end of the exposure. Each place where the radiation is counted is called a pixel (picture element), and modern detectors can count the photons in millions of pixels (megapixels, or MPs).

Because CCDs typically record as much as 60–70% of all the photons that strike them, and the best silicon and infrared CCDs exceed 90% sensitivity, we can detect much fainter objects. Among these are many small moons around the outer planets, icy dwarf planets beyond Pluto, and dwarf galaxies of stars. CCDs also provide more accurate measurements of the brightness of astronomical objects than photography, and their output is digital—in the form of numbers that can go directly into a computer for analysis.
Infrared Observations
Observing the universe in the infrared band of the spectrum presents some additional challenges. The infrared region extends from wavelengths near 1 micrometer (µm), which is about the long wavelength sensitivity limit of both CCDs and photography, to 100 micrometers or longer. Recall from the discussion on radiation and spectra that infrared is “heat radiation” (given off at temperatures that we humans are comfortable with). The main challenge to astronomers using infrared is to distinguish between the tiny amount of heat radiation that reaches Earth from stars and galaxies, and the much greater heat radiated by the telescope itself and our planet’s atmosphere.
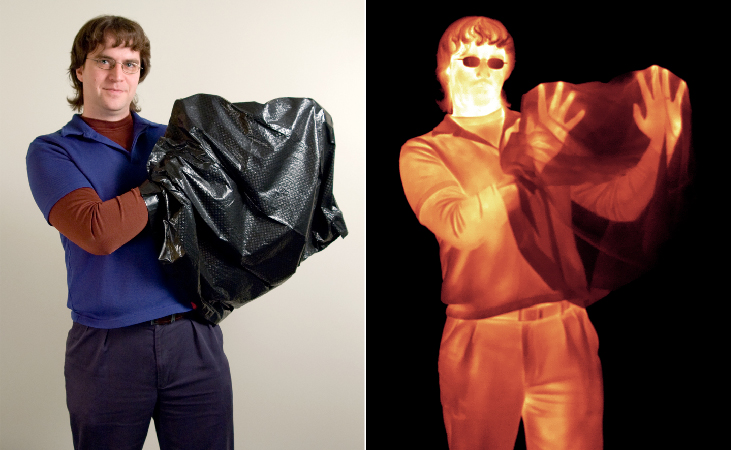
Typical temperatures on Earth’s surface are near 300 K, and the atmosphere through which observations are made is only a little cooler. According to Wien’s law (from the chapter on Radiation and Spectra), the telescope, the observatory, and even the sky are radiating infrared energy with a peak wavelength of about 10 micrometers. To infrared eyes, everything on Earth is brightly aglow—including the telescope and camera (Figure 6.3.2). The challenge is to detect faint cosmic sources against this sea of infrared light. Another way to look at this is that an astronomer using infrared must always contend with the situation that a visible-light observer would face if working in broad daylight with a telescope and optics lined with bright fluorescent lights.

To solve this problem, astronomers must protect the infrared detector from nearby radiation, just as you would shield photographic film from bright daylight. Since anything warm radiates infrared energy, the detector must be isolated in very cold surroundings; often, it is held near absolute zero (1 to 3 K) by immersing it in liquid helium. The second step is to reduce the radiation emitted by the telescope structure and optics, and to block this heat from reaching the infrared detector.
Check out The Infrared Zoo to get a sense of what familiar objects look like with infrared radiation. Slide the slider to change the wavelength of radiation for the picture, and click the arrow to see other animals.
Spectroscopy
Spectroscopy is one of the astronomer’s most powerful tools, providing information about the composition, temperature, motion, and other characteristics of celestial objects. More than half of the time spent on most large telescopes is used for spectroscopy.
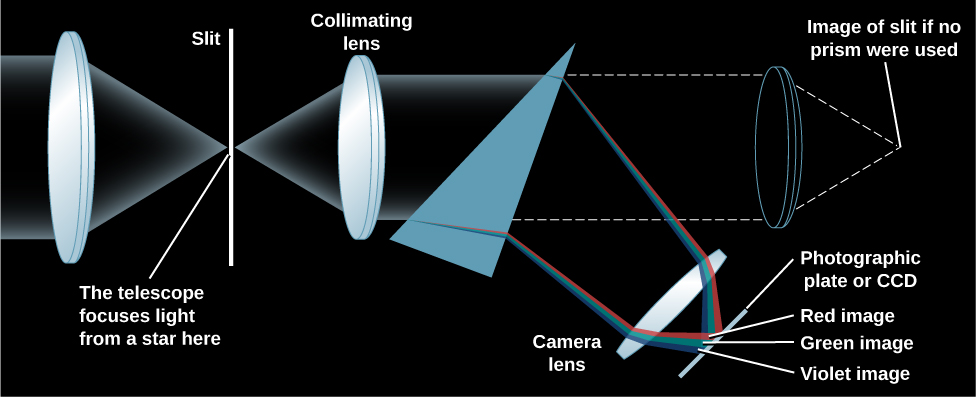
The many different wavelengths present in light can be separated by passing them through a spectrometer to form a spectrum. The design of a simple spectrometer is illustrated in Figure 6.3.3. Light from the source (actually, the image of a source produced by the telescope) enters the instrument through a small hole or narrow slit, and is collimated (made into a beam of parallel rays) by a lens. The light then passes through a prism, producing a spectrum: different wavelengths leave the prism in different directions because each wavelength is bent by a different amount when it enters and leaves the prism. A second lens placed behind the prism focuses the many different images of the slit or entrance hole onto a CCD or other detecting device. This collection of images (spread out by color) is the spectrum that astronomers can then analyze at a later point. As spectroscopy spreads the light out into more and more collecting bins, fewer photons go into each bin, so either a larger telescope is needed or the integration time must be greatly increased—usually both.

In practice, astronomers today are more likely to use a different device, called a grating, to disperse the spectrum. A grating is a piece of material with thousands of grooves on its surface. While it functions completely differently, a grating, like a prism, also spreads light out into a spectrum.
Summary
Visible-light detectors include the human eye, photographic film, and charge-coupled devices (CCDs). Detectors that are sensitive to infrared radiation must be cooled to very low temperatures since everything in and near the telescope gives off infrared waves. A spectrometer disperses the light into a spectrum to be recorded for detailed analysis.
Glossary
- charge-coupled device (CCD)
- array of high-sensitivity electronic detectors of electromagnetic radiation, used at the focus of a telescope (or camera lens) to record an image or spectrum


