6.4: The Telescope
- Page ID
- 29717
\( \newcommand{\vecs}[1]{\overset { \scriptstyle \rightharpoonup} {\mathbf{#1}} } \)
\( \newcommand{\vecd}[1]{\overset{-\!-\!\rightharpoonup}{\vphantom{a}\smash {#1}}} \)
\( \newcommand{\dsum}{\displaystyle\sum\limits} \)
\( \newcommand{\dint}{\displaystyle\int\limits} \)
\( \newcommand{\dlim}{\displaystyle\lim\limits} \)
\( \newcommand{\id}{\mathrm{id}}\) \( \newcommand{\Span}{\mathrm{span}}\)
( \newcommand{\kernel}{\mathrm{null}\,}\) \( \newcommand{\range}{\mathrm{range}\,}\)
\( \newcommand{\RealPart}{\mathrm{Re}}\) \( \newcommand{\ImaginaryPart}{\mathrm{Im}}\)
\( \newcommand{\Argument}{\mathrm{Arg}}\) \( \newcommand{\norm}[1]{\| #1 \|}\)
\( \newcommand{\inner}[2]{\langle #1, #2 \rangle}\)
\( \newcommand{\Span}{\mathrm{span}}\)
\( \newcommand{\id}{\mathrm{id}}\)
\( \newcommand{\Span}{\mathrm{span}}\)
\( \newcommand{\kernel}{\mathrm{null}\,}\)
\( \newcommand{\range}{\mathrm{range}\,}\)
\( \newcommand{\RealPart}{\mathrm{Re}}\)
\( \newcommand{\ImaginaryPart}{\mathrm{Im}}\)
\( \newcommand{\Argument}{\mathrm{Arg}}\)
\( \newcommand{\norm}[1]{\| #1 \|}\)
\( \newcommand{\inner}[2]{\langle #1, #2 \rangle}\)
\( \newcommand{\Span}{\mathrm{span}}\) \( \newcommand{\AA}{\unicode[.8,0]{x212B}}\)
\( \newcommand{\vectorA}[1]{\vec{#1}} % arrow\)
\( \newcommand{\vectorAt}[1]{\vec{\text{#1}}} % arrow\)
\( \newcommand{\vectorB}[1]{\overset { \scriptstyle \rightharpoonup} {\mathbf{#1}} } \)
\( \newcommand{\vectorC}[1]{\textbf{#1}} \)
\( \newcommand{\vectorD}[1]{\overrightarrow{#1}} \)
\( \newcommand{\vectorDt}[1]{\overrightarrow{\text{#1}}} \)
\( \newcommand{\vectE}[1]{\overset{-\!-\!\rightharpoonup}{\vphantom{a}\smash{\mathbf {#1}}}} \)
\( \newcommand{\vecs}[1]{\overset { \scriptstyle \rightharpoonup} {\mathbf{#1}} } \)
\(\newcommand{\longvect}{\overrightarrow}\)
\( \newcommand{\vecd}[1]{\overset{-\!-\!\rightharpoonup}{\vphantom{a}\smash {#1}}} \)
\(\newcommand{\avec}{\mathbf a}\) \(\newcommand{\bvec}{\mathbf b}\) \(\newcommand{\cvec}{\mathbf c}\) \(\newcommand{\dvec}{\mathbf d}\) \(\newcommand{\dtil}{\widetilde{\mathbf d}}\) \(\newcommand{\evec}{\mathbf e}\) \(\newcommand{\fvec}{\mathbf f}\) \(\newcommand{\nvec}{\mathbf n}\) \(\newcommand{\pvec}{\mathbf p}\) \(\newcommand{\qvec}{\mathbf q}\) \(\newcommand{\svec}{\mathbf s}\) \(\newcommand{\tvec}{\mathbf t}\) \(\newcommand{\uvec}{\mathbf u}\) \(\newcommand{\vvec}{\mathbf v}\) \(\newcommand{\wvec}{\mathbf w}\) \(\newcommand{\xvec}{\mathbf x}\) \(\newcommand{\yvec}{\mathbf y}\) \(\newcommand{\zvec}{\mathbf z}\) \(\newcommand{\rvec}{\mathbf r}\) \(\newcommand{\mvec}{\mathbf m}\) \(\newcommand{\zerovec}{\mathbf 0}\) \(\newcommand{\onevec}{\mathbf 1}\) \(\newcommand{\real}{\mathbb R}\) \(\newcommand{\twovec}[2]{\left[\begin{array}{r}#1 \\ #2 \end{array}\right]}\) \(\newcommand{\ctwovec}[2]{\left[\begin{array}{c}#1 \\ #2 \end{array}\right]}\) \(\newcommand{\threevec}[3]{\left[\begin{array}{r}#1 \\ #2 \\ #3 \end{array}\right]}\) \(\newcommand{\cthreevec}[3]{\left[\begin{array}{c}#1 \\ #2 \\ #3 \end{array}\right]}\) \(\newcommand{\fourvec}[4]{\left[\begin{array}{r}#1 \\ #2 \\ #3 \\ #4 \end{array}\right]}\) \(\newcommand{\cfourvec}[4]{\left[\begin{array}{c}#1 \\ #2 \\ #3 \\ #4 \end{array}\right]}\) \(\newcommand{\fivevec}[5]{\left[\begin{array}{r}#1 \\ #2 \\ #3 \\ #4 \\ #5 \\ \end{array}\right]}\) \(\newcommand{\cfivevec}[5]{\left[\begin{array}{c}#1 \\ #2 \\ #3 \\ #4 \\ #5 \\ \end{array}\right]}\) \(\newcommand{\mattwo}[4]{\left[\begin{array}{rr}#1 \amp #2 \\ #3 \amp #4 \\ \end{array}\right]}\) \(\newcommand{\laspan}[1]{\text{Span}\{#1\}}\) \(\newcommand{\bcal}{\cal B}\) \(\newcommand{\ccal}{\cal C}\) \(\newcommand{\scal}{\cal S}\) \(\newcommand{\wcal}{\cal W}\) \(\newcommand{\ecal}{\cal E}\) \(\newcommand{\coords}[2]{\left\{#1\right\}_{#2}}\) \(\newcommand{\gray}[1]{\color{gray}{#1}}\) \(\newcommand{\lgray}[1]{\color{lightgray}{#1}}\) \(\newcommand{\rank}{\operatorname{rank}}\) \(\newcommand{\row}{\text{Row}}\) \(\newcommand{\col}{\text{Col}}\) \(\renewcommand{\row}{\text{Row}}\) \(\newcommand{\nul}{\text{Nul}}\) \(\newcommand{\var}{\text{Var}}\) \(\newcommand{\corr}{\text{corr}}\) \(\newcommand{\len}[1]{\left|#1\right|}\) \(\newcommand{\bbar}{\overline{\bvec}}\) \(\newcommand{\bhat}{\widehat{\bvec}}\) \(\newcommand{\bperp}{\bvec^\perp}\) \(\newcommand{\xhat}{\widehat{\xvec}}\) \(\newcommand{\vhat}{\widehat{\vvec}}\) \(\newcommand{\uhat}{\widehat{\uvec}}\) \(\newcommand{\what}{\widehat{\wvec}}\) \(\newcommand{\Sighat}{\widehat{\Sigma}}\) \(\newcommand{\lt}{<}\) \(\newcommand{\gt}{>}\) \(\newcommand{\amp}{&}\) \(\definecolor{fillinmathshade}{gray}{0.9}\)The Telescope
The main part of this Lab is an introduction to the simple refracting telescope , using a combination of concave lenses. The Refractor , believed to have been first invented by spectacle makers Hans and Zacharias Janssen, then independently Jan Lippershey of Holland in as early as 1595. The refractor was first used astronomically by Galileo Galilei in 1609.
Like with lenses and mirrors, when telescopes are shown as a drawing or illustration, they are more often shown as a cutaway or cross section. What you will see in these drawings is as if one took the telescope and cut it down the middle of the tube and lenses.
The main lens which focuses the incoming image is called the objective . [This is the lens you see on the right side of The Galilean Refracting Telescope diagram, below.] Light — shown by the dashed lines [ – – – ] and arrows enters the objective over the entire surface of the objective. For simplicity, the incoming light is shown as two (sometimes more) lines. Why? Because if you show a solid beam of light incoming — what really happens — then you would not see the objective or any lens in a drawing because it would be blocked out by the “solid” line.
The objective shown here is a double convex lens; that is both sides of the lens shape are outwardly curved. Double convex refers to double (or two) convex (or out) . As the light beam travels down the telescope tube (the solid barrel which holds the lenses), it converges or comes to a focus. The objective lens is a converging lens; think of it as a magnifying glass (which it is!).
When the converging light reaches the end of the tube — its focus — the light must then be focused for the eye. That is why you see a second, diverging lens (spreads the light out) on the left side of the below diagram. You must use this lens or lens system — called the eyepiece — to focus and magnify for the eye. Your eye is one type of detector (shown in the telescope illustrations). Other detectors can include cameras (both film and digital), video camera systems, spectroscopes, photomultiplier tubes (measures the amount of light incoming), etc.


Early telescopes such as the one invented by the Janssens and Lippershey 400 years ago, and the one used by Galileo astronomically, only used one lens for the objective, and a second double concave lens for the eyepiece. Double concave means that both sides of the lens are curved inward, thus double (or two ) concave (or in ).
Again, the eyepiece is required to focus and magnify the image for the human eye. An eyepiece might not be required for other “observers,” such as a camera, CCD, or spectroscope. In modern telescopes the eyepiece can be changed, providing different power or magnification.
The telescope you will assemble and test in lab is similar to the ones built by the Janssens, Lippershey, and Galileo, except for the eyepiece lens type.
Their telescopes used double concave lenses, making for a long “optik stick.” And even though the parts of this simple lab telescope are inexpensive (the lenses are plastic), they are probably better than those used in early telescopes.
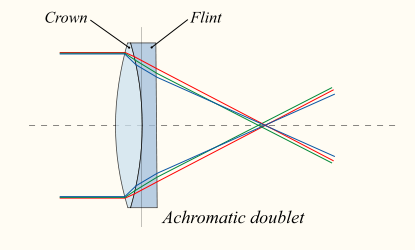
Today’s modern quality refractors use either two ( achromat ) or three ( apochromat ) lenses for the objective. This combination deals with the major refractor problem: color issues. Think of a lens as a prism (look at the edge of the lens); a single lens does indeed begin to break light into component wavelengths. Achromats take care of this to some degree; apochromats (which are much-costlier) totally eliminate the problem (unless it is a poor set of lenses that make up the apochromat).

[” Chromatic aberration lens diagram ” by Bob Mellish , licensed under CC BY-SA 3.0 ;

” Lens6b-en ” by DrBob , licensed under CC BY-SA 3.0 ]
The inside of modern telescope tubes and eyepieces are painted a flat black to avoid internal reflections of light. And most small to moderate-sized objectives and all excellent to high quality eyepiece lenses are coated to prevent internal reflections within the lenses themselves.
Modern eyepieces are also multi-lens systems. There are eyepieces which can cost hundreds of dollars, based on “exotic” glasses and high-quality barrels (the metal barrels and internal rings which support the lenses).

Reflecting Telescope
The other type of telescope used today — now the most-common — is the reflecting telescope. The modern Reflectoruses a concave mirror as its primary objective. A concave mirror has the same basic optical properties as a convex objective lens in a Refractor. There are a variety of Reflector types. These are distinguished by the way the light “exits” the telescope to the detector (eye, camera, etc.). The most common Reflector is the Newtonian Reflector , named after its inventor, Sir Isaac Newton. Light enters the telescope tube, is reflected off of the primary mirror (objective) to a smaller flat second (secondary) mirror. The secondary in turn reflects the converging image to the eyepiece and detector.


