
1.1: Building a Solar Clock and Calendar


- Last updated
- Nov 1, 2022
- Save as PDF

( \newcommand{\kernel}{\mathrm{null}\,}\)
This first unit may not seem very significant, but the activities contain pieces that take extended periods of time to appreciate, so we will start them off now, in the early part of the school year. In this way, they will be prepared and ready when we want them later! Two of the most basic facts in astronomy are that we have the Sun crossing the sky during the day and the stars crossing the sky at night. In this unit, we will focus on the Sun and its movements, both daily, and over the weeks as the school year passes.
Science and Engineering Practices
- Developing and using models.
- Obtain, evaluate, and communicate information.
Crosscutting Concepts
- Patterns in nature.
- Cause and effect.
- Structure and function.
- Stability and change.
Next Generation Science Standards
- Space systems (K-5, 6-8, 9-12).
- Structure and function (K-5).
- Waves and electromagnetic radiation (6-8, 9-12).
For the Educator
Facts you need to know
- The Sun rises in the east and crosses the sky each day. Okay, this seems almost too basic, but then one has to start somewhere, doesn’t one?
- The Sun changes it rising position on the eastern horizon and its highest altitude each day as you move through the school year.
- We can measure these hourly and daily changes easily enough with very simple materials.
Teaching and Pedagogy
The idea that a simple vertical stick or gnomon can tell the time and date is astonishing to most children. They are used to the idea that technology either involves a great many moving parts such as in an automobile, or almost magical electronics with function inside a smartphone or a DVD player. The fact that something so simple can function as a clock and a calendar is a revelation. The idea of ancient people as ‘primitive’ or even ‘stupid’ is easily and often promulgated in popular children’s entertainment and even sometimes in textbooks. Nothing could be further from the truth! As we will discover in various activities through the course of this book, ancient peoples the world over participated in astronomy and were able to do amazing things both scientifically and mathematically. By following in their footsteps, we will learn a great deal about how science discovers the truth about nature, and how science corrects itself when it wanders down the wrong path.
One interesting fact your students may have discovered with their sundials is that the shadow from the gnomon always travels clockwise around the paper! When the first mechanical clocks were made, it would have been just as easy to construct them to run around to the left as to the right, but these clocks were modeled on the sundial, and so they all moved clockwise! Inventors from many different countries and cultures developed clocks, and all of them modeled their inventions in the same way – after nature itself! In our next unit, we will investigate another way to tell time in the heavens – with the phases of the Moon!
Student Outcomes
What will the student discover?
- The Sun’s motion through the sky is regular and predictable. Again, this may seem simple to you, but for young children, the idea that nature is regular and predictable is a powerful one. Recognition of the cycles of nature was one of the foundational ideas that helped develop calendars, timekeeping, and our modern civilization! Once we recognize the regular patterns in nature, we are on the high road to harnessing nature’s power for our benefit and comfort!
- The first clocks were based upon the regular movement of the Sun across the sky (and actually upon the regular rotation of the Earth on its axis!) Have you ever wondered why clocks go clockwise? This activity will easily answer that question for you – and your students!
- Science is based first and foremost upon recognizing patterns. We want to identify these patterns, discover how they change over time, and find out what factors influence and control them. These activities will likely be the first introduction for many young students that science is based upon patterns, and we can all look for them, and learn to recognize them!
- Timekeeping, both clocks and calendars, are also fundamental to science. Patterns are after all, regular events that recur over time. To study science, we must be aware of the passing of time; both in small increments like seconds, as well as longer units like days, months, even years.
Conducting the Activity
Materials
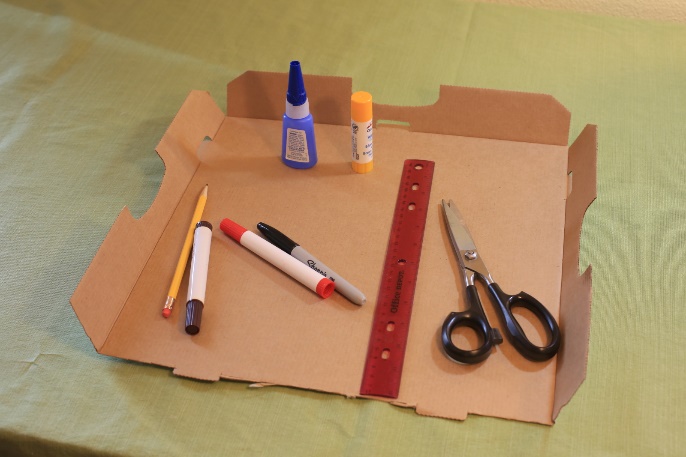 One 12-inch square of cardboard (Old copy paper boxes or pizza boxes can be cut apart to make these easily and cheaply!)
- Construction paper (Lighter colors work best)
- A drawing compass
- Waxed paper (Two six-inch squares is sufficient)
- A small compass (A free compass app on the teacher’s smartphone will do for this.)
- Glue stick or white glue
- Superglue. White glue isn’t strong enough for every part of our project – Teachers will have to handle the superglue part of the project, of course!
- One half-used pencil – about 5-6 inches long works best
- Two metal washers [Optional] Washers that fit snugly around the pencil make our solar clock sturdier. You can also use small squares of cardboard as washers. If you want the metal kind, your local home improvement center will be able to help you out.
Pro Tip! When you go shopping for materials, you might want to take this book along and ask to speak to the manager at your local home improvement store – you’ll be seeing a lot of each other as you work through the projects in this book! Many such stores are locally owned, and if you ask nicely (and have your school ID!), you may be able to get a ‘school discount’ on the materials for your class all year long. If you do get a discount, remember to tell all your parents that your classroom is ‘Sponsored by Bob’s Hardware’; turnabout is fair play, after all!
Building the Solar Clock & Calendar
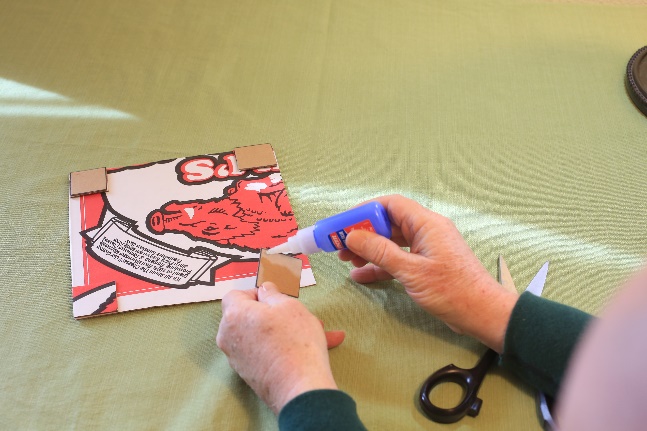
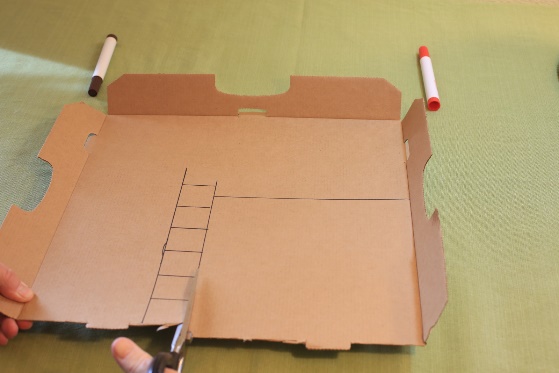 Use a glue stick to secure the construction paper to the cardboard. [Optional]
- Draw a line dividing the paper in half. Start your compass at a point about 1 inch in from the edge and draw a circle with a 3-inch radius. The entire circle will not fit on the paper, that’s perfectly alright for our purposes.
- Carefully use the pencil to carefully punch a hole through the cardboard where the center of your circle is.
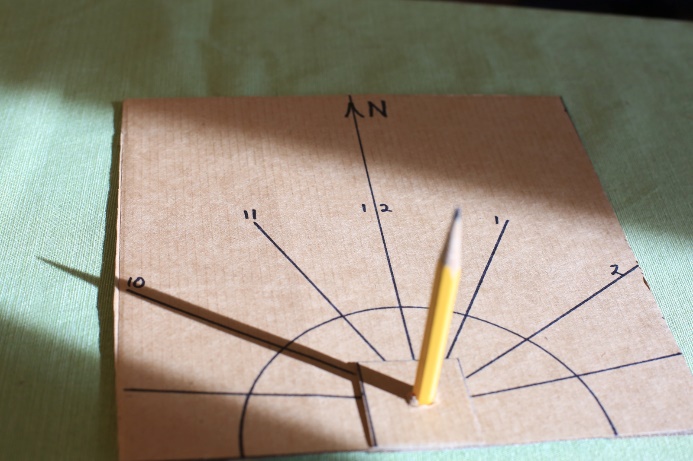
 Use a ruler to draw a pencil line across the paper from the hole to the opposite side. Label the side opposite the hole North.
- Starting at the back side of the cardboard, push the pointed end of the pencil through the hole until it is almost all the way through.
- Have your square of waxed paper ready on the desk and put a generous bead of superglue on the cardboard around the hole and the pencil. Slip the first washer over the pencil, then press the cardboard flat to the table on the waxed paper. The pencil and washer should now be glued in flush with the back of the cardboard!
 Put another generous bead of glue around the pencil on the front side and slide the second washer down over the pencil. Push the second wax paper square down over the pencil and use this to press the washer down firmly for 5-10 seconds, keeping the pencil as vertical as you can while the glue dries. The wax paper should keep you from getting any glue on your hands! Leave the wax paper in place for the remainder of the day to insure the glue is cured completely and protect both hands and surfaces!
- Once the glue is completely dry, remove the wax paper from both sides. If a little clings to the project, don’t worry – that won’t affect how it works!
Exploring the Solar Clock & Calendar
- We will begin by setting our sundials out on a sunny morning when school is just starting. Use your compass to be sure that everyone’s sundial is pointing correctly north. Many school buildings are constructed to be well-aligned to the cardinal directions of the compass. If this is true for your building, then the wall of a building or the direction of a sidewalk may help you to easily set up the sundials in the correct direction; if not, use your compass to help you.
- With the sundials set up in the proper direction at the start of the school day, mark the point where the tip of the shadow lies. Next, mark where the shadow crosses the circle – this point can label this as 8:00 (or whenever you start school.
- For this first day, bring the sundials out several times during the school day on the hour and mark these times as well. You should now have several different hours marked on your sundial.
 With the hours marked, use a ruler to draw straight lines from the pencil out to the time marks. Older students will easily be able to fill in the missing hours and make a more complete clock face. There is, however, no real need to mark your clock with numbers. You can mark the clock with the start of the subjects that you teach. Your first mark might be “Home Room”, the next might be “Math”, then “English”, etc. Children will no doubt enjoy this more whimsical clock, but this is actually a very old tradition. Medieval monks marked the hours with the names of the prayers that they recited at various times of day, other ancient societies did similar things.
- So much for our sundial, but how do we make a calendar? For this, we need to have our sundials out at least once a week (preferably more) at the same time each day. If you have a midday recess or lunch period, this is a perfect time to do this; the closer to noon you are, the better this will work.
- At the noon hour, set your sundial out and mark the point where the tip of the shadow falls on that day with a small, neat dot. Do this with a colorful marker or pen, and remember to use the same color each day for the best effect. You don’t always have sunny weather, of course, but if you can manage two sunny days a week, you will have excellent results. Keep in mind that when we shift our clocks to and from daylight savings time, you will have to adjust your routine. Your sundial does not function in daylight savings time! For instance, let’s say that you mark your calendar dot at noon each day when you begin recording data in the Fall Semester. When you fall back to Standard time in October, you will have to record your calendar dot at 11:00 am until you spring ahead to Daylight Savings time again in April, when you will resume plotting your dots at noon.
- On the 1st and 15th of each month, make the dots a bit larger, and label them with the date. Continue to do this without fail and you will begin to see a pattern emerge – your dots do not fall in the same place each day, but begin to trace out a complex and beautiful figure. When complete, this shape is called an analemma, you will complete a little over three-quarters of it during a typical school year. Your solar clock and calendar will continue to trace out the time and day each year without fail!
- If you have a tether ball in your playground area, you have the perfect setup for creating a solar calendar outdoors on the playground area. Just as you did with the student’s sundials, mark a dot on the ground where the tip of the pole’s shadow falls each day at noon. You can use a circular cardboard stencil and some bright colored spray paint to mark the dots. For the 1st and 15th of the month, use a larger circle stencil and cut out a date stencil from a manila folder. By the end of the school year, you will have an analemma calendar marked on the ground that will accurately show the date each day at noon. Remember to keep these solar clocks and calendars around – we will be using them later in the year to help us make some important decisions!
Discussion Questions
- Why do clocks go clockwise?
- Answer Because the Sun travels across the southern sky from east to west – the shadow it projects travels around the post from west to east – clockwise! When mechanical clocks were developed in the 1400’s, inventors sought to make them move as “conventional” sundials did, so they made the hands rotate to the right.
- What are some limitations to our solar clocks?
- Answer They can’t show the time after sunset!
- Answer: No minute or second hand!
- Answer: They need to be adjusted from summer to winter as the angle of the Sun changes.
- How would having an accurate clock improve people’s lives?
- Answer: It gives us the ability to measure time for appointments, school classes, etc.
- Answer: Accurate timekeeping is important for science and astronomy!
Supplemental Materials
Going Deeper
A very interesting bit of sculpture can be created by constructing a medium-size solar calendar. Use a half-sheet of plywood and a 2-foot long broomstick or 1-inch dowel rod for a gnomon. You may want to use some copper wire as guy-wires to make sure the gnomon stays perfectly straight all year. It also helps to extend the gnomon with a 3-inch piece of coat-hanger wire so you have a precise point to mark.
Mark the point of the shadow each day at the same time as you did with your other model, but this time drill a small 1/8th-inch hole where the tip of the shadow falls. When you have marked a month out on your calendar, take a spool of yellow nylon builder’s twine and tie if off at the top of the gnomon. Run the twine down through the first hole, then back up through the second and back to the top of the gnomon again and so on until you have threaded all the holes you made that month.
When you have completed the next month, do the same thing with another color of thread and continue alternating the colors through the year. You will end up with a 3-D sculpture that shows how the Sun travels through the sky as our Earth orbits the Sun. Each line shows the precise angle and direction to the Sun at noon on that day!
Being an Astronomer:
We know that days are shorter in the winter and longer in the summer, but as astronomers, we can investigate this ourselves. A permanently mounted pole such as a flagpole or a tether ball pole works well, but even a fence post can be used for this investigation.
The shortest day of the year is the Winter Solstice which falls on December 21st each year. On that day, the Sun is at its lowest point in the sky. By contrast, the longest day of the year is the Summer Solstice (June 21st) when the Sun is at its highest point in the sky. If we measure the shadow of a fixed pole once a week, we will see the length of the shadow change as we move through the year.
If you have a tether ball pole in your school yard, draw a line on the ground that starts at the base of the pole and travels due north (use a compass to help you find north!) One day each week, when the shadow of the pole lies along this line, mark the end of the shadow. Use paint so that the marks will not wash away easily!
By marking the shadow one day each week, you will see that in the fall semester, the shadow gets longer each week because the Sun is lower in the sky! During the spring semester, the shadow lengthens again as the Sun travels higher in the sky and the days get longer. By marking a simple shadow, you have measured the path of the Sun across the sky as the Earth travels around its orbit!
Not every planet has a 24-hour day! Mars is the closest to Earth with a day of 24 hours, 37 minutes. The Moon is very different from Earth, the lunar day is 655 hours long – that’s almost 28 days! Since the Moon spins so slowly, the Sun will rise and then stay in the sky for two weeks before setting; the lunar night is also two weeks long.
How would a solar clock behave if you had one on the Moon? Could you use it every day? How would you have to mark the dial differently to make it work there? Think about this with your student group and see what suggestions you can come up with!
Being a Scientist
Measuring time is always important in science. We have succeeded in making a working clock, but how accurate is it? Try measuring the angles for the marked hours, are they all the same size? Time the progress of the shadow on your clock as it moves and mark the progress in 15-minute intervals. Does your clock’s shadow always move at the same speed? Can you explain your result?
Following Up:
There are many different types of clocks. Do some research on the internet and see how many different types you can find. What type of clock do scientists use most often? What is the most accurate clock in the world?