
2.1: Making a Moon Phase Map
- Page ID
- 31547

Some teachers worry about doing STEM activities in class and fear that they will not have all the answers when children start to ask more interesting questions – instead, take this as an opportunity! A piece of poster board or just an area of the class whiteboard can be used to write down questions to be answered. For younger children, the teacher can later research the answer and report back to the class. For older children, supervised web searches can provide a wealth of information. If your classroom has the ability to use a projector with a computer, this can be an exciting learning and exploring activity to follow up a STEM activity. Occasionally, students ask questions that science has not yet answered – this is not a problem! Students can, and should learn that science is not perfect or all knowing. Science has its limits, and unanswered questions are not failure, they are opportunities for future exploration!
Our next student activity will be constructing a model of the lunar phases, but before we do this, let’s review the scientific facts you need to know in order to run this successful STEM activity in your classroom. As I mentioned in the introduction, you don’t need a vast knowledge of facts at your disposal to teach astronomy successfully as a STEM activity in any elementary classroom. You probably already know most of these things, but it is helpful to review them before we begin.
Science and Engineering Practices
- Developing and using models.
- Constructing explanations.
Crosscutting Concepts
- Patterns in nature.
- Systems and system models.
- Stability and change.
Next Generation Science Standards
- Space systems (K-5, 6-8, 9-12)
- The Earth-Moon system (6-8, 9-12)
For the Educator
Facts you need to know
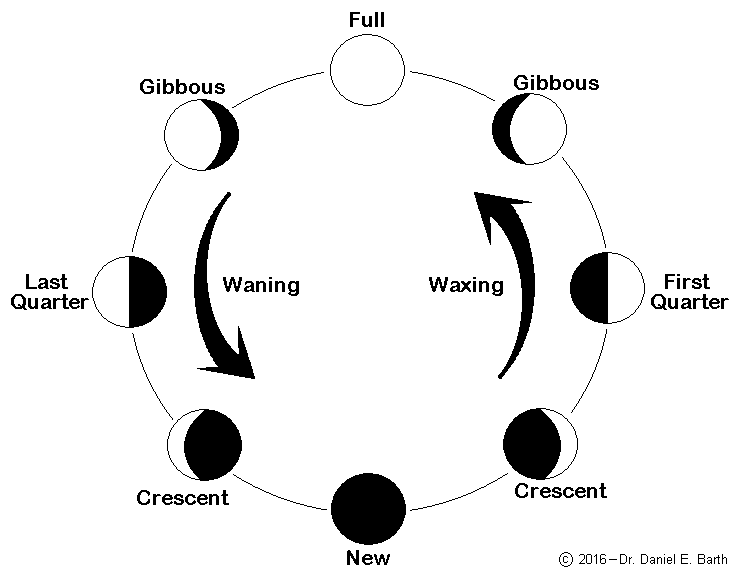
- Lunar phases (the shape of the Moon we see in the sky) change slowly over a period of days. Each of the eight distinct lunar phases lasts 3-4 days, this means we must be patient as lunar observers!
- An entire series of lunar phases from one full Moon to the next is called a lunation, and takes about just over 29 days While a lunation takes 29.5 days, a lunar orbit is shorter at 28.3 days. The difference between the two times is due to the Earth’s own motion around the Sun. We will ignore this small difference in our activities for simplicity’s sake.[/footnote]. This regular change was one of humanity’s first calendars and gives us the modern concept of the month.
- Each complete set of lunar phases coincides with the Moon making a complete trip around the Earth; this is called a lunar orbit. Interestingly, the Moon travels West to East as it orbits the Earth, this is something we will see for ourselves later as we begin observing the Moon outdoors!
Teaching and Pedagogy
When we start students off on a project like this one, they get very involved in the project as art without giving a thought to what it means. That’s okay! We want them to have fun and enjoy the creative aspects of building this lunar phase model as they learn the basic vocabulary and names of the lunar phases. It is also less than helpful for a teacher to try to push students to perform creatively while building a model, plus learning the vocabulary, and then trying to understand the concept of changing lunar phases all at the same time. I suspect that most adults would balk at that much complexity, and it certainly isn’t a recipe for academic success with young children either.
Although I fully understand that the pedagogy we are discussing certainly isn’t a one-day lesson, I’ve resisted breaking this down into lessons for you. You know your class best, the pace at which they can absorb new material – and this will differ quite a bit depending on what age group you are working with. If you are teaching a STEM activity-based unit for the first time, you may have to feel your way forward, have material on hand, and proceed as you feel best by ending lessons early, or extending them into the next topic if you feel your students are energized and ready for the challenge. Those of you teaching in a home school environment may be teaching children of several different ages at one time; the open-ended nature of these lessons will work particularly well for you, with the younger children gaining inspiration and knowledge from their older siblings.
A teacher can help the process along by posting photographs of different lunar phases around the room and labeling them with cards – or even challenging students to use their new lunar phase model to help name the phase shown in the photo once it has been created. Given the piece-meal style of much science curriculum, many older students may expect the learning to end once we’ve finished and labeled the model – far from it, we’re just getting started!
Once your students have finished the model and are ready for the next step, have them start at the bottom of the diagram and label the new moon phase as #1. Proceed anti-clockwise around the diagram, labeling the waxing crescent as #2 and so on until all eight phases are numbered. Starting at the bottom and working around to the left may seem odd to you, but there are very good physical reasons for this. If we were able to stand very high above the North Pole in space and watch the Moon orbit the Earth, we would see that it travels anti-clockwise around the our planet.
As we proceed around the diagram rising up the page to the left, the phases get larger (they are waxing), and when they descend down the page again the phases get smaller (they are waning). Once you explain this to students, there is a very satisfying logic to it all. If they don’t quite see it, and you have a 12 to 15-inch standard globe in your classroom, a Moon can be made from a tennis ball and a small child’s action figure can stand in for our observer so that you can show them how this works.
At the end of this lesson, step back and congratulate yourself! Something marvelous has just happened in your classroom, your students have constructed a scientifically accurate model, compared it to what they know of nature, and learned something profound and important about how it works.
Clever students will probably already be picking up on the idea that the Moon’s position in orbit around the Earth has something to do with which lunar phase we can see in the sky. Excellent! Assure them there will be more to learn about this later!
It’s now time to sprinkle in a few additional facts to add to what we’ve already learned. The Moon takes 28 days to orbit the Earth. So what? Let’s try a little math; division for the older students, counting for the younger ones will quickly bring them to the fact that each quarter of an orbit (from new moon to first quarter for instance) takes 7 days.
“Hey! That’s a week!” Exactly! The Moon was humanity’s first clock and calendar, NASA scientists have found carvings representing the lunar phases dating back over 30,000 years. The word moon is the origin for our word month, and the cycle of lunar phases is the origin for the 4-week long month that we see on our calendar.
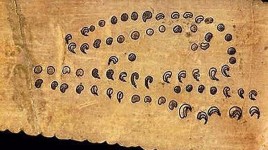
Ancient carven lunar calendar, c. 30,000 BC, courtesy of NASA.
By this time, your students may be spinning off questions faster than you can write them down – what an excellent outcome! Everyone engaged and excited about learning! If you have a skeptical administrator in your building, this period at the end of a project will be an excellent time to invite them to visit your classroom – they are sure to be impressed by what they see!
Student Outcomes
What will the student discover?
- Lunar phases change in predictable ways.
- The idea that we can predict nature is a powerful idea for children, who often see the ability to predict the future as nothing short of magical. But it is not magic that gives us this ability, it is instead careful observation and the use of the scientific method; it is important for children to understand where this powerful ability comes from!
- The Moon orbits the Earth in 28 days.
- While the model created in this activity has its limitations (more on this later!), you should put forward the idea that the lunar phases are linked to the lunar orbit. Regular cycles in nature is a key theme in all fields of science, and this introduction to the idea in elementary school is foundational to a child’s later understanding of science and nature.
- The lunar phases are divided into waxing and waning phases.
- Waxing phases occur when the Moon grows larger each day until it is full. Waxing phases are easily seen just after sunset on any clear night.
- Waning phases occur when the Moon shrinks each day until New Moon, when it is not visible in the sky at all. Waning phases are easily seen at dawn or in the early morning while the sky is still a bit dim.
- The lunar phases are named: New, Crescent, Quarter, Gibbous, and Full.
What will your students learn about science?
- Scientific models explain some facts, but not others.
- The knowledge that science is not omnipotent is important. Children (and sometimes adults!) put too much faith in power of science to know all and do all. Teaching young children that science (like all human endeavors) has its limits is important, and it helps combat misconceptions later!
- Scientific models are creations of the human mind, and people are always changing them.
- No scientific model is perfect, no model explains everything. Even if we are satisfied with a scientific model today, someone may discover a new fact tomorrow that challenges what we think we know and must be explained. Science is never finished.
- Scientific models are fun! We learn about nature by making – and playing with – scientific models.
- The job of scientist can be one of the most joyful occupations! Spending your days building models, playing with them to see what happens, and then comparing what you have learned from your model to what you see in nature can be very exciting. Many scientists I have known would cheerfully admit that they never really grew up, they just found a job where they could play with the best toys ever! As a former research scientist and science teacher, I must agree, science is fun!
Conducting the Activity
Materials
- Modeling clay – enough for each student to make 6 balls about the size of a large marble (¾-inch each).
- Plastic knife
- Flattener – this can be a water glass, jar lid, any flat and rigid object can be used to flatten balls of clay into neat disks.
- Wax paper
- Construction paper and pencils or markers
Building the Lunar Phase Mode
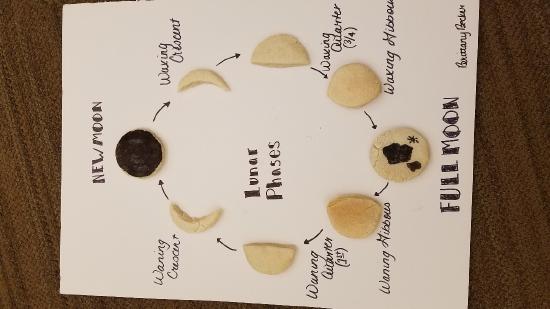
Now it is time to make a lunar phase map. This activity is a simple one, and students will probably not see the significance of it immediately. This is not a flaw, rather consider that student inquiry and discovery are built into these activities from the start. Often, it is helpful to record questions, but not answer them immediately. As science teachers, we do not want to build an expectation that the teacher is the fount of wisdom, but instead create the expectation that looking for, and finding answers is well within the student’s capability!
- Have each student divide their clay and make six balls of roughly equal size. Exact size is not important here, as long as they are roughly the same.
- Place the first ball between two 4-inch squares of wax paper and use the flattener to press it into a disk at least 1/8th inch thick (3-4 mm). This first disk will be the full Moon, peel it carefully from the wax paper and place it at the top of the construction paper as shown below.
- Repeat the process with another ball of clay and make a second disk. Making the disk the exact same size is not critical, but if you are particular, you may wish to use a circular cookie cutter to make all the disks identical.
- We now use the plastic knife to create a gibbous shape by trimming away the clay as shown below. Proceeding counter-clockwise around the diagram, place the waning gibbous shape on the diagram in the next spot to the left of the full moon shape. Create a second identical gibbous shape and fill in the waxing gibbous position on your diagram. When placed correctly, the gibbous shapes should be on the right and left of the full moon shape.
- Note that the cut begins at the north pole and ends at the 6 o’clock position (south pole). This will produce the most accurate phase diagrams!
- For our next step, we will make a new clay disk and cut it in half; this will create both the waning and waxing quarter phases. These are then placed on the diagram as shown.
- Next, we will create our crescent phases. Older children may be able to cut both the waning and waxing shape from one disk, younger children will probably need to do these one at a time. Place them on the diagram as shown.
- Finally, we will color in a dark circle on our diagram to represent the new moon phase. If you’ve used a cookie cutter for making every phase the same size, you can now use it as a stencil to make a dark circle. Otherwise, just trace a circle from a sports-drink bottle top and you’ve got it. Take a marker or pencil and carefully label each phase with its correct name, add some arrows to show the direction in which the diagram runs and our scientifically accurate model of the lunar phases is now complete!
Exploring the Lunar Phase Model
- If you have older students (4th grade & up), you may want to avoid showing them how the phases fit together. Give the students a circle with eight places marked around the circumference, and challenge them to place the phases in order. Be careful, not all the lunar phase models you see on line are correct!
- Once you have your phases in order, a natural question is ‘Where is our Moon now?’ and ‘Which phase is coming next?’ While this is a simple question to answer – go outside tonight and look! The question of what comes next requires patience – it takes several days for one phase to change into another, and an entire month to see the entire cycle of phases.
- Making a calendar. It is easy to find printable calendars online, or to make one with construction paper, a marker, and a ruler. Record the days of the month, and record the changing phases on the appropriate days of the month. Can your students use one month’s calendar to make a prediction about when phases will be visible next month?
- How did making this model help you learn about the Moon and its phases?
- Answer Most students (most people!) see the Moon but do not regularly observe it and pay attention to the changing phases. Increasing awareness of nature is the first step of building STEM thinking!
- How is this model like the Moon?
- Answer It shows the changing phases of the Moon.
- How is this model NOT like the Moon?
- Answer Our model of the Moon is flat – not round!
- Answer There is no motion in our model – the real Moon moves across the sky and orbits the Earth!
Supplemental Materials
Going Deeper
Lunar phases are interesting, but we can look closer! The line that divides light from darkness on the Moon is called the terminator. If you were standing along this line on the Moon, you would see either a sunrise (waxing moon) or a sunset (waning moon.)
Challenge your students to look up photos of the different phases of the Moon online. Look along the terminator and you will see dramatic shadows cast by mountains and craters. Look farther away from the terminator and the Moon appears much more flat, few shadows are to be seen. Can your students explain why this is so?
Hint: Near the terminator, the Sun appears low in the lunar sky. Like sunrise here on Earth, the shadows are long and dramatic. Farther away from the terminator, the Sun is well overhead. Like noon time here on Earth, shadows are shorter and less noticeable. Go outside in the early morning – and again at noon time – your students will easily see the difference!
Being an Astronomer
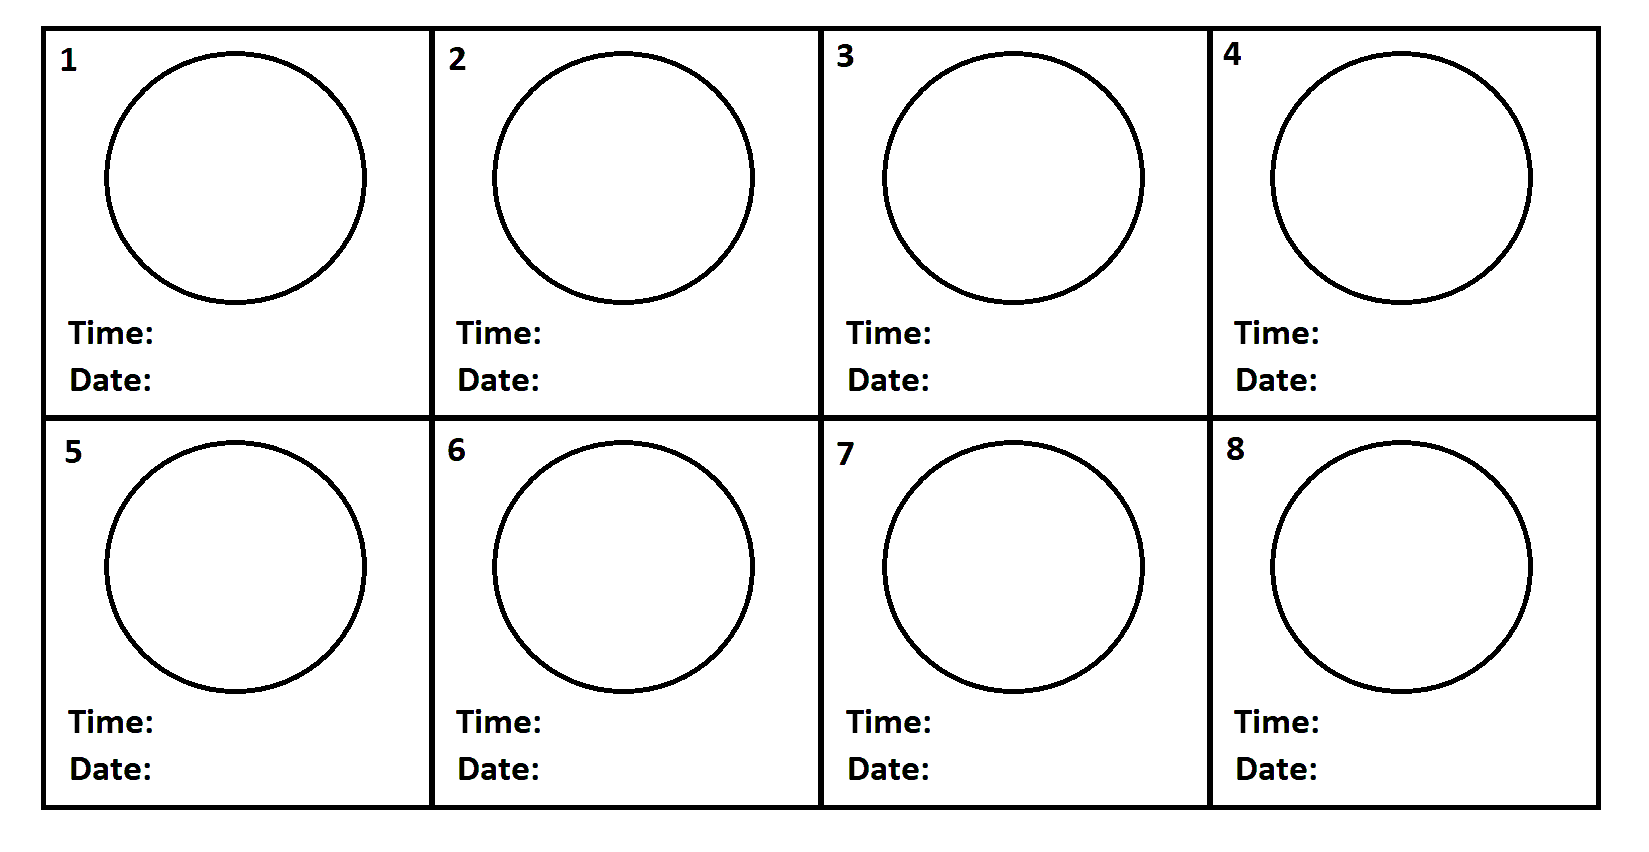
Being an astronomer means first being a careful observer. It works best if you can consult a lunar calendar. Many calendars have little symbols on them indicating full, new, and quarter phases, there are also a variety of free apps for your smartphone that will do the same thing. Plan this initial observation for the time of the first quarter moon phase; the Moon will be easily visible at sunset (students won’t have to stay up late!) and remain in the sky for a few hours making it an easy target for everyone.
Have students trace a circle on a piece of paper and draw a horizontal line below it like the one shown here. Ask them to go out in the back yard with a parent after sunset and sketch the Moon’s appearance inside the circle. Hold the paper up so that the horizontal line matches the horizon before they draw to get the orientation correct if they can. (Some teachers may wish to simplify the activity by eliminating this step for younger children.) Emphasize to the students that all they need to observer is the shape of the lighted portion of the Moon’s surface (just the phase). Understandably, some children may wish to sketch or color in some of the light and dark regions of the lighted portion of the Moon – don’t discourage this, but emphasize that an accurate sketch of the Moon’s shape is the first priority.
If you have older students who have access to smart phones, some of them may wish to try and capture a photograph of the Moon with their phone camera. Don’t discourage them from trying, this is perfectly safe, but far more difficult than it may at first appear. The Moon is a tiny target, smaller than a typical aspirin tablet held at arm’s length! It is also very bright, and on a dark background, making it difficult for most cameras to focus on. Street lights and lights from nearby autos will make it even more difficult, and just holding your hand steady enough to capture this tiny target may well be beyond the skills of most elementary age children. Although it may seem strange, sketching by hand is in this case, much easier than taking a photo!
Once your students have made a single sketch of the Moon at night, ask them to match it to the lunar phase model they have created. Once they have done this, ask them to predict which phase will come next, and how many days this may take to happen.
One of the most powerful things about a scientific model of theory is that it gives us the ability to predict what will happen in nature. This model will give your students the ability to predict the behavior of the Moon, and then the skill set needed to observe and verify their prediction. This is extremely powerful! Your students, even very young children, can learn to function as scientists by observing nature, constructing models, and then making and verifying their predictions.
In spite of the low cost and simple methods used in this activity, the outcomes are sophisticated and powerful. Our students have become scientists. They have the power to predict nature, and the ability to frame and ask even more complex and profound questions. When we, as teachers, highlight and celebrate their achievements in STEM science by doing activities like this, we not only initiate them into the sciences, but armor them against misconceptions later in life.
Being a Scientist
Making a scientific model and exploring it in the classroom is a wonderful activity, but this is only half of what a scientist does. After making a shiny new model and playing with it for a while and thinking up lots of new ideas and questions, it is time to take this baby out for a spin! Let’s compare what the model tells us to what we see in nature! This critical step, which we call an experiment, will tell us if our model is any good or not. A good model is sometimes called a theory, and it will do two important things. First, our model will be able to predict the behavior of nature and help us to know what happens next. Second, our model will point us toward new knowledge by helping us to ask clever questions that lead to further discoveries. Now, it’s time to get started!
Following Up:
Ask your students what is good or powerful about this model we have created? You are likely to get a variety of answers, but sooner or later a student will zero in on the idea that this model allows us to predict the behavior of the Moon as it orbits the Earth and to measure time without a clock or calendar. Point out to them that the ability to predict the lunar phases and keep a calendar was a major accomplishment for ancient societies, and that most modern people can’t do it without help either!
Playing with and exploring the lunar phase model has no doubt inspired many questions among your students. If you have written down and answered some of them, this is the time to go back and draw your student’s attention to the fact that playing with the model inspired both questions and learning! Real scientists value scientific models for just this reason!
Now ask your students what is weak or wrong about this model? Where does it fail? This may be a difficult question for young children; they are not used to considering where or how something fails in a dispassionate way. Failure is synonymous with BAD! Not so for the scientist!
Lead them to consider questions like What? When? Where? Why? How? Our model tells us what will happen next, but it does not tell us why it happens, or how it works. It is true that our model fails to give us all the answers we desire, but this is a fundamental truth about all scientific models. Many students hear the word “science” and they begin to think of a great, all-knowing body of knowledge or an omniscient scientist figure. Nothing could be further from the truth!
Every scientific model explains some things, but not others. A model or theory may answer some questions (What lunar phase comes next?), but will likely fail to answer others (How do lunar phases work?). Students need to learn that science is not infallible! For instance: it is incorrect to say that science has proven something. Scientific models never answer all of our questions – there is always something new to learn or discover, even about the things we’ve known the longest.
The Moon is an excellent example of this; humans have been wondering about, theorizing about and exploring the Moon for millennia, and we are still learning new things today! In fact, men and women working in the sciences all over the world are working to improve and refine even the oldest scientific models as we learn more about them. Point out to your students that by creating and exploring their lunar phase model, they are participating in this process in the classroom today. Many important scientific questions were first asked by children – and then answered as they grew into adults! The best scientific models help us think of new questions to ask, and point us to where the answers may be hidden and waiting to be discovered; science is an adventure that never ends!