
9.1: A Working Model of the Lunar Phases
- Page ID
- 31567

We have looked at lunar phases before; this was one of our first activities, but we found that this model had flaws. While the Moon is round, our old clay model of the phases was completely flat. We also noted that while the old model predicted what was going to happen next with lunar phases, it was noticeably deficient in explaining how the phases worked or why they changed as they did. This helped our students to recognize that all scientific models have flaws and are incomplete in places.
Now it is time to create a new model, one that takes into account both the shape of the Moon, and its motion as it orbits the Earth. Our new model will also take light into account. The lunar phases are obviously a play of sunlight and shadow, so we will include the light from the Sun in our new model as well. It might seem at first glance that adding shape, motion, and the effects of a distant light source into our model would make it far too complex to understand easily – not so! The power of a good scientific model to explain and simplify is often greatly underestimated – as your students will soon show you!
Science and Engineering Practices
- Developing and using models
- Analyzing and interpreting data
- Constructing explanations
- Argument from evidence
Crosscutting Concepts
- Patterns in nature
- Cause and effect
- Systems and system models
- Stability and change
Next Generation Science Standards
- Space systems (K-5, 6-8, 9-12)
- Structure and function (K-5, 6-8, 9-12)
- Waves and electromagnetic radiation (6-8, 9-12)
- The Earth-Moon system (6-8, 9-12)
- Gravitation and orbits (6-8, 9-12)
For the Educator
Facts you need to know
- Planets and moons are all in motion. Okay, this one seems obvious, but the implications of what that means when you are observing the cosmos from a spinning, orbiting platform are not as simple as they may seem.
- Adding motion to our model of the Earth – Moon system will finally answer the “How do phases work?” question that has been nagging us throughout this book.
- It is the very motion of the planets, and the invention of the astronomical telescope by Galileo, which allowed him to prove that the Sun-centered model of Copernicus was in fact correct, and the Earth-centered model of Aristotle and Ptolemy were wrong.
Teaching and Pedagogy
One of the more profound and difficult tasks we face when we start teaching students using physical models is making the transition from a static model to a dynamic one. Consider that many students today learn science from looking at pictures in a text or on a screen. It is rather shocking when one realizes how little activity based science occurs in most schools. We could endlessly ruminate about the causes of this state of affairs, but the point is that students (and many teachers) are completely unfamiliar with dynamic models.
A dynamic model in motion often helps create a wonderful ‘A-ha!’ moment that lifts an idea from the page and makes it part of a child’s everyday reality. Once again, play will be an important part of our teaching. Children may stare vacantly at a photo or a video, but I have yet to meet a child who plays with a toy by simply looking at it.
The student’s urge to pick up a model and play with it should be gratified. As teachers, our job at this point is not to stop the child from ‘playing with the science equipment’, but rather to guide the child to make useful observations and discoveries during play. This is a different model of teaching than I grew up with to be sure, but it has been a powerful and effective pedagogy in my own classroom for many decades!
Student Outcomes
- Students will discover how the phases of the Moon actually work. This is not only a matter of angles and simple geometry, but of perspective and where you stand to view the cosmos.
- Motion is a critical part of any solar system model. Until we incorporate the movement of planets rotating on their axes and revolving in their orbits our models will be incomplete.
- The point of view of the observer is a critical factor. The phases of the Moon that we see are not a universal phenomenon, they are dependent upon our privileged position as we observe from the surface of the Earth. If we view the moons of Mars, Jupiter, or Saturn, we will see no such phases.
What will your students learn about science?
- How did Galileo actually prove Copernicus’ ideas were correct? How does any scientist prove that their ideas are correct and the old ideas are wrong? This is a theme we will continue to develop throughout this book!
- How do the phases of the Moon actually work? What mechanical process creates them and causes them to change as they do? Exploration of the How does that work? question in science is a fundamental one. We generally begin a scientific investigation with Whatis that? and later progress to How does that change over time? But eventually, those nagging Howdoes it do that? questions must be addressed!
- Our new model is very different. It hypothesizes a number of things that we take for granted, but historically were not always clear to thinking men and women. First, our model supposes that the Moon is actually round, a spherical body like the Earth. Second, it says that the Sun is the only source of light, and that it shines on Earth and Moon equally and with identical effect (half the globe is always lighted, half is always in darkness.) Third, this model hypothesizes that it is the motion of the Moon around the Earth (and the changing angles between Sun, Earth, and Moon) which causes the changes in the lunar phases that we see.
- The final thing we learn about science in this activity is most important. By making these new hypotheses about the shape and motion of the Moon affecting lunar phases, we have in fact developed an entirely new scientific model. Our tests show us something new, how the phases of the Moon actually work and how the Moon’s shape and orbital motion create them. But our model does something more – it reconfirms what we already knew. When your students drew the lunar phases on paper as they moved their model Moon around in orbit, they confirmed the lunar phase model that we began with, and reconfirmed the evidence of their own eyes when they looked up in the sky and observed the lunar phases change from night to night.
- Our new model both taught us something new and reconfirmed what we had already discovered. This is the grand sweep and majesty of a scientific theory. A scientific theory explains everything we already know about a subject. Our theory answers old nagging questions, sometimes questions that have puzzled thinking men and women for centuries! Our theory also points us on the way to new knowledge and helps us frame new questions that we didn’t even know how to ask before.
- A scientific theory, such as the one we just explored about the shape and motion of the Moon causing the familiar lunar phases, is often a work of genius and the product of a lifetime of diligent work and struggle. We remember the men and women of discipline and genius who developed these theories and often name these theories after their discoverers. When Newton said: “If I see farther than other men, it is because I stand upon the shoulders of giants!”, he was referring to those people of science who had come before him and made his work possible.
- At this point in my class, I often ask students if they have ever heard someone say: “You don’t know that for a fact, it’s just a theory!” Many of them have, and after this activity it is easy for them to see how unscientific this statement actually is. Our goal as STEM educators is to help students understand the difference between facts, hypotheses, and comprehensive scientific theories.
Conducting the Activity
Materials
- Three white ping-pong balls per student group
 Six poker chips per group (you can substitute sports-drink caps if you like)
- One set of 6-10 powerful magnets (for the teacher’s model)
- One tube silicone glue
- One tube super glue (optional)
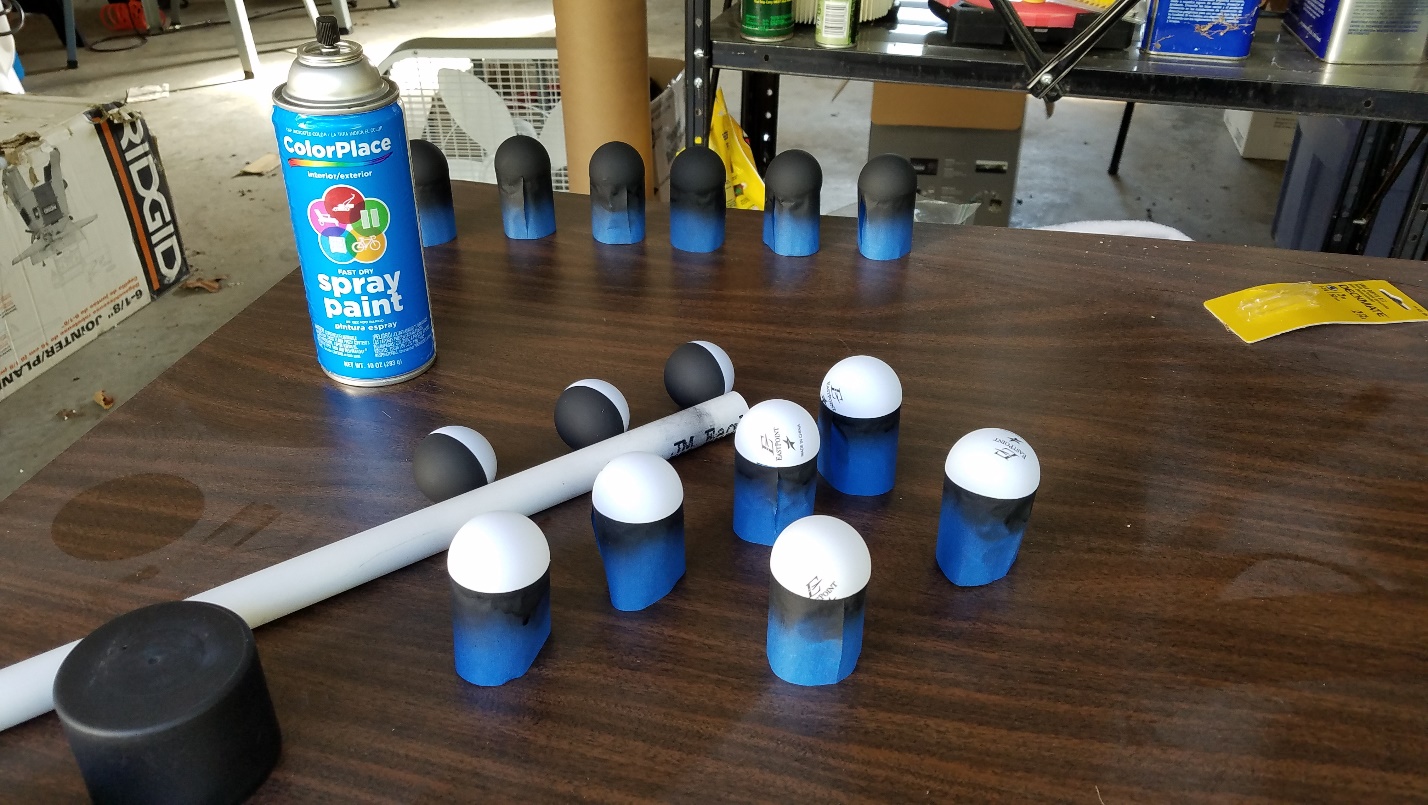
- One can flat black spray paint
- One can gloss yellow spray paint
- Roll of 2” wide masking tape
- Wooden or plastic ruler (actually, almost any sturdy stick will do)
Building the Lunar Phases Model
- You can reuse your Sun model from Activity #20 again here.
- [Teacher] Your two remaining ping-pong balls must be colored half-black, and half left unpainted white; the black side will represent night, the white side will be the daytime side of the moon or planet. If you wish to save time, you can reuse the Venus model from Activity #20 as your Moon model here. As we explained in Activity #20, there are two fundamental ways to paint ping-pong balls half-black: one at a time (very neat and precise), or in batches of a dozen or so at a time (less precise, but saves a great deal of time.) See Activity #20 for more details.
- Now it is time to decorate the Earth and Moon using markers. There are two approaches to this, the accurate and the creative – you must decide which will work best for your stud
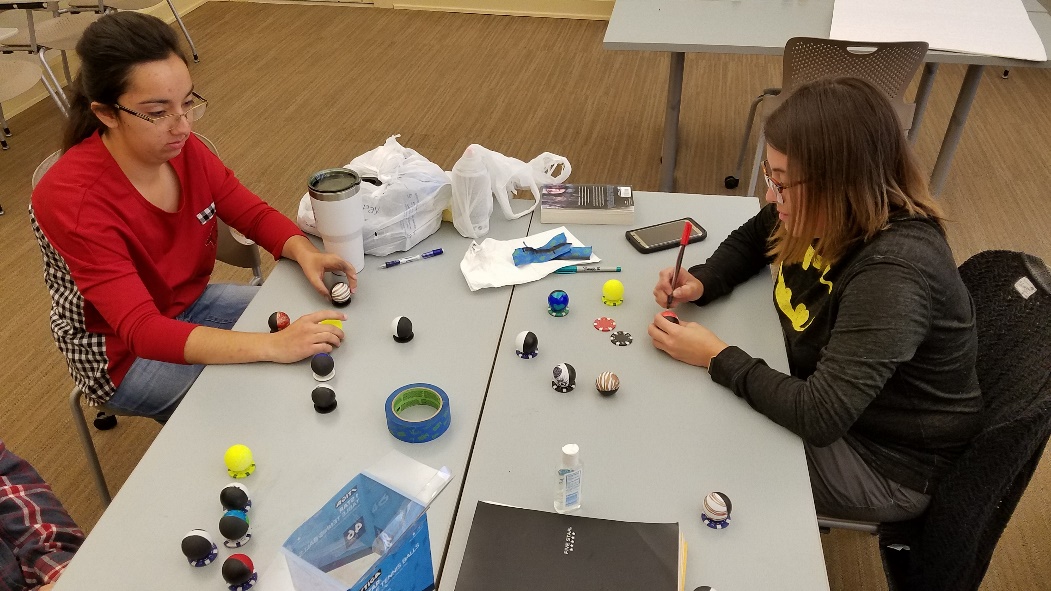 ents! For an accurate model, use photos or maps of the Earth and Moon and draw in continents, oceans, mountain ridges, green prairies, islands, etc. You can even use a bit of white paint (or correction fluid!) to add storms and clouds to your model of Earth. The Moon will have no color, make it all grey and white (paler shades will work best). Draw in the maria and prominent craters and make the model as accurate as you can! For a creative model, have students draw continents, islands, oceans any way they wish. You can even have them name their planet creations. A creative moon may have maria, mountains, craters, etc. Some moons even have oceans, although they are not always filled with water! For the purposes of our model, it will not matter which approach you take. Alien worlds with unexplored moons still have phases the same way, and for the same reasons, that we have them here on Earth with our Moon! When you are done decorating, glue the planets and moons to their bases with silicone glue. After they are dry (24 hours!), a quick coat of clear art sealer will not go amiss (old-fashioned lacquer hair spray works well for this if you can find it!) – it often helps keep marker from coming off again on little hands!
 - Your model is now ready to play with and explore!
Exploring the Lunar Phases Model
Now that students have made their models, it is time to have some fun with them. In spite of the desktop scale of this model, working with it is an active experience for students, and one that will help them appreciate our perspective of standing on the Earth and looking out into space in a new way. This is one of my favorite activities, the delight that it brings to young and old alike is refreshing and contagious!
If you have made a set of ping-pong planet models for yourself, go ahead and attach magnets to the bottom of the bases with some superglue or silicone glue. Don’t use cheap rubbery refrigerator magnets, they won’t do. Models made with these weak magnets slide right down the slick whiteboard surface; this is frustrating for the teacher and often seems quite funny to the student. A magnetized set of models on the class white board can help students to position their models and understand what they are to do; a visual model to follow can be especially important for ESL or special needs students in your classroom.
Since this model only works when you look at it from the right perspective, you must take care that the students understand how to look at the model. When using magnetized models, I often use a large colorful arrow on the white board (also held on with magnets) to show students exactly how (and from what direction) to look at the model.
- Begin by having students place the Sun, Earth, and Moon on a piece of large construction paper on the table in front of them as shown here. Be sure the ‘lighted’ sides of the Earth and Moon face the Sun (obviously!) and the dark, unlighted side faces away. I usually ask a sort of trick question at this point; “What do we call the lighted side of the Earth that faces the Sun?” The answer, of course, is “Day”, which elicits both groans and laughter. It does serve the remind students that there is both a cosmic and pedestrian perspective to this model!
- Now have students move the Moon around in orbit, reminding them to keep the lighted side of the Moon always facing the distant Sun. Where are the lunar phases? The answer to this relies on where your eye is relative to the model! From the perspective of the model Earth and Moon, your eye high above the desktop (your viewing position) is millions of miles out in space above the North Pole. Although no human has ever been this far out in space, if youwere there, you would not see the Moon cycle through lunar phases either! Students at this point may be a little frustrated, but fear not, all will be revealed in the next step! Depending on the age and sophistication of your students, this may be a good time to remind them of the scale of things from the 1000-yard solar system (activity #18). Our model is ‘lying’ about the distance between Earth and Sun, as well as the relative size of Earth and Moon, but these little inaccuracies will not affect the experiments we are about to do, or the truth of what we are learning about.
- Now ask the students “Where do we see the Moon from?” Okay, another tricky question, but we see the Moon from the surface of the Earth! Have the students put their eye down near the Earth model and look over the Earth toward the Moon – now ask them what they see! Remember that colorful arrow on the whiteboard? This is where it comes into play! (This arrow is especially helpful with younger students.) Your students will see a full moon phase! Have them draw a full moon phase (an empty circle) at this position where the Moon is sitting on the paper and label it. You may wish them to trace out a circle with a coin or a sports drink cap to keep things neat.
- Advance the position of the Moon anti-clockwise in orbit by 45 degrees as shown below, remembering to keep the lighted side of the Moon facing the Sun. Have the students put their eye near the Earth and once again look over the Earth toward the Moon. If they have kept everything lined up correctly, they will now see a gibbous moon phase. Once again have them draw a circle near the Moon’s position and shade in and label the phase as they see it.
- Very likely, the students will be way ahead of you now and able to continue advancing the Moon 45 degrees each time, then looking past the Earth and drawing the phase as they see it. In no time at all, your students will have recreated the familiar map of the lunar phases which we began this book with in activity #1. This is not repetitive, instead it has great pedagogic value as we will soon see!
Discussion Questions
- How is this new model different from our clay-circle lunar phase model?
- Answer: The Earth and Sun are shown in this model.
- Answer The Earth, Moon, and Sun are shown as round in this model
- Answer The Moon moves in this model.
- What does the Sun do in our model? Why did we include it here?
- Answer The Sun model reminds us where the light comes from and shows us the directly from which it shines.
- What do you think causes the phases of the Moon to change as they do?
- Answer The motion of the Moon in orbit around the Earth.
- Answer The changing angle between Sun, Earth, and Moon.
- How is this model different or better than our previous model of lunar phases?
- Answer This model shows how the phases work – not just what happens next.
- Answer This model includes Earth, Moon, and Sun working together to create the lunar phases – the old model just showed the Moon.
- Answer This model includes motion and time – it is not a static model like a picture or drawing.
- Draw a picture and use it to explain to your seatmate how the lunar phases work!
Supplemental Materials
Going Deeper
You can tell students “The angle between the Sun, Earth, and Moon creates the lunar phases!” all you wish, and have them study diagrams in textbooks or on posters, but nothing I’ve ever done in a classroom has been as powerful as this simple activity for helping students understand that it is the motion of the Moon around the Earth and the geometry of the lunar orbit combined with our unique perspective here on Earth the creates lunar phases.
If you really want a victory for STEM science in your classroom, have your administrator come to your room after this activity is over and ask your students to teach the Principal how the lunar phases work. Your students will be delighted to show off their knowledge and expertise to your boss, and the model is so impressive that young and old find delight in it.
Everyone seems to learn something new the first time they try it for themselves. If you have a back to school night or parent’s night at your school, this is an easy and powerful was to demonstrate exciting and active learning in your classroom. This activity never fails to impress; in fact, when I came to interview for my current position as Professor of STEM Education at my university, this is the lesson that I chose to present to my boss and future colleagues!
Being an Astronomer
If you have a telescope or an active relationship with the local astronomy club, it is an excellent time for another peek through the eyepiece. If you don’t have access to a small telescope, try looking at high resolution photos of the Moon online.
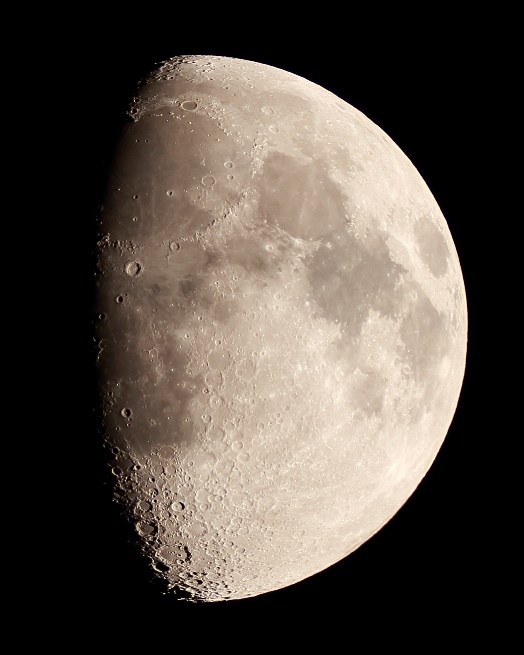
If you are lucky enough to be able to see the Moon in the first quarter phase, look along the terminator, the dividing line between light and darkness; this is the place where sunrise is happening on the lunar surface and shadows are the longest and most dramatic. Look at the shadows that lie inside craters near the terminator, then gradually sweep your view into the more lighted portion of the lunar surface.
If you look carefully, you will see that as you sweep away from the terminator and into the light, the shadows inside the craters become smaller – this is because the Sun is higher in the sky in these locations! You are actually seeing how shadows change when the angle of the Sun in the sky changes, and this is exactly how the lunar phases work! The changing angle of the Sun shining on the Moon as seen from our perspective on Earth causes the changing patterns of light and shadow which we call the phases of the Moon.
Being a Scientist
 If we examine our lunar phase model carefully or take photos of it with a cell phone, you will notice that the terminator, the line that separates light from darkness on the Moon’s surface, always stretches from one lunar pole to the other.
The reason for this is simple, looking down on the Moon from high above the lunar equator, we astronomers on Earth can see both poles at once. When asking students to draw phases of the Moon outdoors in my astronomy classes, I noticed something curious, very few students drew the terminator shadow stretching from one pole to another.
Can you verify this curious fact in your own observations of the Moon? It is not difficult, all you need to is take time to look at the Moon with your naked eye, or through binoculars if you have them. See if you can extreme ends of the terminator lie 180 degrees apart on opposite sides of the Moon as the model suggests they must do!
Following Up
Lunar eclipses are much more common than solar eclipses, and usually far easier to see! If you and your students have the opportunity to observe a lunar eclipse, you will get to see an entirely different type of shadow move across the Moon’s surface.
Lunar phases occur because we can see both the illuminated (day) side of the Moon and the dark side (night) at the same time. During the normal phases – there is no shadow on the Moon – we simply get to see both day and night at the same time.
Eclipses are different – here the Moon is moving into the shadow of the Earth and there is no connection to the day and night sides of the Moon itself. As a result, the Earth’s shadow does not stretch from pole to pole as the lunar terminator does. This proves that an eclipse is a completely different phenomenon than the Moon’s normal phases.
Can you make careful sketches or take photos of the Moon during a lunar eclipse that prove this hypothesis?