
02. Drawing Free-Body Diagrams
- Page ID
- 626

\( \newcommand{\vecs}[1]{\overset { \scriptstyle \rightharpoonup} {\mathbf{#1}} } \)
\( \newcommand{\vecd}[1]{\overset{-\!-\!\rightharpoonup}{\vphantom{a}\smash {#1}}} \)
\( \newcommand{\dsum}{\displaystyle\sum\limits} \)
\( \newcommand{\dint}{\displaystyle\int\limits} \)
\( \newcommand{\dlim}{\displaystyle\lim\limits} \)
\( \newcommand{\id}{\mathrm{id}}\) \( \newcommand{\Span}{\mathrm{span}}\)
( \newcommand{\kernel}{\mathrm{null}\,}\) \( \newcommand{\range}{\mathrm{range}\,}\)
\( \newcommand{\RealPart}{\mathrm{Re}}\) \( \newcommand{\ImaginaryPart}{\mathrm{Im}}\)
\( \newcommand{\Argument}{\mathrm{Arg}}\) \( \newcommand{\norm}[1]{\| #1 \|}\)
\( \newcommand{\inner}[2]{\langle #1, #2 \rangle}\)
\( \newcommand{\Span}{\mathrm{span}}\)
\( \newcommand{\id}{\mathrm{id}}\)
\( \newcommand{\Span}{\mathrm{span}}\)
\( \newcommand{\kernel}{\mathrm{null}\,}\)
\( \newcommand{\range}{\mathrm{range}\,}\)
\( \newcommand{\RealPart}{\mathrm{Re}}\)
\( \newcommand{\ImaginaryPart}{\mathrm{Im}}\)
\( \newcommand{\Argument}{\mathrm{Arg}}\)
\( \newcommand{\norm}[1]{\| #1 \|}\)
\( \newcommand{\inner}[2]{\langle #1, #2 \rangle}\)
\( \newcommand{\Span}{\mathrm{span}}\) \( \newcommand{\AA}{\unicode[.8,0]{x212B}}\)
\( \newcommand{\vectorA}[1]{\vec{#1}} % arrow\)
\( \newcommand{\vectorAt}[1]{\vec{\text{#1}}} % arrow\)
\( \newcommand{\vectorB}[1]{\overset { \scriptstyle \rightharpoonup} {\mathbf{#1}} } \)
\( \newcommand{\vectorC}[1]{\textbf{#1}} \)
\( \newcommand{\vectorD}[1]{\overrightarrow{#1}} \)
\( \newcommand{\vectorDt}[1]{\overrightarrow{\text{#1}}} \)
\( \newcommand{\vectE}[1]{\overset{-\!-\!\rightharpoonup}{\vphantom{a}\smash{\mathbf {#1}}}} \)
\( \newcommand{\vecs}[1]{\overset { \scriptstyle \rightharpoonup} {\mathbf{#1}} } \)
\(\newcommand{\longvect}{\overrightarrow}\)
\( \newcommand{\vecd}[1]{\overset{-\!-\!\rightharpoonup}{\vphantom{a}\smash {#1}}} \)
\(\newcommand{\avec}{\mathbf a}\) \(\newcommand{\bvec}{\mathbf b}\) \(\newcommand{\cvec}{\mathbf c}\) \(\newcommand{\dvec}{\mathbf d}\) \(\newcommand{\dtil}{\widetilde{\mathbf d}}\) \(\newcommand{\evec}{\mathbf e}\) \(\newcommand{\fvec}{\mathbf f}\) \(\newcommand{\nvec}{\mathbf n}\) \(\newcommand{\pvec}{\mathbf p}\) \(\newcommand{\qvec}{\mathbf q}\) \(\newcommand{\svec}{\mathbf s}\) \(\newcommand{\tvec}{\mathbf t}\) \(\newcommand{\uvec}{\mathbf u}\) \(\newcommand{\vvec}{\mathbf v}\) \(\newcommand{\wvec}{\mathbf w}\) \(\newcommand{\xvec}{\mathbf x}\) \(\newcommand{\yvec}{\mathbf y}\) \(\newcommand{\zvec}{\mathbf z}\) \(\newcommand{\rvec}{\mathbf r}\) \(\newcommand{\mvec}{\mathbf m}\) \(\newcommand{\zerovec}{\mathbf 0}\) \(\newcommand{\onevec}{\mathbf 1}\) \(\newcommand{\real}{\mathbb R}\) \(\newcommand{\twovec}[2]{\left[\begin{array}{r}#1 \\ #2 \end{array}\right]}\) \(\newcommand{\ctwovec}[2]{\left[\begin{array}{c}#1 \\ #2 \end{array}\right]}\) \(\newcommand{\threevec}[3]{\left[\begin{array}{r}#1 \\ #2 \\ #3 \end{array}\right]}\) \(\newcommand{\cthreevec}[3]{\left[\begin{array}{c}#1 \\ #2 \\ #3 \end{array}\right]}\) \(\newcommand{\fourvec}[4]{\left[\begin{array}{r}#1 \\ #2 \\ #3 \\ #4 \end{array}\right]}\) \(\newcommand{\cfourvec}[4]{\left[\begin{array}{c}#1 \\ #2 \\ #3 \\ #4 \end{array}\right]}\) \(\newcommand{\fivevec}[5]{\left[\begin{array}{r}#1 \\ #2 \\ #3 \\ #4 \\ #5 \\ \end{array}\right]}\) \(\newcommand{\cfivevec}[5]{\left[\begin{array}{c}#1 \\ #2 \\ #3 \\ #4 \\ #5 \\ \end{array}\right]}\) \(\newcommand{\mattwo}[4]{\left[\begin{array}{rr}#1 \amp #2 \\ #3 \amp #4 \\ \end{array}\right]}\) \(\newcommand{\laspan}[1]{\text{Span}\{#1\}}\) \(\newcommand{\bcal}{\cal B}\) \(\newcommand{\ccal}{\cal C}\) \(\newcommand{\scal}{\cal S}\) \(\newcommand{\wcal}{\cal W}\) \(\newcommand{\ecal}{\cal E}\) \(\newcommand{\coords}[2]{\left\{#1\right\}_{#2}}\) \(\newcommand{\gray}[1]{\color{gray}{#1}}\) \(\newcommand{\lgray}[1]{\color{lightgray}{#1}}\) \(\newcommand{\rank}{\operatorname{rank}}\) \(\newcommand{\row}{\text{Row}}\) \(\newcommand{\col}{\text{Col}}\) \(\renewcommand{\row}{\text{Row}}\) \(\newcommand{\nul}{\text{Nul}}\) \(\newcommand{\var}{\text{Var}}\) \(\newcommand{\corr}{\text{corr}}\) \(\newcommand{\len}[1]{\left|#1\right|}\) \(\newcommand{\bbar}{\overline{\bvec}}\) \(\newcommand{\bhat}{\widehat{\bvec}}\) \(\newcommand{\bperp}{\bvec^\perp}\) \(\newcommand{\xhat}{\widehat{\xvec}}\) \(\newcommand{\vhat}{\widehat{\vvec}}\) \(\newcommand{\uhat}{\widehat{\uvec}}\) \(\newcommand{\what}{\widehat{\wvec}}\) \(\newcommand{\Sighat}{\widehat{\Sigma}}\) \(\newcommand{\lt}{<}\) \(\newcommand{\gt}{>}\) \(\newcommand{\amp}{&}\) \(\definecolor{fillinmathshade}{gray}{0.9}\)The free-body diagram is by far the most important analysis tool for determining the interactions between an object and its surroundings. There are three distinct steps to creating a free-body diagram. Let’s walk through the steps for the situation described below:
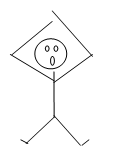
A child pulls herself up a rope using only her hands.
1. Select the object you would like to study
In this example, it is probably safe to assume that the object we would like to study is the child. However, depending on what we are investigating it may be the rope or even the ceiling we are interested in. Selecting the correct object to represent by a free-body diagram is a crucial step, especially in more complicated situations. With practice you will develop a knack for selecting the correct object to represent.
2. Draw a picture of the object of interest free from all other objects.
Notice that the rope does not appear in the diagram. As the name free-body implies, the object is drawn free of all external constraints.
3. Indicate on the diagram all interactions of the object with its environment.
Now comes the most difficult part of constructing a free-body diagram. It is crucial not to miss an interaction. If an interaction is overlooked, than the total of the forces will be incorrect, and the acceleration will be incorrect, and your entire analysis will be incorrect.
Also, only the portion of the interaction that acts on the girl should be indicated on a free-body diagram of the girl. For example, she is interacting with the rope. The rope’s action on the girl will be indicated, not the action of the girl on the rope.
To aid in the search for interactions, we will divide the types of interactions that the girl can be part of into two types, non-contact and contact.
Non-Contact Interactions
Non-contact interactions include all interactions that can occur between the girl and objects in her surroundings that do not require direct physical contact between the two objects. Non-contact interactions include the interaction of the girl with the gravitational and electromagnetic fields in her vicinity. (How these fields are created and how they can effect the girl will slowly be incorporated into our physics model.)
At the current level of complexity, however, the only non-contact interaction you need worry about is the interaction of the girl with the gravitational field created by the earth, which we will simply term the force of gravity. The direction of this force is down, toward the center of the earth.
Contact Interactions
Contact interactions occur at every point on the girls’ body in which she is in direct physical contact with an external object. The most obvious of these is the rope. The girl is in contact with the rope, so the rope and girl exert forces on each other. These forces are equal in magnitude. Remember, however, that it is only the force exerted on the girl that is indicated on a free-body diagram of the girl. The location of this force is at the girls’ hands, and the direction of this force is up. (The direction of this force cannot be down, because that would imply that the rope is pushing the girl, as opposed to pulling her. It is impossible for a rope to push someone, unless it is a very stiff rope. Very stiff ropes will be called rods.)
The only other objects to actually make contact with the girl are air molecules. The air molecules interact with the girl on all sides, each exerting a small force directly inward, perpendicular to the girl’s body. Although each of these forces is very small, their sum is not always small. For example, if the girl were falling freely from an airplane the vast numbers of air molecules colliding with the girl from underneath, versus the rather small number colliding from above, and the strength of these collisions, would add to a very large force acting upward on the girl. This force could easily be equal in magnitude to the force of gravity on the girl. The force of air molecules on an object, referred to as air resistance, is often ignored in analyzing scenarios simply because of the difficulty of dealing with the complexity.
However, in many cases the effects of the air molecules are negligible compared to the other forces acting on the object. This is the case with the girl climbing the rope. The forces exerted by the air molecules are probably very close to being uniformly distributed around the girl’s surface. Thus, for every air molecule pushing her to the right, there is probably an air molecule pushing her to the left. These forces will add to a total force very close to zero.
A correct free-body diagram for the girl is shown below:
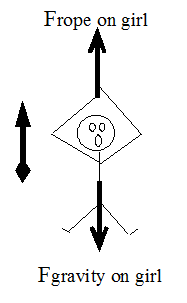
Since a coordinate system is crucial for translating motion diagrams and free-body diagrams into mathematical relationships, a coordinate system has been added to the free-body diagram. It is always a good idea to use the same coordinate system for both the free-body diagram and the motion diagram.