
5.2: Same Events; Different Free-float Frames
- Page ID
- 57729

\( \newcommand{\vecs}[1]{\overset { \scriptstyle \rightharpoonup} {\mathbf{#1}} } \)
\( \newcommand{\vecd}[1]{\overset{-\!-\!\rightharpoonup}{\vphantom{a}\smash {#1}}} \)
\( \newcommand{\dsum}{\displaystyle\sum\limits} \)
\( \newcommand{\dint}{\displaystyle\int\limits} \)
\( \newcommand{\dlim}{\displaystyle\lim\limits} \)
\( \newcommand{\id}{\mathrm{id}}\) \( \newcommand{\Span}{\mathrm{span}}\)
( \newcommand{\kernel}{\mathrm{null}\,}\) \( \newcommand{\range}{\mathrm{range}\,}\)
\( \newcommand{\RealPart}{\mathrm{Re}}\) \( \newcommand{\ImaginaryPart}{\mathrm{Im}}\)
\( \newcommand{\Argument}{\mathrm{Arg}}\) \( \newcommand{\norm}[1]{\| #1 \|}\)
\( \newcommand{\inner}[2]{\langle #1, #2 \rangle}\)
\( \newcommand{\Span}{\mathrm{span}}\)
\( \newcommand{\id}{\mathrm{id}}\)
\( \newcommand{\Span}{\mathrm{span}}\)
\( \newcommand{\kernel}{\mathrm{null}\,}\)
\( \newcommand{\range}{\mathrm{range}\,}\)
\( \newcommand{\RealPart}{\mathrm{Re}}\)
\( \newcommand{\ImaginaryPart}{\mathrm{Im}}\)
\( \newcommand{\Argument}{\mathrm{Arg}}\)
\( \newcommand{\norm}[1]{\| #1 \|}\)
\( \newcommand{\inner}[2]{\langle #1, #2 \rangle}\)
\( \newcommand{\Span}{\mathrm{span}}\) \( \newcommand{\AA}{\unicode[.8,0]{x212B}}\)
\( \newcommand{\vectorA}[1]{\vec{#1}} % arrow\)
\( \newcommand{\vectorAt}[1]{\vec{\text{#1}}} % arrow\)
\( \newcommand{\vectorB}[1]{\overset { \scriptstyle \rightharpoonup} {\mathbf{#1}} } \)
\( \newcommand{\vectorC}[1]{\textbf{#1}} \)
\( \newcommand{\vectorD}[1]{\overrightarrow{#1}} \)
\( \newcommand{\vectorDt}[1]{\overrightarrow{\text{#1}}} \)
\( \newcommand{\vectE}[1]{\overset{-\!-\!\rightharpoonup}{\vphantom{a}\smash{\mathbf {#1}}}} \)
\( \newcommand{\vecs}[1]{\overset { \scriptstyle \rightharpoonup} {\mathbf{#1}} } \)
\(\newcommand{\longvect}{\overrightarrow}\)
\( \newcommand{\vecd}[1]{\overset{-\!-\!\rightharpoonup}{\vphantom{a}\smash {#1}}} \)
\(\newcommand{\avec}{\mathbf a}\) \(\newcommand{\bvec}{\mathbf b}\) \(\newcommand{\cvec}{\mathbf c}\) \(\newcommand{\dvec}{\mathbf d}\) \(\newcommand{\dtil}{\widetilde{\mathbf d}}\) \(\newcommand{\evec}{\mathbf e}\) \(\newcommand{\fvec}{\mathbf f}\) \(\newcommand{\nvec}{\mathbf n}\) \(\newcommand{\pvec}{\mathbf p}\) \(\newcommand{\qvec}{\mathbf q}\) \(\newcommand{\svec}{\mathbf s}\) \(\newcommand{\tvec}{\mathbf t}\) \(\newcommand{\uvec}{\mathbf u}\) \(\newcommand{\vvec}{\mathbf v}\) \(\newcommand{\wvec}{\mathbf w}\) \(\newcommand{\xvec}{\mathbf x}\) \(\newcommand{\yvec}{\mathbf y}\) \(\newcommand{\zvec}{\mathbf z}\) \(\newcommand{\rvec}{\mathbf r}\) \(\newcommand{\mvec}{\mathbf m}\) \(\newcommand{\zerovec}{\mathbf 0}\) \(\newcommand{\onevec}{\mathbf 1}\) \(\newcommand{\real}{\mathbb R}\) \(\newcommand{\twovec}[2]{\left[\begin{array}{r}#1 \\ #2 \end{array}\right]}\) \(\newcommand{\ctwovec}[2]{\left[\begin{array}{c}#1 \\ #2 \end{array}\right]}\) \(\newcommand{\threevec}[3]{\left[\begin{array}{r}#1 \\ #2 \\ #3 \end{array}\right]}\) \(\newcommand{\cthreevec}[3]{\left[\begin{array}{c}#1 \\ #2 \\ #3 \end{array}\right]}\) \(\newcommand{\fourvec}[4]{\left[\begin{array}{r}#1 \\ #2 \\ #3 \\ #4 \end{array}\right]}\) \(\newcommand{\cfourvec}[4]{\left[\begin{array}{c}#1 \\ #2 \\ #3 \\ #4 \end{array}\right]}\) \(\newcommand{\fivevec}[5]{\left[\begin{array}{r}#1 \\ #2 \\ #3 \\ #4 \\ #5 \\ \end{array}\right]}\) \(\newcommand{\cfivevec}[5]{\left[\begin{array}{c}#1 \\ #2 \\ #3 \\ #4 \\ #5 \\ \end{array}\right]}\) \(\newcommand{\mattwo}[4]{\left[\begin{array}{rr}#1 \amp #2 \\ #3 \amp #4 \\ \end{array}\right]}\) \(\newcommand{\laspan}[1]{\text{Span}\{#1\}}\) \(\newcommand{\bcal}{\cal B}\) \(\newcommand{\ccal}{\cal C}\) \(\newcommand{\scal}{\cal S}\) \(\newcommand{\wcal}{\cal W}\) \(\newcommand{\ecal}{\cal E}\) \(\newcommand{\coords}[2]{\left\{#1\right\}_{#2}}\) \(\newcommand{\gray}[1]{\color{gray}{#1}}\) \(\newcommand{\lgray}[1]{\color{lightgray}{#1}}\) \(\newcommand{\rank}{\operatorname{rank}}\) \(\newcommand{\row}{\text{Row}}\) \(\newcommand{\col}{\text{Col}}\) \(\renewcommand{\row}{\text{Row}}\) \(\newcommand{\nul}{\text{Nul}}\) \(\newcommand{\var}{\text{Var}}\) \(\newcommand{\corr}{\text{corr}}\) \(\newcommand{\len}[1]{\left|#1\right|}\) \(\newcommand{\bbar}{\overline{\bvec}}\) \(\newcommand{\bhat}{\widehat{\bvec}}\) \(\newcommand{\bperp}{\bvec^\perp}\) \(\newcommand{\xhat}{\widehat{\xvec}}\) \(\newcommand{\vhat}{\widehat{\vvec}}\) \(\newcommand{\uhat}{\widehat{\uvec}}\) \(\newcommand{\what}{\widehat{\wvec}}\) \(\newcommand{\Sighat}{\widehat{\Sigma}}\) \(\newcommand{\lt}{<}\) \(\newcommand{\gt}{>}\) \(\newcommand{\amp}{&}\) \(\definecolor{fillinmathshade}{gray}{0.9}\)different frames: different points for an event on their spacetime maps, but same spacetime interval between the events
Figure 5.1.1 demonstrates two great payoffs of the spacetime map: (1) It places space and time on an equal footing, thus recognizing a basic symmetry of nature. (2) It allows us to review at a single glance the whole history of events and motions that have occurred along the given line in space.
Same events, difFerent frames: Different spacetime maps
We want to take advantage of a third payoff of the spacetime map: Plot the same events on two, three, or more spacetime maps based on two, three, or more different free-float frames in uniform relative motion. Compare. In this way analyze the various space and time relations among these events as measured in different frames. Why do this? In order to find out what is different in the different frames and what remains the same.1
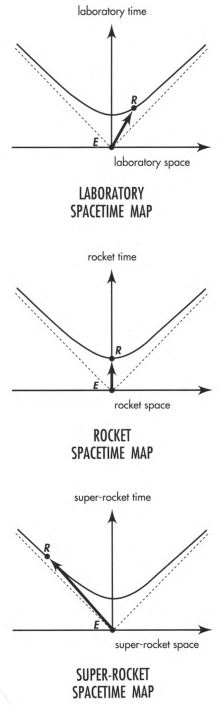
Figure \(\PageIndex{2}\) shows three spacetime maps - for laboratory, rocket, and super-rocket free-float frames. The super-rocket moves faster than the rocket with respect to the laboratory (but not faster than light!). On each of the three spacetime maps we plot the same two events: the events of emission \(E\) and reception \(R\) of a light flash. These are the two events analyzed in Chapter 3 to derive the expression for the spacetime interval. As a reminder of the physical phenomena behind events \(E\) and \(R\), refer to Figure \(\PageIndex{1}\).
The light flash is emitted (event \(E\) ) from a sparkplug attached to the reference clock of the first rocket. Take event \(E\) as the reference event, called event \(O\) in Figure 5.1.1. By prearrangement the sparkplug fires at the instant when both the rocket reference clock and the super-rocket reference clock pass the laboratory reference clock. All three reference clocks are set to read zero at this reference event, whose event point is placed at the origin of all three spacetime maps.
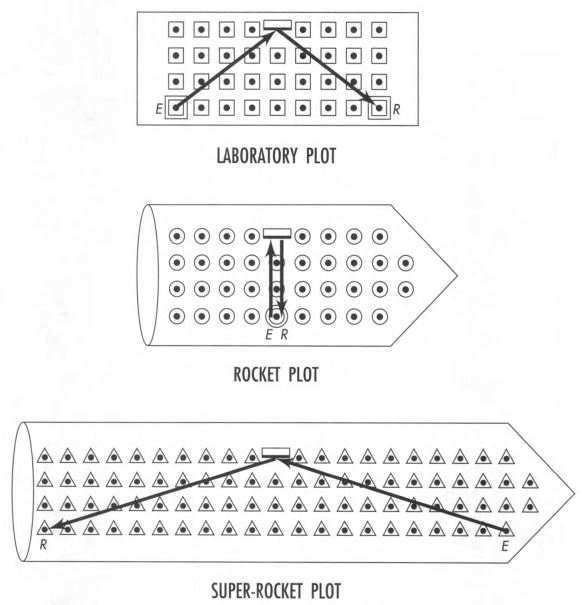
Now use the latticework of meter sticks and clocks in each free-float frame (clocks pictured in Figure \(\PageIndex{1}\) ) to measure the position and time of every other event with respect to the reference event. In particular, record the position and time of the reception (event \(R\) ) of the flash in each of the three frames.
The reception of the light ray (event \(R\) ) occurs at different locations and at different times as measured in the three frames. In the rocket the reception of the reflected flash occurs back at the reference clock (the zero of position) and 6 meters of time later, as seen in Figure \(\PageIndex{1}\) and more directly in Figure \(\PageIndex{2}\) (center):2
Same events, different frames: Different space and time coordinates
Rocket: (position of reception, event \(R\) ) = 0
Rocket: (time of reception, event \(R\) ) = 6 meters
Emission and reception occur at the same place in the rocket frame. Therefore the rocket time, 6 meters, is just equal to the interval, or proper time, between these two events:
\[\begin{align*} & \hspace{1em}\textbf { Rocket } \hspace{3.5em} \textbf { Rocket } &\\(\text { proper time })^{2}=&\left(\begin{array}{c} \text { time of } \\ \text { reception } \end{array}\right)^{2}-\left(\begin{array}{c} \text { position of } \\ \text { reception } \end{array}\right)^{2} \\[6pt] & \hspace{1em}\textbf { Rocket } \hspace{2.3em} \textbf { Rocket } &\\=&\left(\begin{array}{c} \text { time of } \\ \text { reception } \end{array}\right)^{2}-(\text{zero})^{2} = (\text{6 meters})^{2} \end{align*}\]
In the laboratory the reception event \(R\) occurs at a time greater than 6 meters, as can be seen from the expression for interval:
\[\begin{align*} &\textbf { Laboratory } \hspace{2em} \textbf { Laboratory } \\ &\left(\begin{array}{c} \text { time of } \\ \text { reception } \end{array}\right)^{2}-\left(\begin{array}{c} \text { position of } \\ \text { reception } \end{array}\right)^{2}=(6 \text { meters })^{2} \end{align*}\]
In this equation the square of 6 meters results from subtracting a positive quantity from the square of the laboratory time of reception. Therefore the laboratory time of reception itself must be greater than 6 meters:
Laboratory: (position of reception, event \(R\) ) = 8 meters
Laboratory: (time of reception, event \(R\) ) =10 meters
In the laboratory frame, reception appears to the right of the emission, as seen in Figure \(\PageIndex{1}\). Hence it is plotted to the right of the origin in the laboratory map (Figure \(\PageIndex{2}\), top).
Same events, different frames: Same spacetime interval
In the super-rocket frame, moving faster than the rocket with respect to the laboratory, the event of reception appears to the left of the emission (Figure \(\PageIndex{1}\)). Therefore the space separation is called negative and plotted to the left of the origin in the super-rocket map (Figure \(\PageIndex{2}\), bottom). The time separation in the super-rocket is greater than 6 meters, by the same argument used for the time of reception in the laboratory frame:3
\[\begin{align*} &\textbf { Super-rocket } \hspace{0.5em} \textbf { Super-rocket } \\ &\left(\begin{array}{c} \text { time of } \\ \text { reception } \end{array}\right)^{2}-\left(\begin{array}{c} \text { position of } \\ \text { reception } \end{array}\right)^{2}=(6 \text { meters })^{2} \end{align*}\]
In this equation, the space separation is a negative quantity. Nevertheless its square is a positive quantity. So the equation says that the square of 6 meters results from subtracting a positive quantity from the square of the super-rocket time of reception. Therefore the super-rocket time separation must also be greater than 6 meters:
Super-rocket: (position of reception, event \(R\) ) = -20 meters
Super-rocket: (time of reception, event \(R\) ) = 20.88 meters
1 Same events, different frames: Different spacetime maps
2 Same events, different frames: Different space and time coordinates
3 Same events, different frames: Same spacetime interval