9.4: Procedures
- Page ID
- 29165
\( \newcommand{\vecs}[1]{\overset { \scriptstyle \rightharpoonup} {\mathbf{#1}} } \)
\( \newcommand{\vecd}[1]{\overset{-\!-\!\rightharpoonup}{\vphantom{a}\smash {#1}}} \)
\( \newcommand{\id}{\mathrm{id}}\) \( \newcommand{\Span}{\mathrm{span}}\)
( \newcommand{\kernel}{\mathrm{null}\,}\) \( \newcommand{\range}{\mathrm{range}\,}\)
\( \newcommand{\RealPart}{\mathrm{Re}}\) \( \newcommand{\ImaginaryPart}{\mathrm{Im}}\)
\( \newcommand{\Argument}{\mathrm{Arg}}\) \( \newcommand{\norm}[1]{\| #1 \|}\)
\( \newcommand{\inner}[2]{\langle #1, #2 \rangle}\)
\( \newcommand{\Span}{\mathrm{span}}\)
\( \newcommand{\id}{\mathrm{id}}\)
\( \newcommand{\Span}{\mathrm{span}}\)
\( \newcommand{\kernel}{\mathrm{null}\,}\)
\( \newcommand{\range}{\mathrm{range}\,}\)
\( \newcommand{\RealPart}{\mathrm{Re}}\)
\( \newcommand{\ImaginaryPart}{\mathrm{Im}}\)
\( \newcommand{\Argument}{\mathrm{Arg}}\)
\( \newcommand{\norm}[1]{\| #1 \|}\)
\( \newcommand{\inner}[2]{\langle #1, #2 \rangle}\)
\( \newcommand{\Span}{\mathrm{span}}\) \( \newcommand{\AA}{\unicode[.8,0]{x212B}}\)
\( \newcommand{\vectorA}[1]{\vec{#1}} % arrow\)
\( \newcommand{\vectorAt}[1]{\vec{\text{#1}}} % arrow\)
\( \newcommand{\vectorB}[1]{\overset { \scriptstyle \rightharpoonup} {\mathbf{#1}} } \)
\( \newcommand{\vectorC}[1]{\textbf{#1}} \)
\( \newcommand{\vectorD}[1]{\overrightarrow{#1}} \)
\( \newcommand{\vectorDt}[1]{\overrightarrow{\text{#1}}} \)
\( \newcommand{\vectE}[1]{\overset{-\!-\!\rightharpoonup}{\vphantom{a}\smash{\mathbf {#1}}}} \)
\( \newcommand{\vecs}[1]{\overset { \scriptstyle \rightharpoonup} {\mathbf{#1}} } \)
\( \newcommand{\vecd}[1]{\overset{-\!-\!\rightharpoonup}{\vphantom{a}\smash {#1}}} \)
\(\newcommand{\avec}{\mathbf a}\) \(\newcommand{\bvec}{\mathbf b}\) \(\newcommand{\cvec}{\mathbf c}\) \(\newcommand{\dvec}{\mathbf d}\) \(\newcommand{\dtil}{\widetilde{\mathbf d}}\) \(\newcommand{\evec}{\mathbf e}\) \(\newcommand{\fvec}{\mathbf f}\) \(\newcommand{\nvec}{\mathbf n}\) \(\newcommand{\pvec}{\mathbf p}\) \(\newcommand{\qvec}{\mathbf q}\) \(\newcommand{\svec}{\mathbf s}\) \(\newcommand{\tvec}{\mathbf t}\) \(\newcommand{\uvec}{\mathbf u}\) \(\newcommand{\vvec}{\mathbf v}\) \(\newcommand{\wvec}{\mathbf w}\) \(\newcommand{\xvec}{\mathbf x}\) \(\newcommand{\yvec}{\mathbf y}\) \(\newcommand{\zvec}{\mathbf z}\) \(\newcommand{\rvec}{\mathbf r}\) \(\newcommand{\mvec}{\mathbf m}\) \(\newcommand{\zerovec}{\mathbf 0}\) \(\newcommand{\onevec}{\mathbf 1}\) \(\newcommand{\real}{\mathbb R}\) \(\newcommand{\twovec}[2]{\left[\begin{array}{r}#1 \\ #2 \end{array}\right]}\) \(\newcommand{\ctwovec}[2]{\left[\begin{array}{c}#1 \\ #2 \end{array}\right]}\) \(\newcommand{\threevec}[3]{\left[\begin{array}{r}#1 \\ #2 \\ #3 \end{array}\right]}\) \(\newcommand{\cthreevec}[3]{\left[\begin{array}{c}#1 \\ #2 \\ #3 \end{array}\right]}\) \(\newcommand{\fourvec}[4]{\left[\begin{array}{r}#1 \\ #2 \\ #3 \\ #4 \end{array}\right]}\) \(\newcommand{\cfourvec}[4]{\left[\begin{array}{c}#1 \\ #2 \\ #3 \\ #4 \end{array}\right]}\) \(\newcommand{\fivevec}[5]{\left[\begin{array}{r}#1 \\ #2 \\ #3 \\ #4 \\ #5 \\ \end{array}\right]}\) \(\newcommand{\cfivevec}[5]{\left[\begin{array}{c}#1 \\ #2 \\ #3 \\ #4 \\ #5 \\ \end{array}\right]}\) \(\newcommand{\mattwo}[4]{\left[\begin{array}{rr}#1 \amp #2 \\ #3 \amp #4 \\ \end{array}\right]}\) \(\newcommand{\laspan}[1]{\text{Span}\{#1\}}\) \(\newcommand{\bcal}{\cal B}\) \(\newcommand{\ccal}{\cal C}\) \(\newcommand{\scal}{\cal S}\) \(\newcommand{\wcal}{\cal W}\) \(\newcommand{\ecal}{\cal E}\) \(\newcommand{\coords}[2]{\left\{#1\right\}_{#2}}\) \(\newcommand{\gray}[1]{\color{gray}{#1}}\) \(\newcommand{\lgray}[1]{\color{lightgray}{#1}}\) \(\newcommand{\rank}{\operatorname{rank}}\) \(\newcommand{\row}{\text{Row}}\) \(\newcommand{\col}{\text{Col}}\) \(\renewcommand{\row}{\text{Row}}\) \(\newcommand{\nul}{\text{Nul}}\) \(\newcommand{\var}{\text{Var}}\) \(\newcommand{\corr}{\text{corr}}\) \(\newcommand{\len}[1]{\left|#1\right|}\) \(\newcommand{\bbar}{\overline{\bvec}}\) \(\newcommand{\bhat}{\widehat{\bvec}}\) \(\newcommand{\bperp}{\bvec^\perp}\) \(\newcommand{\xhat}{\widehat{\xvec}}\) \(\newcommand{\vhat}{\widehat{\vvec}}\) \(\newcommand{\uhat}{\widehat{\uvec}}\) \(\newcommand{\what}{\widehat{\wvec}}\) \(\newcommand{\Sighat}{\widehat{\Sigma}}\) \(\newcommand{\lt}{<}\) \(\newcommand{\gt}{>}\) \(\newcommand{\amp}{&}\) \(\definecolor{fillinmathshade}{gray}{0.9}\)You will launch a steel ball at a variety of angles and parallel to the ground.
Investigating Angle
-
Draw a table in which to record data for three different angles. Do not fill in data until you have read the instructions for obtaining that data.
|
Angle |
Trial 1 Distance |
Trial 2 Distance |
Trial 3 Distance |
Average Distance |
|---|---|---|---|---|
-
Use the C-Clamp to secure the launcher to the table, near the edge of the table.

-
Position the launcher such that it is horizontal, with a 0 angle. Use the push rod to press the ball into the launcher; pushing the piston back into the barrel will load the launcher and each click results in more force to launch your projectile. Make a couple of practice shots to familiarize yourself with the launcher.
-
Choose three non-zero angles from which you will release the ball, and record these angles in your table. Indicate the angle you think will result in the ball traveling the greatest distance.
-
Use the same number of clicks each time you load the launcher, and collect the data to complete your Investigating Angles data table. All of your distance measurements should be in meters. Once you have collected all of your data, calculate the average distances for the angles you chose.
Determining the Range
-
Draw a data table in which to record your measurements and calculations for horizontal range. Read the instructions for obtaining the data.
|
Drop Distance y |
Dropping Time t |
Launch Speed v |
Predicted/Calculated Horizontal Distance x |
Measured Horizontal Distance x |
Error |
|---|---|---|---|---|---|
-
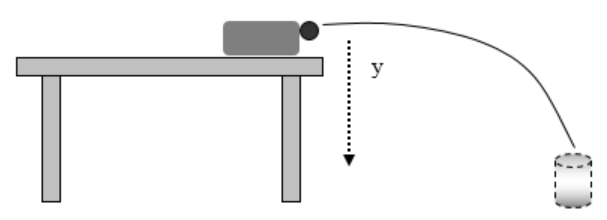
Measure and record the vertical distance (y), in meters, that the ball must drop from its release point to a can on the floor. Do not attempt to launch the ball into the can yet.

-
Measure or calculate the time (t) for the ball to drop from the first drop height (y). The vertical motion equation and your measured (y) can be used to calculate the time (t) it will take the ball to fall from the release point to the can on the floor. Record the time (t) in seconds for your measured distance (y). Also record a time for the 1/2y drop.
-
Position the launcher such that it is horizontal, parallel to the ground, with a 0° angle.
-
Place the photogate in front of the launcher such that the ball will pass through the photogate when launched. Make a couple of practice shots through the photogate to determine the number of clicks that will work best with the launcher at a 0° angle.
-
Load the projectile. Launch the projectile with a 0° angle at least 3-4 times, and record the average launch speed (v) of the ball shown by the photogate. Record this value for in your Horizontal Range data table; this speed applies to both drop distances.
-
Predict the horizontal distance (x) you think the ball will travel for each drop distance. You may choose whether to make a hypothesis or use the horizontal motion equation to calculate the horizontal distance (x) that the ball should travel. Record your prediction or calculation for the horizontal distance (x) in your data table.
-
Measure from the table along the floor to where you predict the can should be placed, for the first drop distance (y). Place the can on the floor at the horizontal range (distance) you have predicted. Launch the projectile with a 0⁰ angle and observe the actual horizontal distance (x) the ball travels. It may take a couple of trials to observe exactly where the ball hits. Measure and record the actual horizontal distance your ball travels. Calculate the difference between your predicted distance and the measured distance the ball travelled in the horizontal; record this as your error.
-
Use the ring stand to set up the launcher at 1/2 y. Maintain the 0° angle, so your projectile will launch horizontally.

Measure from the table along the floor to where you predict the can should be placed for the 2nd drop distance (1/2 y). Place the can on the floor at the horizontal range (distance) you have predicted of this drop. Repeat the launch process and record values for this drop distance.

