
14.5: Free-Body Diagrams


- Last updated
- Oct 13, 2022
- Save as PDF

( \newcommand{\kernel}{\mathrm{null}\,}\)
Trying to draw every single force acting on every single object can very quickly become pretty messy. And anyway, this is not usually what we need: what we need is to separate cleanly all the forces acting on any given object, one object at a time, so we can apply Newton’s second law, Fnet=ma, to each object individually.
In order to accomplish this, we use what are known as free-body diagrams. In a free-body diagram, a potentially very complicated object is replaced symbolically by a dot or a small circle, and all the forces acting on the object are drawn (approximately to scale and properly labeled) as acting on the dot. Regardless of whether a force is a pulling or pushing force, the convention is to always draw it as a vector that originates at the dot. If the system is accelerating, it is also a good idea to indicate the acceleration’s direction also somewhere on the diagram.
The figure below shows, as an example, a free-body diagram for a block, in the presence of both a nonzero acceleration and a friction force. The diagram includes all the forces, even gravity and the normal force.
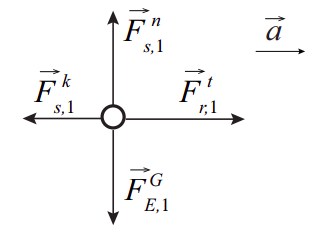
Note that I have drawn Fn and the force of gravity FGE,1 as having the same magnitude, since there is no vertical acceleration for that block. If I know the value of the friction force, I should also try to draw Fk approximately to scale with the other two forces. Then, since I know that there is an acceleration to the right, I need to draw Ft greater than Fk, since the net force on the block must be to the right as well.