2.2: Double-Slit Interference
- Page ID
- 94098
\( \newcommand{\vecs}[1]{\overset { \scriptstyle \rightharpoonup} {\mathbf{#1}} } \)
\( \newcommand{\vecd}[1]{\overset{-\!-\!\rightharpoonup}{\vphantom{a}\smash {#1}}} \)
\( \newcommand{\id}{\mathrm{id}}\) \( \newcommand{\Span}{\mathrm{span}}\)
( \newcommand{\kernel}{\mathrm{null}\,}\) \( \newcommand{\range}{\mathrm{range}\,}\)
\( \newcommand{\RealPart}{\mathrm{Re}}\) \( \newcommand{\ImaginaryPart}{\mathrm{Im}}\)
\( \newcommand{\Argument}{\mathrm{Arg}}\) \( \newcommand{\norm}[1]{\| #1 \|}\)
\( \newcommand{\inner}[2]{\langle #1, #2 \rangle}\)
\( \newcommand{\Span}{\mathrm{span}}\)
\( \newcommand{\id}{\mathrm{id}}\)
\( \newcommand{\Span}{\mathrm{span}}\)
\( \newcommand{\kernel}{\mathrm{null}\,}\)
\( \newcommand{\range}{\mathrm{range}\,}\)
\( \newcommand{\RealPart}{\mathrm{Re}}\)
\( \newcommand{\ImaginaryPart}{\mathrm{Im}}\)
\( \newcommand{\Argument}{\mathrm{Arg}}\)
\( \newcommand{\norm}[1]{\| #1 \|}\)
\( \newcommand{\inner}[2]{\langle #1, #2 \rangle}\)
\( \newcommand{\Span}{\mathrm{span}}\) \( \newcommand{\AA}{\unicode[.8,0]{x212B}}\)
\( \newcommand{\vectorA}[1]{\vec{#1}} % arrow\)
\( \newcommand{\vectorAt}[1]{\vec{\text{#1}}} % arrow\)
\( \newcommand{\vectorB}[1]{\overset { \scriptstyle \rightharpoonup} {\mathbf{#1}} } \)
\( \newcommand{\vectorC}[1]{\textbf{#1}} \)
\( \newcommand{\vectorD}[1]{\overrightarrow{#1}} \)
\( \newcommand{\vectorDt}[1]{\overrightarrow{\text{#1}}} \)
\( \newcommand{\vectE}[1]{\overset{-\!-\!\rightharpoonup}{\vphantom{a}\smash{\mathbf {#1}}}} \)
\( \newcommand{\vecs}[1]{\overset { \scriptstyle \rightharpoonup} {\mathbf{#1}} } \)
\( \newcommand{\vecd}[1]{\overset{-\!-\!\rightharpoonup}{\vphantom{a}\smash {#1}}} \)
Splitting a Light Wave into Two Waves that Interfere
We now return to the topic of static interference patterns created from two sources, this time for light. As with sound, we first need to start with two light sources that are at the same frequency. In the case of light, we say that the sources are monochromatic. For sound we were able to keep track of the starting phases of sounds coming from separate speakers by connecting them to a common source, but for light it’s a bit trickier. There simply isn’t a way to coordinate the phases of light waves coming from two independent sources (like two light bulbs). Light waves from multiple independent sources have phases that are essentially distributed randomly, resulting in a variety of light referred to as incoherent. In fact, even light from a single source such as an incandescent bulb is incoherent, because the vibrations of the various electrons that create the waves are not coordinated. It turns out (for complicated reasons we won’t go into) that after light travels a long distance the coherence of the waves grows (so light from the sun is highly coherent), but for experiments with light sources located here on Earth we are forced to use lasers, which do produce coherent light. Again, the reason that laser light is coherent is complicated, and outside the scope of this class.
Even with the coherence available from a single laser, we cannot coordinate the phases of two separate laser sources, so we need to somehow use the waves coming from a single laser source. We do this by directing the light from a single source through two very narrow adjacent slits, called a double-slit apparatus. Huygens’s principle assures us that then each slit becomes a source for a spherical wave emanating from the position of each slit, and since the wavefront reaches each slit at the same time, the two sources start in phase, just like the tones coming from two speakers attached to the same source.
Okay, so to get an idea of the interference pattern created by such a device, we can map the points of constructive and destructive interference. We can do this by mapping what happens to two spherical waves that start at different positions near each other, and specifically keeping track of the crests (solid circles) and troughs (dashed circles). [Note: The two waves shown are in different colors to make it easier to distinguish them – the actual light from both sources is all the same frequency/wavelength/color.]
Figure 2.2.1 – Double-Slit Interference
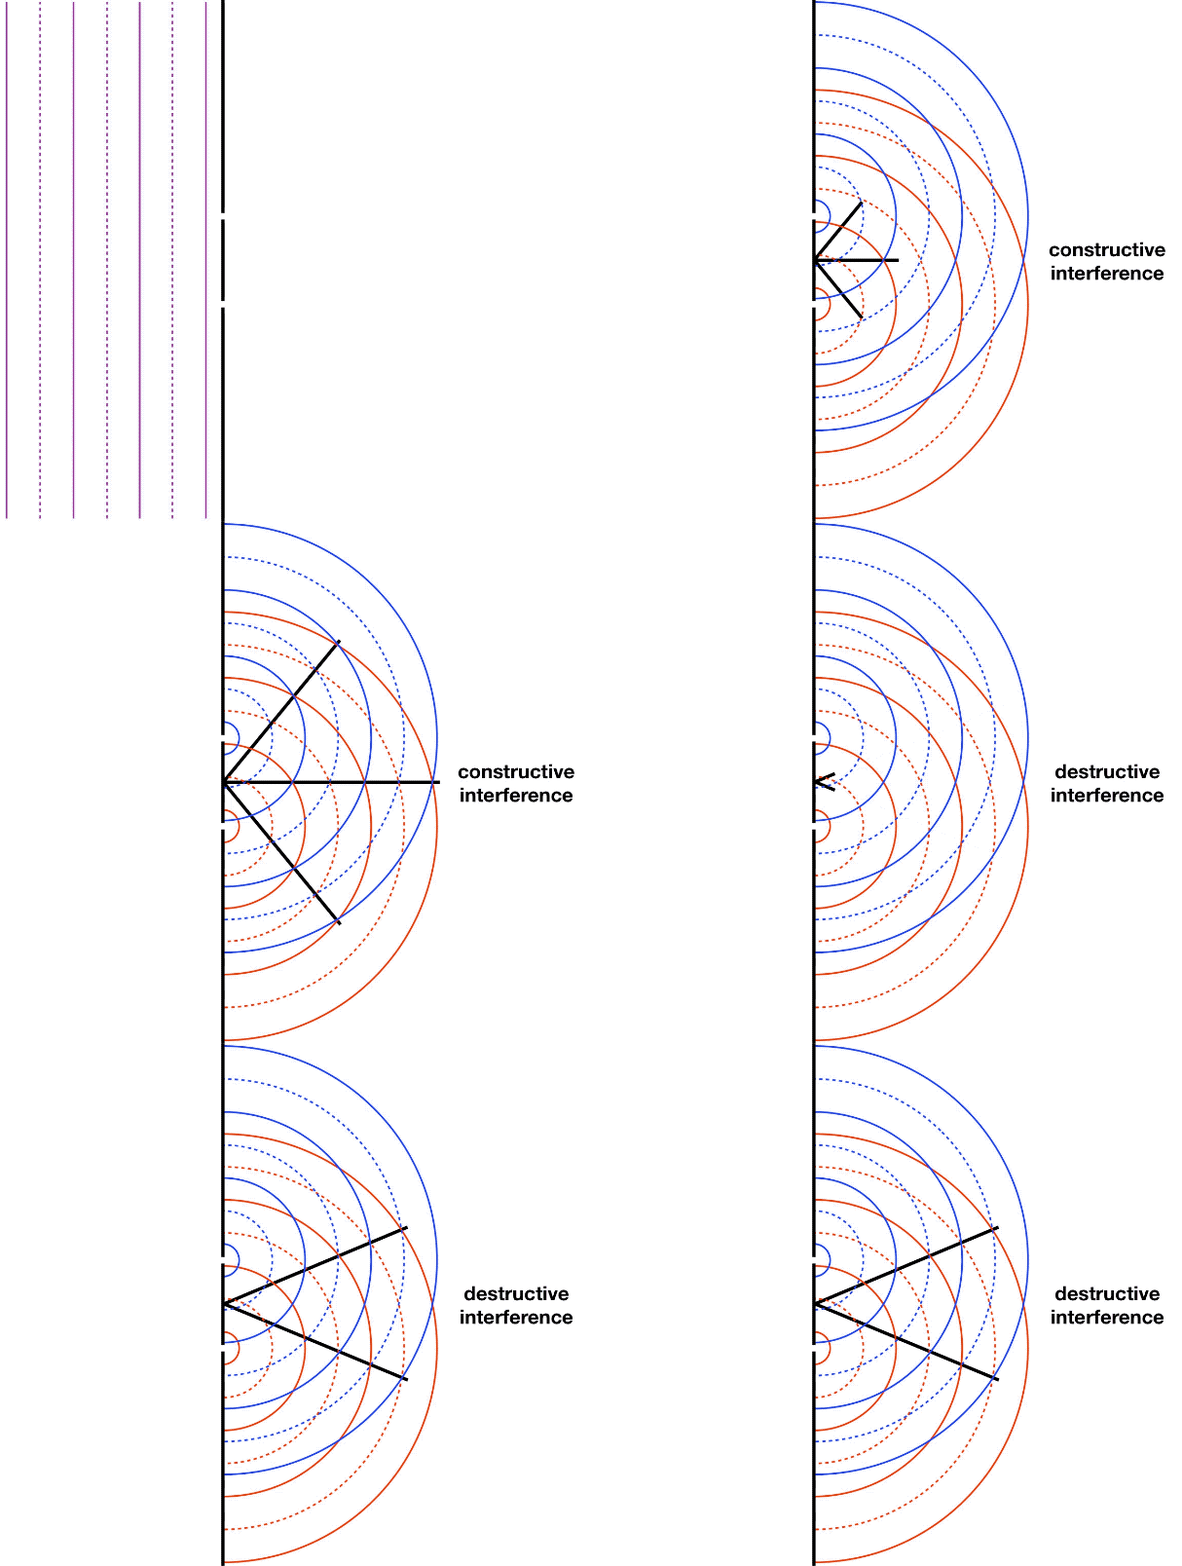
A coherent plane wave comes into the double slit, and thanks to Huygens's principle, the slits filter-out only the point sources on the plane wave that can pass through them, turning the plane wave into two separate radial waves, which then interfere with each other. Whenever a crest meets a trough there is total destructive interference, and whenever two crests or two troughs meet, the interference is (maximally) constructive. We notice a number of things here:
- If we watch the points of total destructive and maximally constructive interference as the waves evolve, they follow approximately straight lines, all passing through the center point between the two slits.
- Because of symmetry, we see that these lines are symmetric about the horizontal line that divides the two slits, and that the center line itself is a line followed by a point of maximal constructive interference.
- These lines alternate in type as the angle increases – the central line is constructive, the lines on each side with the next-greatest angle trace points of destructive interference, the next pair of lines trace points of constructive interference, and so on.
- There are a limited number of these lines possible.
How are these effects perceived? Total destructive interference means zero intensity, which is the absence of any wave – darkness. Constructive interference is perceived as bright light, so if we placed a reflecting screen in the way of these light waves, we would see alternating regions of brightness and darkness, called fringes. It should be noted that the brightness varies continuously as one observes different positions on the screen, but we are focusing our attention on the brightest and darkest positions only. For the figure above, the screen would exhibit a central bright fringe directly across from the center point between the slits, then the first dark fringes some distance off-center, then more bright fringes outside of those. It is possible for a double-slit apparatus to produce either more or fewer fringes, depending upon the slit separation and the wavelength of the light. We will discuss the roles these variables play next.
Geometry of a Double-Slit Apparatus
Since we are (for now) only considering the brightest and darkest points, we can work with lines and geometry to get some mathematical answers. As stated above, these points only approximately follow straight lines from the center point, so our analysis will necessarily require some approximations. Whenever this is the case in physics, it is important to make a note of the physical features that go into determining the usefulness of the approximation as well as the tolerances we are willing to accept.
We begin by defining the slit separation (\(d\)) and the distance from the slits to a screen where the brightness interference pattern is seen (\(L\)). We also label some of the quantities related to the position on the screen in question.
Figure 2.2.2a – Double-Slit Geometry
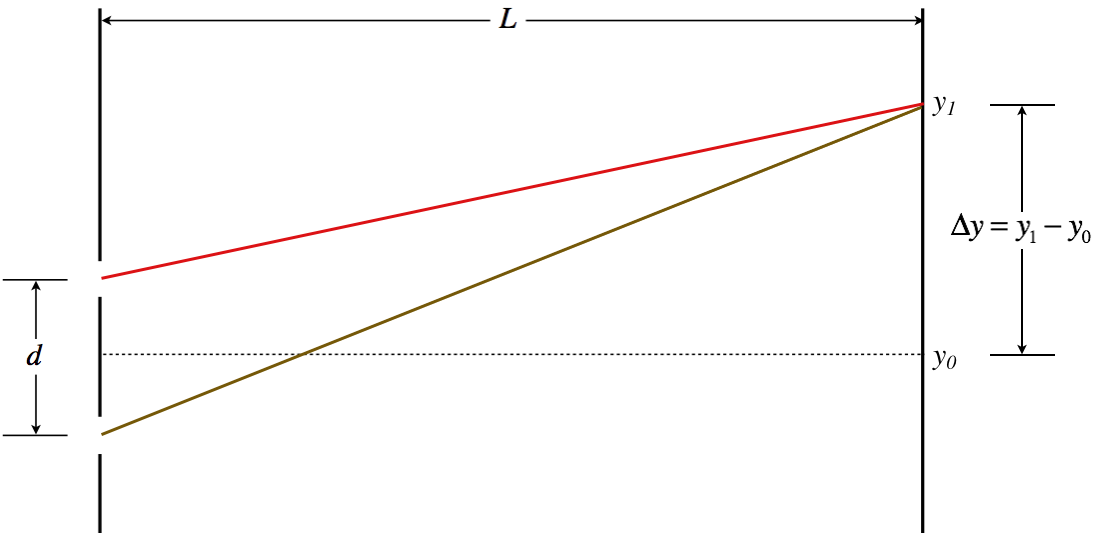
We are looking for those lines that define the destructive and constructive interference, so we want to express things in terms of a line that joins the midpoint of the two slits and the point located at \(y_1\). In particular, we are looking for the angle \(\theta\) that this line makes with the center line. We already know the center line traces a constructive interference, so our final answer should reflect this for \(\theta=0\).
The key physical argument we make here is that the wave that travels to \(y_1\) from the upper slit has a shorter trip than the wave that gets there from the lower slit. The two waves start at the same time, and in phase, so this difference in distance traveled (\(\Delta x\)) accounts for the phase difference in the two waves that causes interference. So to relate the interference witnessed at \(y_1\) to \(\theta\), we need to determine how (\(\Delta x\)) is related to \(\theta\).
As a start, we will draw in the line that goes from the midpoint of the slits to \(y_1\), and label a bunch of angles:
Figure 2.2.2b – Double-Slit Geometry
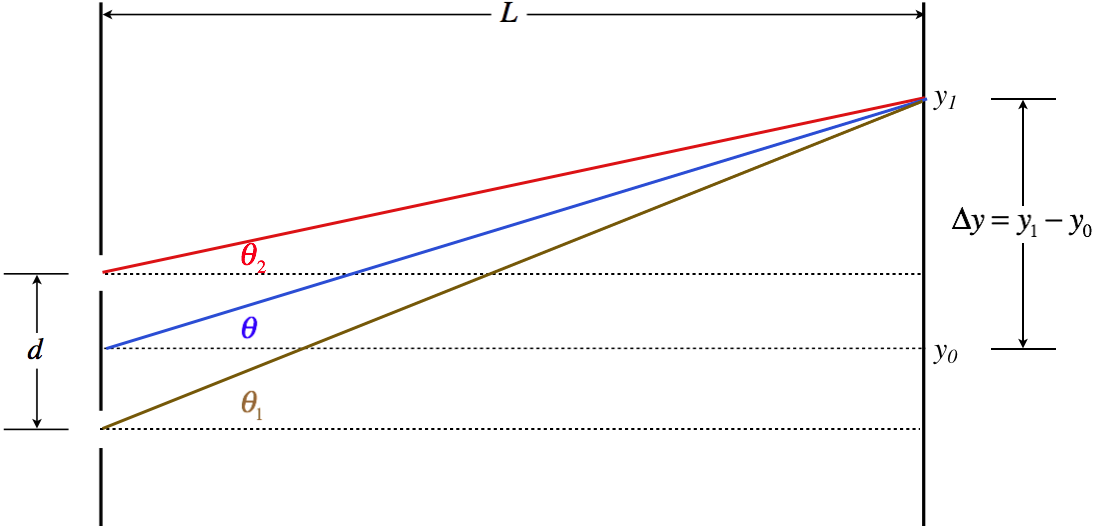
Now we need to do some math and apply some approximations. The tangents of these angles can be written in terms of the sides of the triangles they form:
\[\begin{array}{l} \tan\theta_2 && = && \dfrac{\Delta y-\frac{d}{2}}{L} \\ \tan\theta && = && \dfrac{\Delta y}{L} \\ \tan\theta_1 && = && \dfrac{\Delta y+\frac{d}{2}}{L} \end{array}\]
We don't actually require this math to convince us that if the slit separation is very small compared to the distance to the screen (i.e. \(d\ll L\)), then these three angles are all approximately equal. This is a good approximation, as this phenomenon is typically observed with slits separated by distances measured in fractions of millimeters, while distances to the screen are measured in meters. So henceforth we will make no mention of the angles \(\theta_1\) and \(\theta_2\).
The next step is to break the lower (brown) line into two segments – one with the same length as the top (red) line that touches \(y_1\) but doesn't quite reach the lower slit, and the other with the additional distance traveled, (\(\Delta x\)) that connects the first line to the lower slit. Then with the two equal-length segments, form an isosceles triangle:
Figure 2.2.2c – Double-Slit Geometry
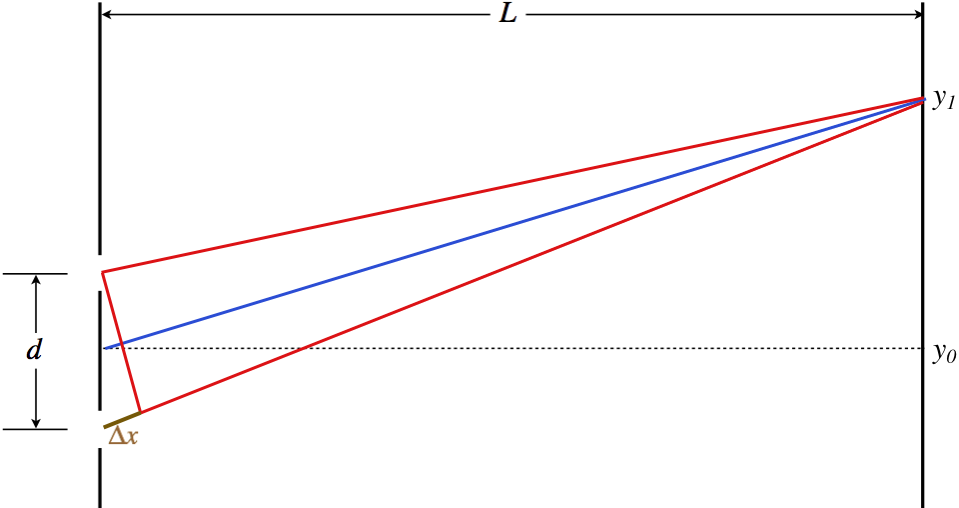
Returning to our angle approximation where the top and bottom lines are approximately parallel, we see that this triangle has approximately two right angles at its base, which means there is a small right triangle formed by the base of the triangle, \(\Delta x\), and the slit separation \(d\). Imagine rotating the triangle clockwise. The angle at the top of this small triangle closes to zero at exactly the same moment that the blue line coincides with the center line, so this angle equals \(\theta\):
Figure 2.2.2d – Double-Slit Geometry
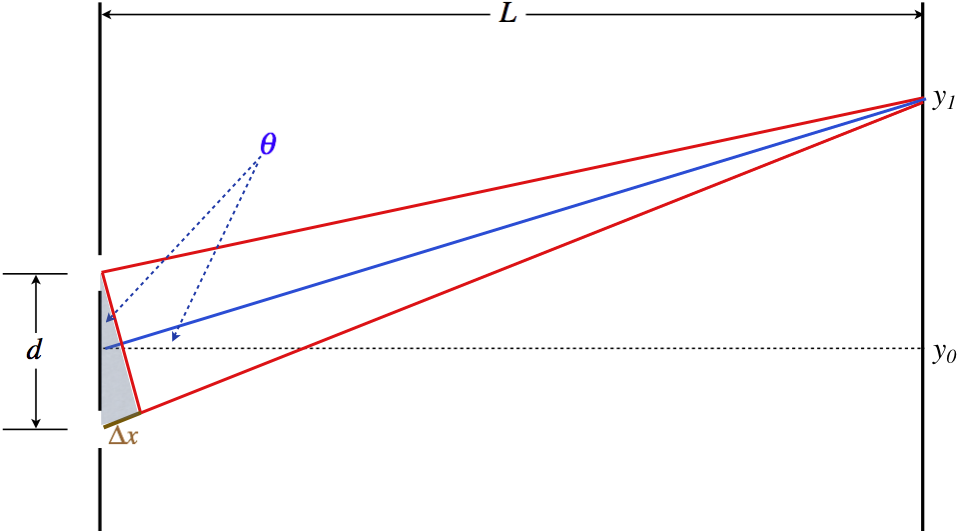
This gives us precisely the relationship between \(\Delta x\) and \(\theta\) that we were looking for:
\[\Delta x = d\sin\theta\]
Now all we have to do is put this into the expression for total destructive and maximally-constructive interference. We know that total destructive interference occurs when the difference in distances traveled by the waves is an odd number of half-wavelengths, and constructive interference occurs when the the difference is an integer number of full wavelengths, so:
Let's take a moment to examine these equations, comparing what they require with the bulleted observations we made above:
- The plus-or-minus values of the integer \(m\) confirms that the fringes are symmetrically reflected across the center line.
- The case of \(m=0\) for constructive interference corresponds to the center line.
- Moving out from the center, the next fringe of any kind occurs when \(m=0\) for destructive interference. Then the next occurs for \(m=1\) for constructive interference, and so on – the bright and dark fringes alternate.
- Not all integer values of \(m\) will work, because the absolute value of \(\sin\theta\) can never exceed 1. When the absolute value of \(m\) gets too high, this relation cannot possibly hold, placing a limit on the number of fringes. This limit is determined by the ratio of the wavelength to the slit separation.
It is sometimes useful to convert this result into measurements of distances from the center line on the screen, rather than the angle \(\theta\). To get this, we need the distance \(L\), which was not necessary for the solution above (other than assuming it is much larger than \(d\)). Calling the distance from the center line to the \(m^{th}\) fringe \(y_m\), we use the fact that the tangent of the angle is the rise over the run (\(y_m=L\tan\theta_m\)) to get:
\[ \begin{array}{l} \text{center of bright fringes:} && y_m=L\tan\left[\sin^{-1}m\dfrac{\lambda}{d}\right] \\ \text{totally dark points:} && y_m=L\tan\left[\sin^{-1}\left(m+\frac{1}{2}\right)\dfrac{\lambda}{d}\right] \end{array} \;\;\;\;\; m = 0,\;\pm 1,\; \pm 2,\dots\]
So long as we are careful, we can simplify this with a second approximation. If the angle is small, then the tangent and sine of that angle are approximately equal. This simplifies the above result to:
This shows us that for small angles, fringes of the same type are equally-spaced on the screen, with a spacing of:
\[\Delta y = \dfrac{\lambda L}{d} \]
Example \(\PageIndex{1}\)
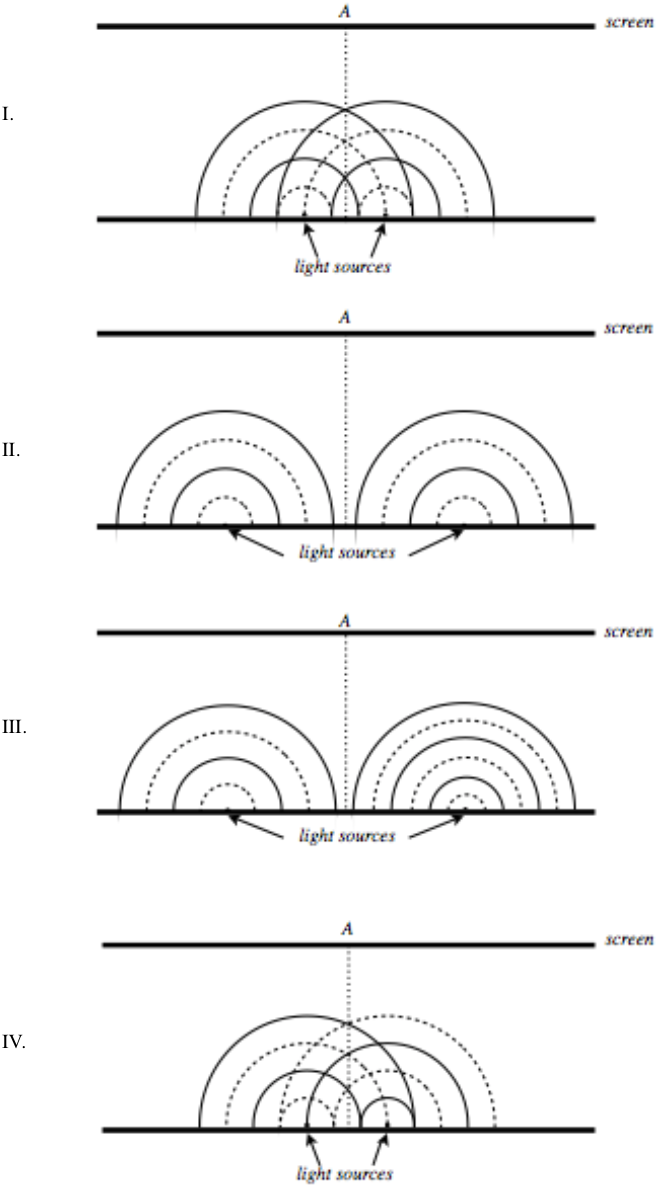
Below are four depictions of two point sources of light (not necessarily caused by two slits), using the wave front model. These depictions are “snap shots,” meaning they are frozen at an instant in time, but the questions below pertain to what happens in real time. Solid lines represent crests, and the dotted lines troughs. For each case, determine the following, and provide explanations:
- Will these sources create a fixed interference pattern on the distant screen?
- If there is an interference pattern, what will appear at the point A on the screen, which is directly across from the midway point between the two sources? That is, will it be a bright fringe, a dark fringe, or something in-between?
- If there is an interference pattern, how many bright fringes will appear on the screen?
- Solution
-
I.
a. Yes. The sources have the same wavelength (and therefore the same frequency), which means that their interference pattern will not have a time-dependent element to them (i.e. they will not provide the light equivalent of “beats”).
b. Bright fringe. The two waves start in phase, and travel equal distances from the sources to get to the center line, so they end up in phase, resulting in constructive interference.
c. One can see by drawing lines through the crossings of crests & troughs that only 3 such lines will strike the screen (parallel to the screen crests match with troughs, so those will not give bright fringes):
We can do this mathematically by noting that these waves start in phase, which means this is equivalent using \(d\sin\theta =m\lambda\) for bright fringes, and by noting from the diagram that the two slits are separated by a distance of \(1.5\lambda\). The fact that \(\sin\theta\) can never be greater than 1 puts a limit on \(m\). This is an integer that can’t be greater than 1.5, so its maximum value is 1, leaving us with 3 bright fringes.
II.
a. Yes. The same reasons as given above for (I.a) apply.
b. Bright fringe. Same reasoning as II.b
c. Now it is not possible (or at least exceedingly difficult) to draw in the lines that lead to constructive interference, so the mathematical method is the only practical approach. This time the slit separation d is clearly more than \(4\lambda\) and less than \(5\lambda\). This means that the highest integer value of \(m\) is 4. With 4 bright fringes on each side of the central bright fringe, the total number is 9.
III.
a. No! These two waves have different wavelengths, and therefore different frequencies, which means that when they interfere, the resulting wave’s amplitude (and therefore the brightness) will be time-dependent.
b. N/A
c. N/A
IV.
a. Yes. Back to equal wavelengths.
b. Dark fringe. These waves start out-of-phase by \(\pi\) radians, so when they travel equal distances, they remain out-of-phase.
c. We can once again draw the lines that follow the paths of constructive interference:
The light sources are separated by \(1.5\lambda\) as they were once before, but now the condition for constructive interference is different, to make up for the starting phase difference. It is now: \(d \sin\theta = \left(m + 1/2\right)\lambda\). We see that there are now two bright spots associated with \(m = 0\), and although there is a solution for \(m = 1\), it gives \(\theta = \frac{\pi}{2}\), which means the light never reaches the screen, so the number of bright spots on the screen is 2.
Double Slit Intensity Pattern
The answers above only apply to the specific positions where there is totally destructive or maximally constructive interference. What about the points in between? For this answer, we return to Equation 1.4.10, which relates any phase difference of two waves to the intensity of the wave in comparison to its maximum intensity (when maximal constructive interference occurs). As noted earlier, the only source of phase difference is the distance traveled by the two waves, so:
\[\left. \begin{array}{l} I=I_o\cos^2\left(\dfrac{\Delta \Phi}{2}\right) \\ \Delta \Phi = \dfrac{2\pi}{\lambda}\Delta x \\ \Delta x = d\sin\theta \end{array} \right\}\;\;\;\Rightarrow\;\;\; I\left(\theta\right) = I_o\cos^2\left[\dfrac{\pi d\sin\theta}{\lambda}\right] \]
It's easy to see that this works correctly for the specific cases of total destructive and maximal constructive interference, as the intensity vanishes for the destructive angles, and equals \(I_o\) for the constructive angles. If the angle is small, then we can approximate this answer in terms of the distance from the center line:
\[I\left(y\right) = I_o \cos^2\left[\dfrac{\pi yd}{\lambda L}\right]\]
Activity
To see all the features of double-slit interference, check out this simulator. To simulate double slit interference for light, take the following steps:
- Select and click on the "Interference" box.
- In the control box, click the laser icon:
 .
. - In the control box, click the "Screen" toggle box to see the fringes.
- Click on the green buttons on the lasers to start propagating the light waves.
- In the control box, you can adjust frequency and slit separation to see the effects on the interference pattern.
- You can click on the intensity toggle box in the control box to see the graph of the intensity at the screen, as described by Equation 2.2.8.
- You can even explore this phenomenon quantitatively (i.e. check the math derived above) by reading the slit separation in the control box, dragging measuring devices from above the control box, and pausing the simulation.


