
12.2: The Binocular Projector


- Last updated
- Nov 1, 2022
- Save as PDF

( \newcommand{\kernel}{\mathrm{null}\,}\)
This activity does the exact same thing as our pinhole camera – it allows us to examine the surface of the Sun safely by looking at a projected image. There are some important differences however! Unlike the pinhole camera, the binoculars do not dim the brightness of the solar image – instead they concentrate the light and brighten it substantially. The binocular projector is easier to use, there is no construction needed and it becomes very easy to draw or photograph the image which we have seen. The increased brightness makes it more difficult to make out subtle features like sunspots on the solar disk, the glare of the intense image tends to obscure them. For eclipse viewing however, this is an excellent method requiring almost no setup time.
Science and Engineering Practices
- Developing and using models.
- Planning and carrying out investigations.
- Analyzing and interpreting data.
- Argument from evidence.
Crosscutting Concepts
- Systems and system models.
- Structure and function.
Next Generation Science Standards
- Space systems (K-5, 6-8, 9-12).
- Engineering and design (K-5, 6-8, 9-12).
- Waves and electromagnetic radiation (6-8, 9-12).
- The Earth-Moon system (6-8, 9-12).
For the Educator
Facts you need to know
- NEVER look at the Sun directly!
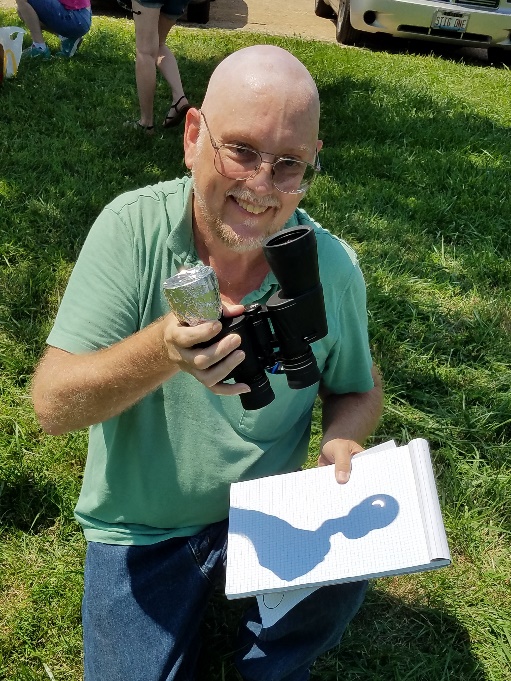
- Using only one pair of binoculars which remain in the teacher’s hands at all times, this activity is perfectly safe for all ages.
- We will use the binoculars to project an image of the Sun on paper.
- The projected solar image will be large enough and bright enough for an entire class to view it at once.
Teaching and Pedagogy
Once again, every science teacher teaches safety first! This activity makes safe observation virtually automatic. When you use the binoculars to project a solar image onto a piece of paper, students must stand with their backs to the Sun in order to view the projected image.
Using a pair of binoculars to project a solar image is simple in principle, but it requires practice to learn how to line up the binoculars, the Sun, and the paper. You will need to practice this activity several times before you do it in front of your students!
Take the binoculars and focus them for a distant object such as a tree or building at least 300 meters away. Remember to keep one side of the binocular covered, and start with the binoculars just a couple inches from the paper, then pull the binocular back until you get a large, sharp image of the Sun!
The Sun is different every day, sunspots and other features move slowly across the Sun. If you have a chance to try this activity during a lunar or solar eclipse, the effect is quite spectacular!
Student Outcomes
What will the student discover?
- A solar eclipse is a rare and wonderful event that is not to be missed. For many students, this will be a once-in-a-lifetime experience – do not allow them to miss it!
- The new Moon will at times be perfectly lined up to allow it to pass in front of the disk of the Sun, causing an eclipse.
- In order to see a total eclipse, you must be in exactly the right spot! The shadow of the Moon on the Earth’s surface is usually not more than 50 miles wide, and the shadow traces a path across the Earth called the path of totality. You must be inside this narrow path to see a total eclipse!
- Most people will not see a total eclipse, instead we get to see a partial eclipse because we are on one side or the other of the path of totality. This is still a wonderful event and worthy of our observation and study.
What will your students learn about science?
- People have been predicting solar eclipses for several thousand years. Scientists and mathematicians today predict these events with marvelous precision.
- Predictions are still just that – predictions made using a scientific model much as we have been doing throughout this book. Modern predictions of the timing and extent of a solar eclipse are not exact. This is a chance for students to see the precision – and the uncertainty – of modern science in one magnificent activity.
Conducting the Activity
Materials
- One pair of binoculars. Larger binocular work better for this, a pair of 7×50 binoculars work perfectly.
- A sheet of white paper on a notebook or clipboard.
Exploring the Binocular Projector
 Check the binoculars on a tree or building to see that they are focused correctly.
- Put one of the lens caps on the binoculars so light only passes through one side. If lens caps are missing, use a piece of aluminum foil to tightly cap one side of the binoculars.
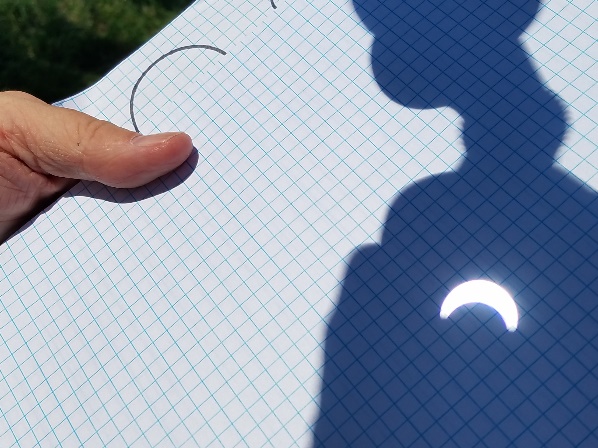
- Point the large end of the binoculars toward the Sun and hold the paper underneath the eyepiece. The paper may be anywhere from 1-4 inches away to give you the best image, this varies with styles and models of binoculars, so you will have to adjust this until you have the best view.
- You should now be able to observe the solar disk, sunspots, even an eclipse just as you can with the pinhole camera. The advantage of this method is that working with a partner, your students can easily draw directly on the paper they are observing and copy down what they see!
Discussion Questions
- How does the binocular projector make it safe to view the Sun?
- Answer We never look directly at the Sun – only at its image projected on paper.
- Why doesn’t the Sun look the same every time we look at it like the Moon does?
- Answer: The Sun has no solid or permanent surface. The sunspots we sometimes see are magnetic storms on the solar surface, they appear and disappear as conditions change on the Sun’s surface, much as thunderstorms appear and disappear on Earth.
Supplemental Materials
Going Deeper
The binocular projector is also an excellent method to use when trying your hand at imaging the Moon. Take your binoculars out on a night when the Moon is at least half-full and try setting up to project the image on a piece of paper just as you did with the Sun. You will need a dark place to do this properly, yard lights and street lights will interfere with the image substantially. You will find that the projected image is substantially dimmer than the solar image, and this makes it much easier to pick up things such as dark maria and even some of the larger craters in addition to the shape of the lunar phase that night!
If you have a chance, try this activity with both a telescope and a binocular. You will find that the binocular projects an image just as you see it in the sky, while the telescope flips the image from side to side or even upside down! (This depends upon the type of telescope you use.) Optics are fun and mysterious – something your students will have the chance to explore further as they get older and enter higher grades in school!
Being an Astronomer
There are dedicated solar telescopes which allow you to look directly at the Sun and see many amazing features on the solar surface. Solar telescopes are specially built, single purpose machines, and quite expensive – even for telescopes!
Once again, it is time to contact your local astronomy club and ask for their help. Many clubs have a member with a special interest in the Sun who may own their very own solar telescope; some larger clubs purchase one of these specifically for the club to take out to schools and outreach events. If your local club has such an instrument, your students are in for a real treat!
Being a Scientist
If you are lucky enough to observe a solar eclipse through a binocular projector, you will find that the image is bright and well-focused enough to be easily photographed.
If you are able to take a photograph of the Sun every 5-10 minutes during an eclipse, the pictures can be combined into a GIF or time-lapse video to show how the Moon moves in front of the solar disk and put the Sun into eclipse!
Following Up
There have been many famous eclipse events in history and literature. Columbus’ eclipse during his exploration of the New World and Mark Twain’s A Connecticut Yankee in King Arthur’s Court both come to mind. How many others can you find?