33: Limb Darkening
- Page ID
- 24381
\( \newcommand{\vecs}[1]{\overset { \scriptstyle \rightharpoonup} {\mathbf{#1}} } \)
\( \newcommand{\vecd}[1]{\overset{-\!-\!\rightharpoonup}{\vphantom{a}\smash {#1}}} \)
\( \newcommand{\dsum}{\displaystyle\sum\limits} \)
\( \newcommand{\dint}{\displaystyle\int\limits} \)
\( \newcommand{\dlim}{\displaystyle\lim\limits} \)
\( \newcommand{\id}{\mathrm{id}}\) \( \newcommand{\Span}{\mathrm{span}}\)
( \newcommand{\kernel}{\mathrm{null}\,}\) \( \newcommand{\range}{\mathrm{range}\,}\)
\( \newcommand{\RealPart}{\mathrm{Re}}\) \( \newcommand{\ImaginaryPart}{\mathrm{Im}}\)
\( \newcommand{\Argument}{\mathrm{Arg}}\) \( \newcommand{\norm}[1]{\| #1 \|}\)
\( \newcommand{\inner}[2]{\langle #1, #2 \rangle}\)
\( \newcommand{\Span}{\mathrm{span}}\)
\( \newcommand{\id}{\mathrm{id}}\)
\( \newcommand{\Span}{\mathrm{span}}\)
\( \newcommand{\kernel}{\mathrm{null}\,}\)
\( \newcommand{\range}{\mathrm{range}\,}\)
\( \newcommand{\RealPart}{\mathrm{Re}}\)
\( \newcommand{\ImaginaryPart}{\mathrm{Im}}\)
\( \newcommand{\Argument}{\mathrm{Arg}}\)
\( \newcommand{\norm}[1]{\| #1 \|}\)
\( \newcommand{\inner}[2]{\langle #1, #2 \rangle}\)
\( \newcommand{\Span}{\mathrm{span}}\) \( \newcommand{\AA}{\unicode[.8,0]{x212B}}\)
\( \newcommand{\vectorA}[1]{\vec{#1}} % arrow\)
\( \newcommand{\vectorAt}[1]{\vec{\text{#1}}} % arrow\)
\( \newcommand{\vectorB}[1]{\overset { \scriptstyle \rightharpoonup} {\mathbf{#1}} } \)
\( \newcommand{\vectorC}[1]{\textbf{#1}} \)
\( \newcommand{\vectorD}[1]{\overrightarrow{#1}} \)
\( \newcommand{\vectorDt}[1]{\overrightarrow{\text{#1}}} \)
\( \newcommand{\vectE}[1]{\overset{-\!-\!\rightharpoonup}{\vphantom{a}\smash{\mathbf {#1}}}} \)
\( \newcommand{\vecs}[1]{\overset { \scriptstyle \rightharpoonup} {\mathbf{#1}} } \)
\(\newcommand{\longvect}{\overrightarrow}\)
\( \newcommand{\vecd}[1]{\overset{-\!-\!\rightharpoonup}{\vphantom{a}\smash {#1}}} \)
\(\newcommand{\avec}{\mathbf a}\) \(\newcommand{\bvec}{\mathbf b}\) \(\newcommand{\cvec}{\mathbf c}\) \(\newcommand{\dvec}{\mathbf d}\) \(\newcommand{\dtil}{\widetilde{\mathbf d}}\) \(\newcommand{\evec}{\mathbf e}\) \(\newcommand{\fvec}{\mathbf f}\) \(\newcommand{\nvec}{\mathbf n}\) \(\newcommand{\pvec}{\mathbf p}\) \(\newcommand{\qvec}{\mathbf q}\) \(\newcommand{\svec}{\mathbf s}\) \(\newcommand{\tvec}{\mathbf t}\) \(\newcommand{\uvec}{\mathbf u}\) \(\newcommand{\vvec}{\mathbf v}\) \(\newcommand{\wvec}{\mathbf w}\) \(\newcommand{\xvec}{\mathbf x}\) \(\newcommand{\yvec}{\mathbf y}\) \(\newcommand{\zvec}{\mathbf z}\) \(\newcommand{\rvec}{\mathbf r}\) \(\newcommand{\mvec}{\mathbf m}\) \(\newcommand{\zerovec}{\mathbf 0}\) \(\newcommand{\onevec}{\mathbf 1}\) \(\newcommand{\real}{\mathbb R}\) \(\newcommand{\twovec}[2]{\left[\begin{array}{r}#1 \\ #2 \end{array}\right]}\) \(\newcommand{\ctwovec}[2]{\left[\begin{array}{c}#1 \\ #2 \end{array}\right]}\) \(\newcommand{\threevec}[3]{\left[\begin{array}{r}#1 \\ #2 \\ #3 \end{array}\right]}\) \(\newcommand{\cthreevec}[3]{\left[\begin{array}{c}#1 \\ #2 \\ #3 \end{array}\right]}\) \(\newcommand{\fourvec}[4]{\left[\begin{array}{r}#1 \\ #2 \\ #3 \\ #4 \end{array}\right]}\) \(\newcommand{\cfourvec}[4]{\left[\begin{array}{c}#1 \\ #2 \\ #3 \\ #4 \end{array}\right]}\) \(\newcommand{\fivevec}[5]{\left[\begin{array}{r}#1 \\ #2 \\ #3 \\ #4 \\ #5 \\ \end{array}\right]}\) \(\newcommand{\cfivevec}[5]{\left[\begin{array}{c}#1 \\ #2 \\ #3 \\ #4 \\ #5 \\ \end{array}\right]}\) \(\newcommand{\mattwo}[4]{\left[\begin{array}{rr}#1 \amp #2 \\ #3 \amp #4 \\ \end{array}\right]}\) \(\newcommand{\laspan}[1]{\text{Span}\{#1\}}\) \(\newcommand{\bcal}{\cal B}\) \(\newcommand{\ccal}{\cal C}\) \(\newcommand{\scal}{\cal S}\) \(\newcommand{\wcal}{\cal W}\) \(\newcommand{\ecal}{\cal E}\) \(\newcommand{\coords}[2]{\left\{#1\right\}_{#2}}\) \(\newcommand{\gray}[1]{\color{gray}{#1}}\) \(\newcommand{\lgray}[1]{\color{lightgray}{#1}}\) \(\newcommand{\rank}{\operatorname{rank}}\) \(\newcommand{\row}{\text{Row}}\) \(\newcommand{\col}{\text{Col}}\) \(\renewcommand{\row}{\text{Row}}\) \(\newcommand{\nul}{\text{Nul}}\) \(\newcommand{\var}{\text{Var}}\) \(\newcommand{\corr}{\text{corr}}\) \(\newcommand{\len}[1]{\left|#1\right|}\) \(\newcommand{\bbar}{\overline{\bvec}}\) \(\newcommand{\bhat}{\widehat{\bvec}}\) \(\newcommand{\bperp}{\bvec^\perp}\) \(\newcommand{\xhat}{\widehat{\xvec}}\) \(\newcommand{\vhat}{\widehat{\vvec}}\) \(\newcommand{\uhat}{\widehat{\uvec}}\) \(\newcommand{\what}{\widehat{\wvec}}\) \(\newcommand{\Sighat}{\widehat{\Sigma}}\) \(\newcommand{\lt}{<}\) \(\newcommand{\gt}{>}\) \(\newcommand{\amp}{&}\) \(\definecolor{fillinmathshade}{gray}{0.9}\)Look at a picture of the Sun carefully. Compare the appearance of the center of the solar disk to the edges.
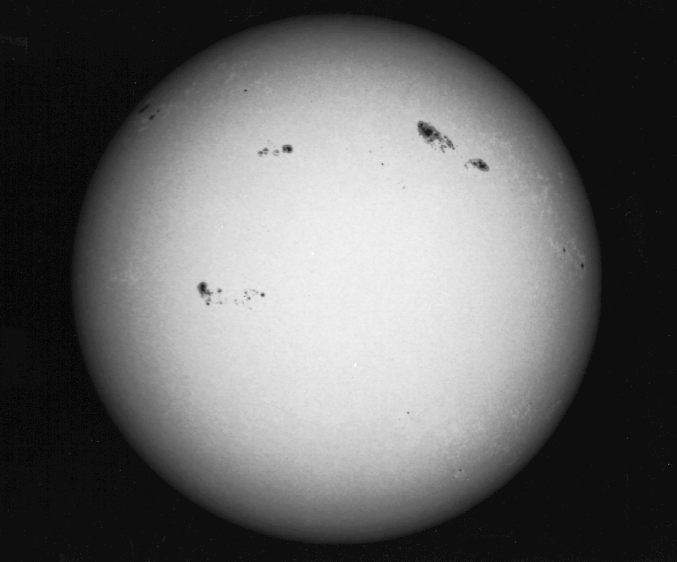
It looks brighter in the center, doesn't it? A color picture shows another difference:
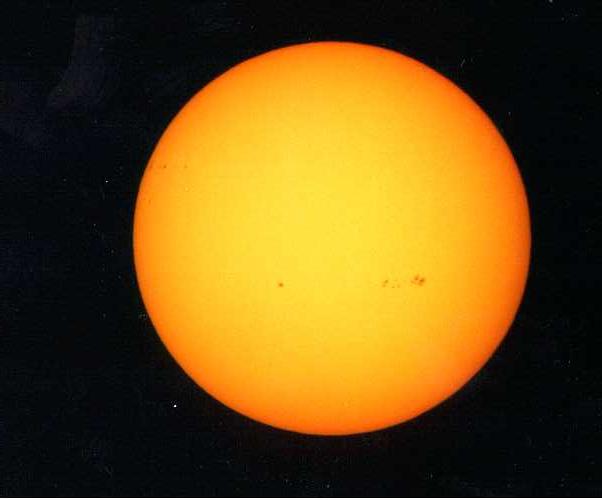
Image copyright Laurent Corp
The limbs of the Sun are not only dimmer than the center, they are redder, too. Why?
Part of the answer lies in the gradient of temperature within the solar photosphere. The deeper you go, the hotter it gets.
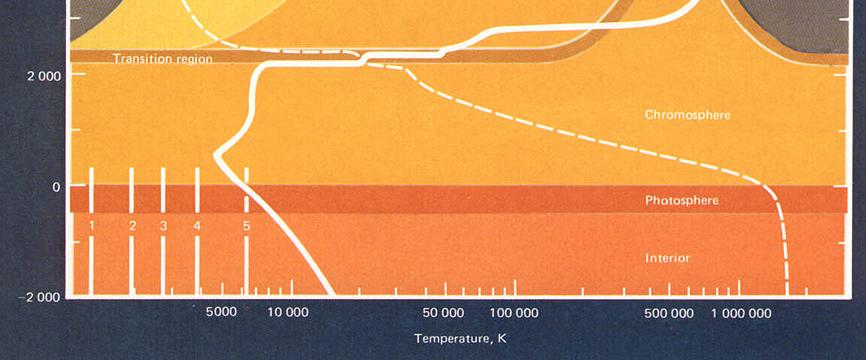
The other part of the answer involves optical depth. Light rays can escape from the Sun's photosphere when they are about 1 optical depth away from empty space. That means that we see photons which come from 1 optical depth "below the surface":
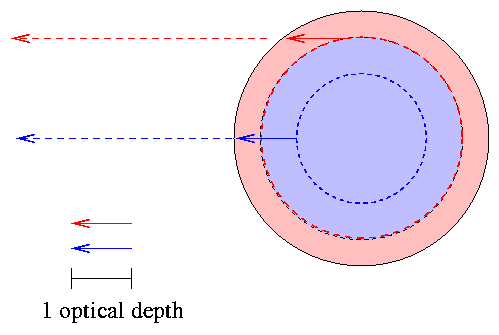
When we look at the center of the solar disk, we see light rays which are coming radially outwards. They originate relatively deep in the photosphere, where the temperature is relatively high. When we look at the limbs, we see light rays which must skim through the photosphere at a shallow angle to reach the Earth. They originate in the upper reaches of the photosphere, where the temperature is somewhat lower.
Since the source spectrum is (approximately) a blackbody in both instances, the radiation coming from the hot material near the center of the disk will be more intense and have a shorter peak wavelength. If we know exactly how temperature changes with radius, and how opacity and density change with radius, we can predict the change in surface brightness as a function of angular distance away from the center of the disk. See the example on page 292 of your textbook, which derives an expression of the form
\[\frac{I(\theta)}{I(\theta=0)}=A+B \cos (\theta) \nonumber \]
We can also measure the brightness as a function of position very easily -- for the Sun:
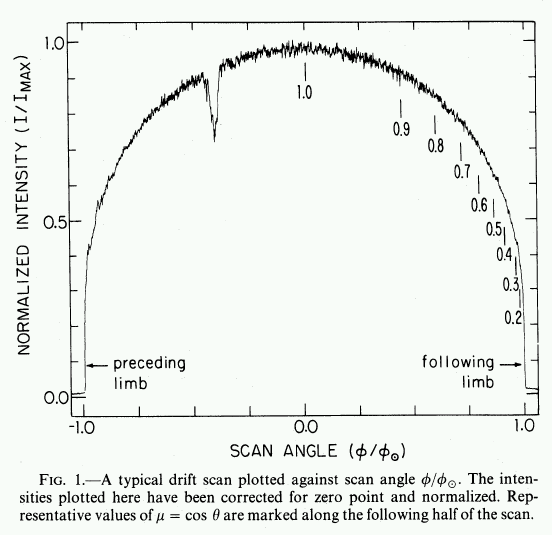
Be careful when comparing limb darkening. Some studies, like the one above, use angular distance from the center of disk as the independent variable (on the horizontal axis). Others use the cosine of this angle.
Now, apart from the Sun, there are very, very few stars which are big enough, and close enough, that astronomers can resolve their photospheres and measure their limb darkening. One of the very few which can be studied directly is the star Betelgeuse; but look at how few measurements we can make across its disk:
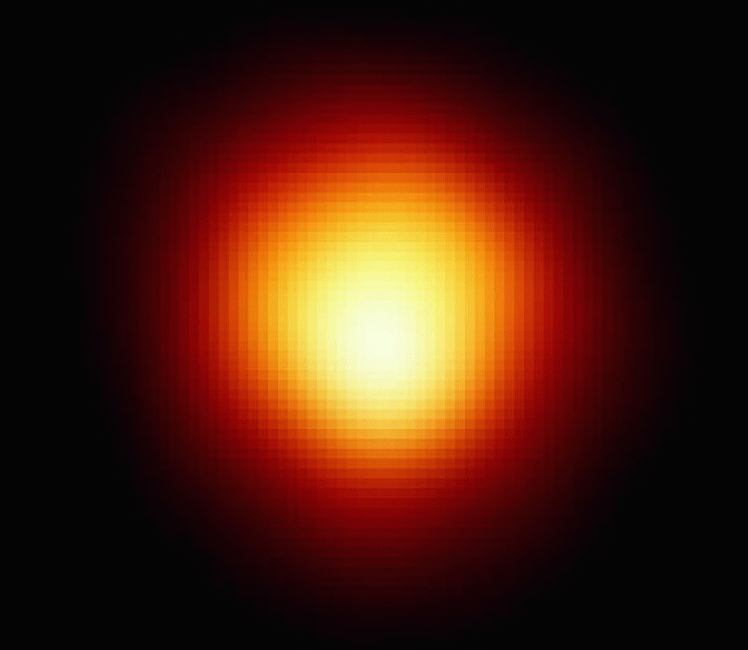
Apart from Betelgeuse and 3 or 4 others, stars exhibit such small angular diameters that we have no way to resolve their disks, and so no way to measure their limb darkening. Rats! Limb darkening could tell us a lot about the properties of a stellar atmosphere. If only there was some clever way to see it ...
Limb darkening of a distant star, via microlensing
Occasionally, from our point of view here on Earth, one distant star appears to pass behind some closer star. If the alignment is nearly perfect -- which doesn't happen very often at all -- light from the background "source" star may be bent by the gravitational field of the foreground "lens" stars.
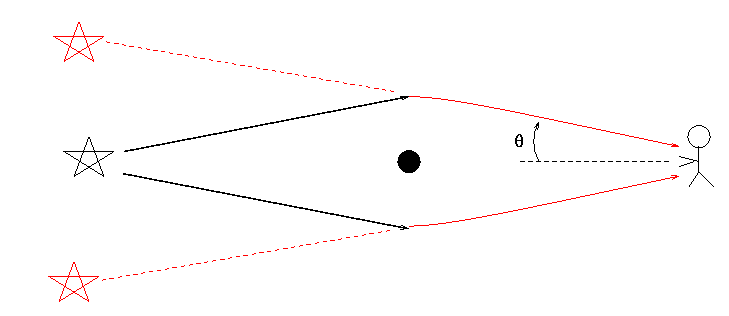
We call this gravitational lensing; in the case of lensing by the gravity of a single star or pair of stars, rather than by the gravity of an entire galaxy, we sometimes use the term microlensing.
You can read more about this subject in lectures from the Introductory Extragalactic Astronomy course
The basic idea is that as the background source passes behind the lens star(s), its brightness appears to increase as its light rays are focused towards the observer. We therefore expect to see a brief (days-to-weeks) brightening of the source star as it approaches the lens system, passes it, and then moves away. The shape of the light curve should look like this:
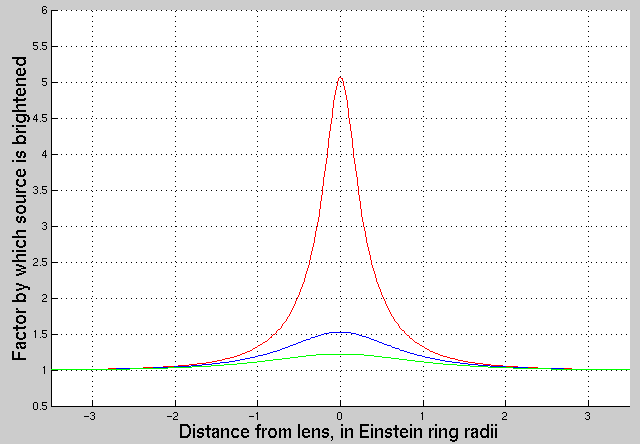
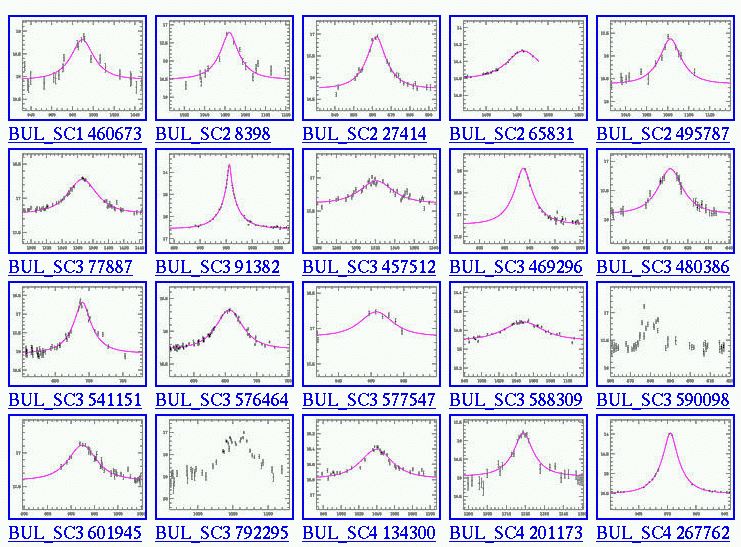
Microlensing is not a common phenomenon: given the density of stars in our Milky Way Galaxy, one needs to monitor millions and millions of stars in order to find one which is currently passing behind a foreground system and being magnified. It's a tough job, but several groups of astronomers have accepted the challenge. One of them carries out the Optical Gravitational Lensing Experiment , or OGLE. After a decade or so of hard work, they have discovered hundreds of microlensing events. Here's a small gallery of some of the light curves they have measured:
Another group searching for lensing events is EROS. In the summer of 2000, the EROS group noticed one of the stars in its fields was growing brighter, and issued an alert for "EROS BLG-2000-5". Several different observatories started to monitor the system intensively. Over the next few months, the source star underwent a bizarre series of sharp increases and decreases in brightness:
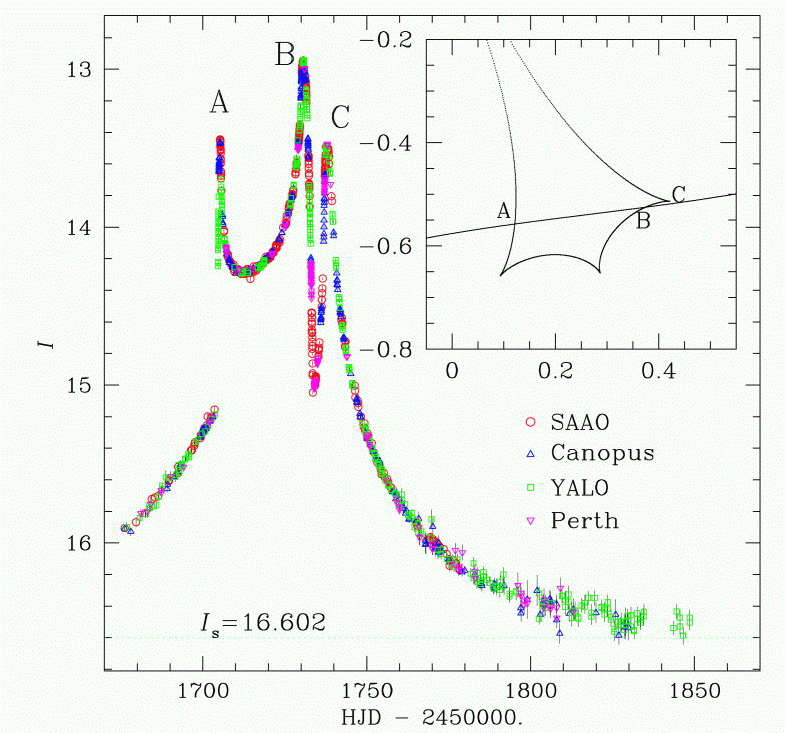
THIS certainly doesn't follow the usual gentle rise-and-fall pattern of microlensing. What was going on?
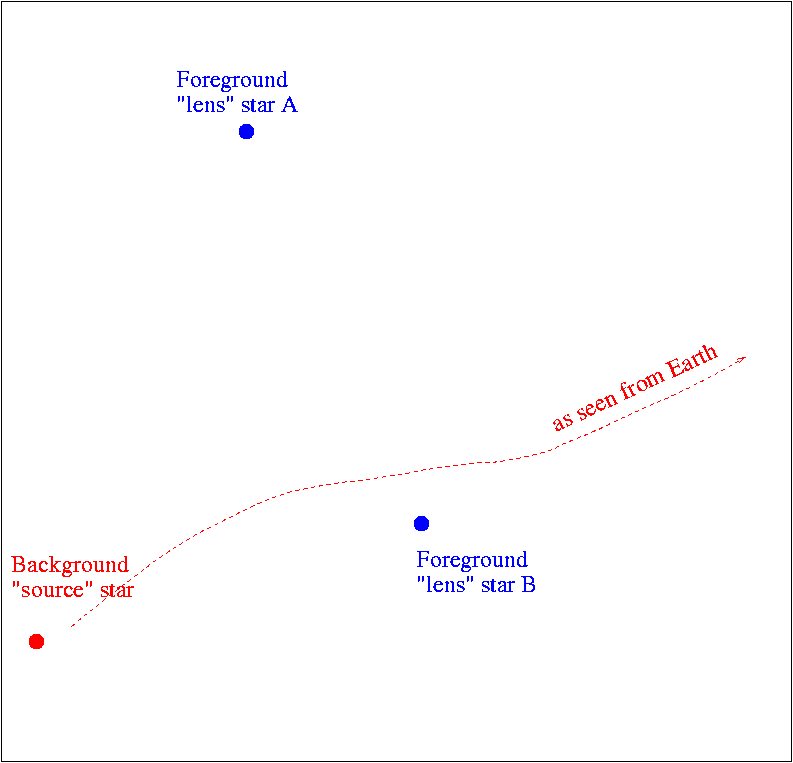
Theorists decided that the "lens" in this instance was not a single star, but a binary system:
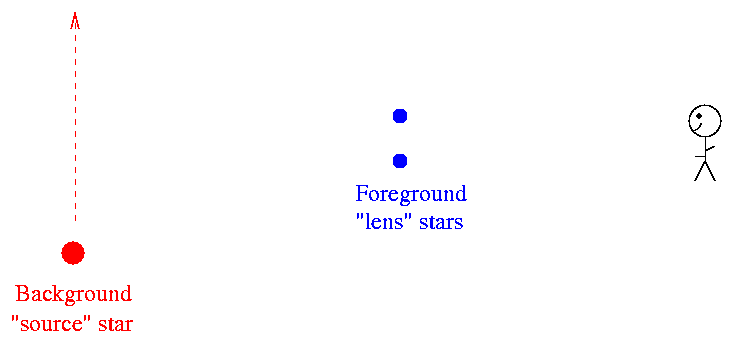
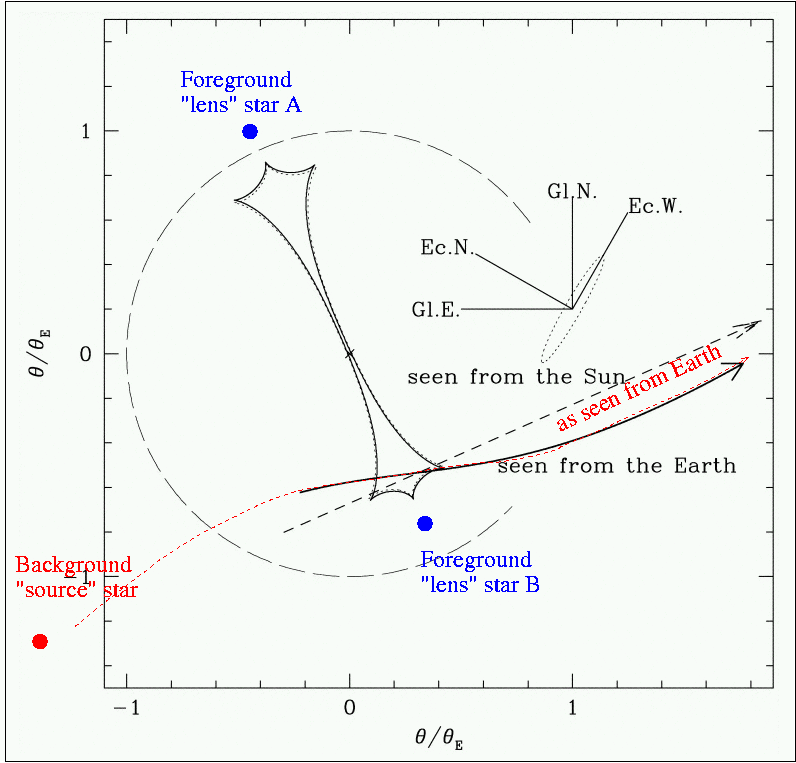
The source passed in between the two lens stars, as seen from the Sun ...
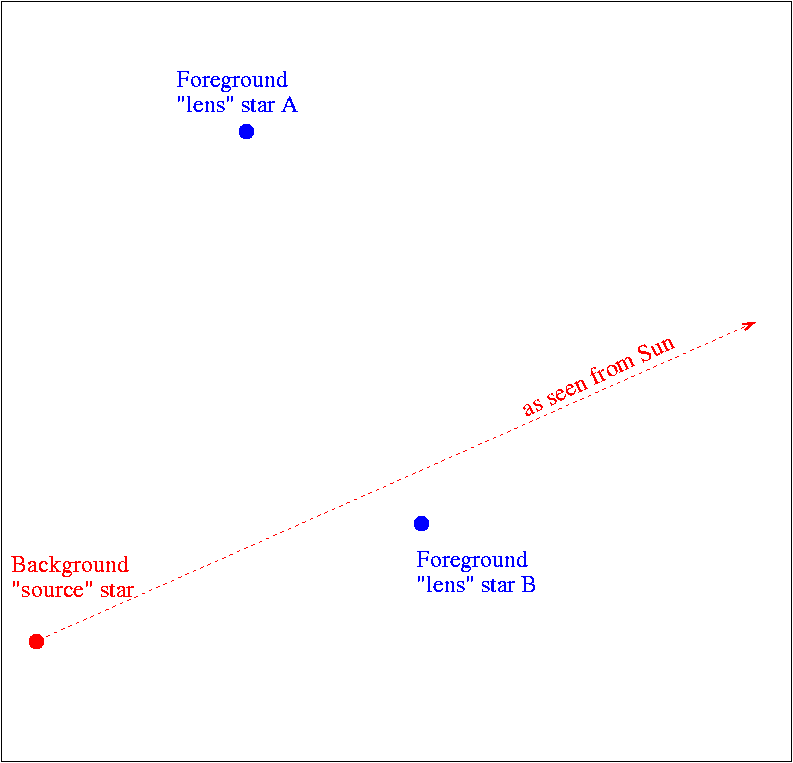
... or, in a slightly more complicated path due to parallax, as seen from the Earth:
Now, even though the source didn't pass directly behind either lens star, it did experience several episodes of very strong magnification. The gravitational potential of a binary star creates a complicated "caustic"; in the diagram below, it appears as a pointy-headed dumbbell between the two lens components. Whenever the source moves across a caustic, it undergoes high amplification.
In the closeup of this diagram below, you can see the estimated angular size of the source star (green circle) as it moves past the second and third caustic crossings (events B and C in the light curve).
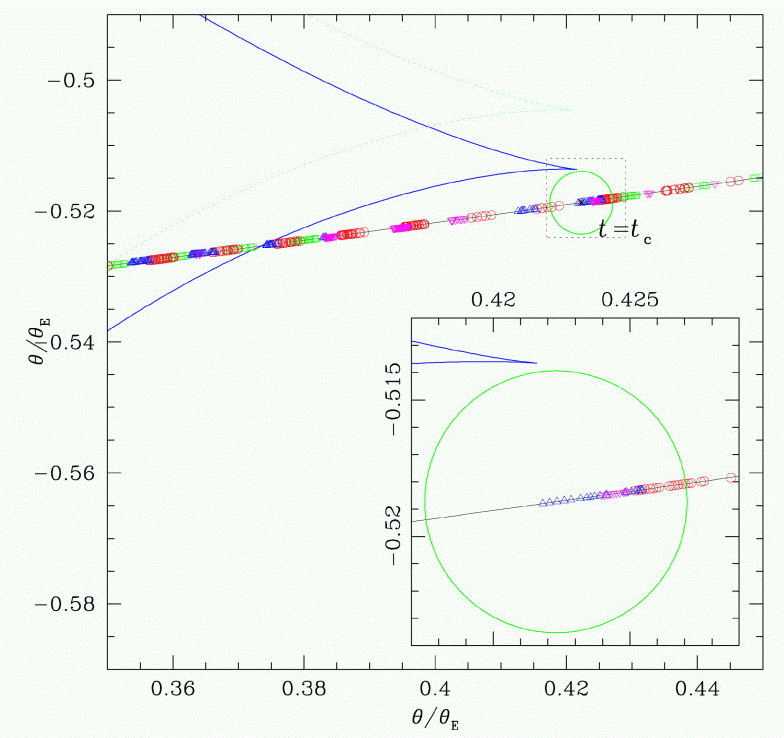
Note that during the second crossing, seen at the left in the diagram above, the star moves nearly parallel to the caustic; that means that it will spend a considerable amount of time (hours to days) being magnified. Moreover, as it moves across the caustic -- which is a mathematically thin line -- different parts of the source star will be magnified more than others. First the right limb ...
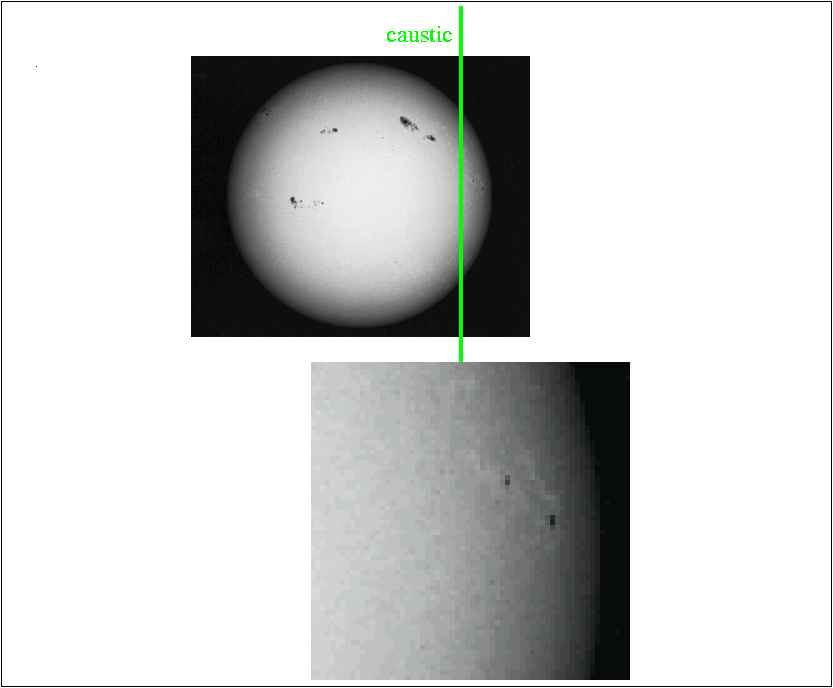
... and then the central portion ...
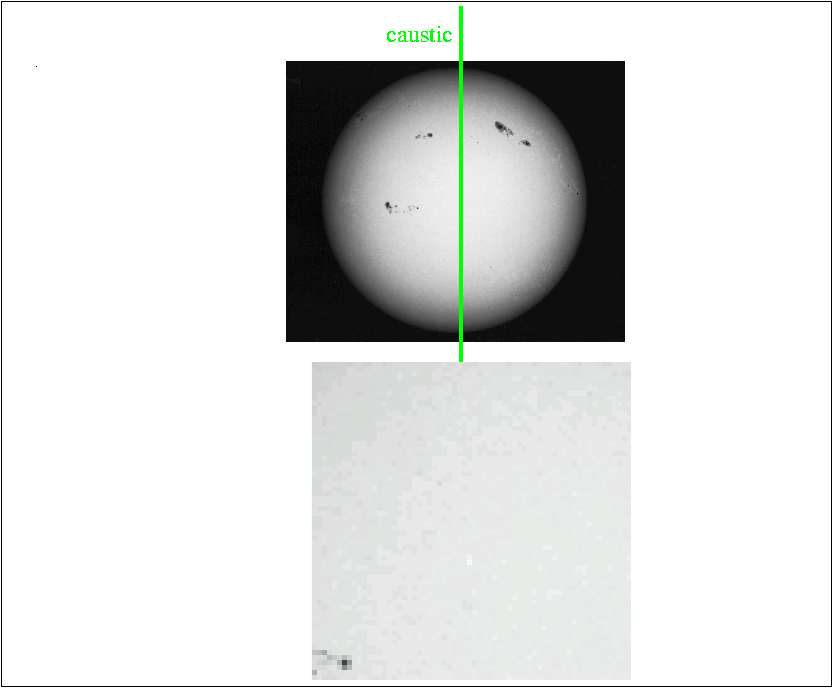
... and then the left limb ...
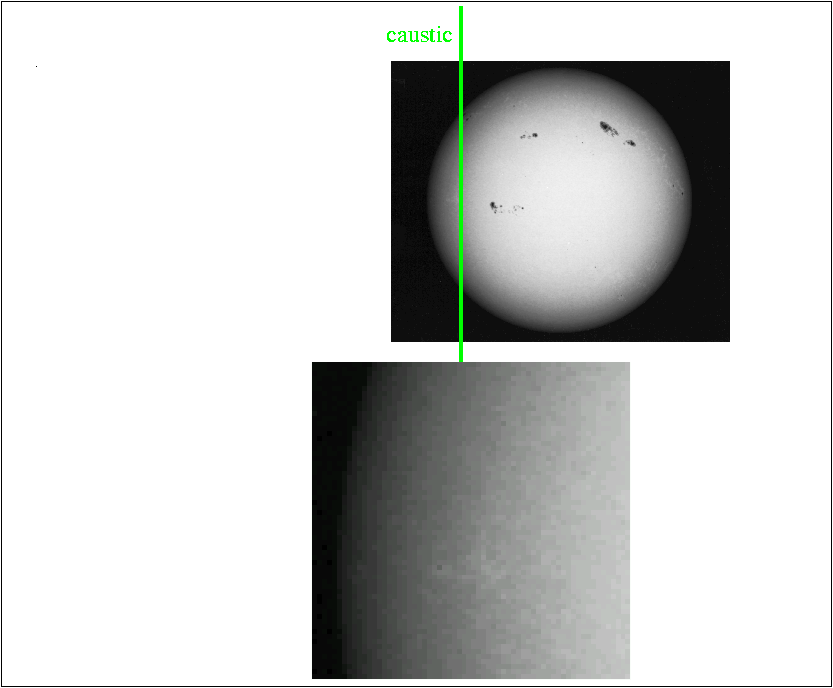
In the words of the authors of a paper analyzing this event,
The limb-darkening parameters are primarily determined by the behavior of the light curve between the time the source edge enters the caustic and the time the source center enters the caustic (and the inverse of this process as the source leaves the caustic).
There are a lot of factors which go into the shape of the light curves:
- size of the source star
- mass and position of each component of the lens
- exact path of the source relative to the lens system
- motion of the Earth around the Sun
- location of the observatories on Earth
- limb darkening of the source star
The paper by An et al. (2002) uses a model with 11 different geometric parameters, in addition to the limb darkening model. The paper by Fields et al. (2003) uses the same geometric parameters, but includes data taken in several additional passbands (and several additional observatories). By looking very closely at the change in intensity during the caustic crossings, it may be possible to constrain all the other parameters well enough that one can learn something about the limb darkening of the source star.
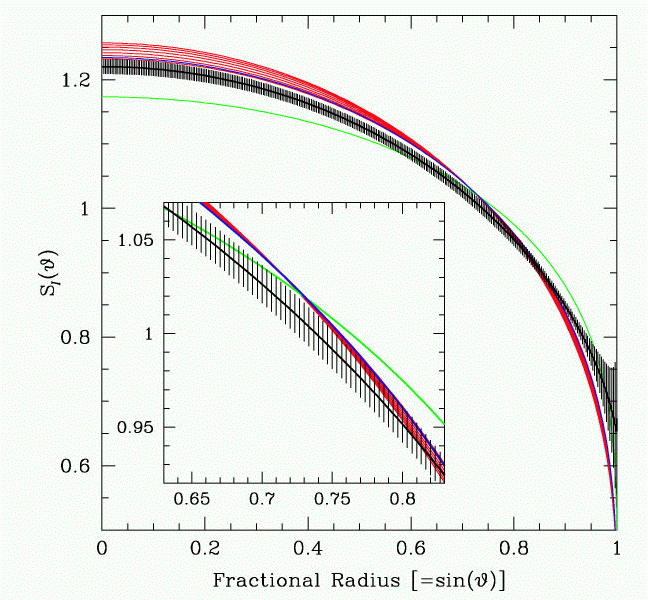
In fact, there is so many measurements available that Fields et al. employ not just a simple cosine curve to describe the limb darkening, but a more sophisticated model with two parameters:
\[S_{\lambda}(\vartheta)=\bar{S}_{\lambda}\left[\left(1-\Gamma_{\lambda}-\Lambda_{\lambda}\right)+\frac{3 \Gamma_{\lambda}}{2} \cos \vartheta+\frac{5 \Lambda_{\lambda}}{4} \sqrt{\cos \vartheta}\right] \nonumber \]
Here are their results: the surface brightness of the source star is shown as a function of the distance away from its center. The Sun's surface brightness profile appears for comparison as the green line. Note the somewhat unconventional choice of normalization, and note also that the y-axis of the graph does not extend to zero.
Gravitational microlensing gives astronomers a new tool that can be applied to choose between different models for stellar atmospheres. We don't get to pick which stars to study, but we do gain the ability to resolve stellar surfaces, for stars which are way, way, WAY too distant to be resolved by ordinary means.
Exercise \(\PageIndex{1}\)
An et al. estimate that the source star is roughly 8 kpc away from the Sun, and that its radius is roughly 11 solar radii.
- What is the angular radius of the source star?
- How does it compare to the smallest angle that can be resolved with a 10m space telescope at a wavelength of 5000 Angstroms?
For more information
- First Microlens Mass Measurement: PLANET Photometry of EROS BLG-2000-5 by An et al. (2002) provides photometry of the event and some analysis.
- High-Precision Limb-Darkening Measurement of a K3 Giant Using Microlensing by Fields et al. (2003), provides another look at the event.
- Revealing stellar intensity profiles by means of microlensing fold caustics a technical paper by Dominik, soon to appear in MNRAS.


