3.5: The Telescope
- Page ID
- 7085
\( \newcommand{\vecs}[1]{\overset { \scriptstyle \rightharpoonup} {\mathbf{#1}} } \)
\( \newcommand{\vecd}[1]{\overset{-\!-\!\rightharpoonup}{\vphantom{a}\smash {#1}}} \)
\( \newcommand{\dsum}{\displaystyle\sum\limits} \)
\( \newcommand{\dint}{\displaystyle\int\limits} \)
\( \newcommand{\dlim}{\displaystyle\lim\limits} \)
\( \newcommand{\id}{\mathrm{id}}\) \( \newcommand{\Span}{\mathrm{span}}\)
( \newcommand{\kernel}{\mathrm{null}\,}\) \( \newcommand{\range}{\mathrm{range}\,}\)
\( \newcommand{\RealPart}{\mathrm{Re}}\) \( \newcommand{\ImaginaryPart}{\mathrm{Im}}\)
\( \newcommand{\Argument}{\mathrm{Arg}}\) \( \newcommand{\norm}[1]{\| #1 \|}\)
\( \newcommand{\inner}[2]{\langle #1, #2 \rangle}\)
\( \newcommand{\Span}{\mathrm{span}}\)
\( \newcommand{\id}{\mathrm{id}}\)
\( \newcommand{\Span}{\mathrm{span}}\)
\( \newcommand{\kernel}{\mathrm{null}\,}\)
\( \newcommand{\range}{\mathrm{range}\,}\)
\( \newcommand{\RealPart}{\mathrm{Re}}\)
\( \newcommand{\ImaginaryPart}{\mathrm{Im}}\)
\( \newcommand{\Argument}{\mathrm{Arg}}\)
\( \newcommand{\norm}[1]{\| #1 \|}\)
\( \newcommand{\inner}[2]{\langle #1, #2 \rangle}\)
\( \newcommand{\Span}{\mathrm{span}}\) \( \newcommand{\AA}{\unicode[.8,0]{x212B}}\)
\( \newcommand{\vectorA}[1]{\vec{#1}} % arrow\)
\( \newcommand{\vectorAt}[1]{\vec{\text{#1}}} % arrow\)
\( \newcommand{\vectorB}[1]{\overset { \scriptstyle \rightharpoonup} {\mathbf{#1}} } \)
\( \newcommand{\vectorC}[1]{\textbf{#1}} \)
\( \newcommand{\vectorD}[1]{\overrightarrow{#1}} \)
\( \newcommand{\vectorDt}[1]{\overrightarrow{\text{#1}}} \)
\( \newcommand{\vectE}[1]{\overset{-\!-\!\rightharpoonup}{\vphantom{a}\smash{\mathbf {#1}}}} \)
\( \newcommand{\vecs}[1]{\overset { \scriptstyle \rightharpoonup} {\mathbf{#1}} } \)
\(\newcommand{\longvect}{\overrightarrow}\)
\( \newcommand{\vecd}[1]{\overset{-\!-\!\rightharpoonup}{\vphantom{a}\smash {#1}}} \)
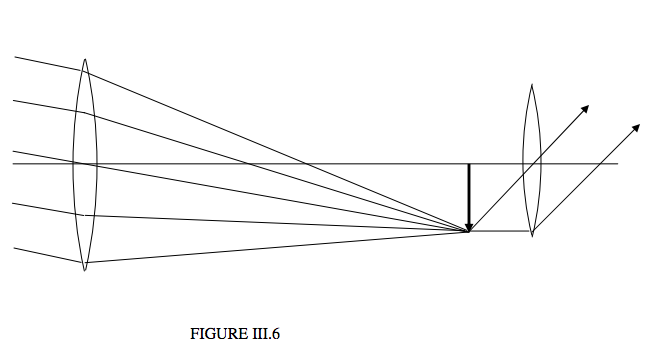
\(\newcommand{\avec}{\mathbf a}\) \(\newcommand{\bvec}{\mathbf b}\) \(\newcommand{\cvec}{\mathbf c}\) \(\newcommand{\dvec}{\mathbf d}\) \(\newcommand{\dtil}{\widetilde{\mathbf d}}\) \(\newcommand{\evec}{\mathbf e}\) \(\newcommand{\fvec}{\mathbf f}\) \(\newcommand{\nvec}{\mathbf n}\) \(\newcommand{\pvec}{\mathbf p}\) \(\newcommand{\qvec}{\mathbf q}\) \(\newcommand{\svec}{\mathbf s}\) \(\newcommand{\tvec}{\mathbf t}\) \(\newcommand{\uvec}{\mathbf u}\) \(\newcommand{\vvec}{\mathbf v}\) \(\newcommand{\wvec}{\mathbf w}\) \(\newcommand{\xvec}{\mathbf x}\) \(\newcommand{\yvec}{\mathbf y}\) \(\newcommand{\zvec}{\mathbf z}\) \(\newcommand{\rvec}{\mathbf r}\) \(\newcommand{\mvec}{\mathbf m}\) \(\newcommand{\zerovec}{\mathbf 0}\) \(\newcommand{\onevec}{\mathbf 1}\) \(\newcommand{\real}{\mathbb R}\) \(\newcommand{\twovec}[2]{\left[\begin{array}{r}#1 \\ #2 \end{array}\right]}\) \(\newcommand{\ctwovec}[2]{\left[\begin{array}{c}#1 \\ #2 \end{array}\right]}\) \(\newcommand{\threevec}[3]{\left[\begin{array}{r}#1 \\ #2 \\ #3 \end{array}\right]}\) \(\newcommand{\cthreevec}[3]{\left[\begin{array}{c}#1 \\ #2 \\ #3 \end{array}\right]}\) \(\newcommand{\fourvec}[4]{\left[\begin{array}{r}#1 \\ #2 \\ #3 \\ #4 \end{array}\right]}\) \(\newcommand{\cfourvec}[4]{\left[\begin{array}{c}#1 \\ #2 \\ #3 \\ #4 \end{array}\right]}\) \(\newcommand{\fivevec}[5]{\left[\begin{array}{r}#1 \\ #2 \\ #3 \\ #4 \\ #5 \\ \end{array}\right]}\) \(\newcommand{\cfivevec}[5]{\left[\begin{array}{c}#1 \\ #2 \\ #3 \\ #4 \\ #5 \\ \end{array}\right]}\) \(\newcommand{\mattwo}[4]{\left[\begin{array}{rr}#1 \amp #2 \\ #3 \amp #4 \\ \end{array}\right]}\) \(\newcommand{\laspan}[1]{\text{Span}\{#1\}}\) \(\newcommand{\bcal}{\cal B}\) \(\newcommand{\ccal}{\cal C}\) \(\newcommand{\scal}{\cal S}\) \(\newcommand{\wcal}{\cal W}\) \(\newcommand{\ecal}{\cal E}\) \(\newcommand{\coords}[2]{\left\{#1\right\}_{#2}}\) \(\newcommand{\gray}[1]{\color{gray}{#1}}\) \(\newcommand{\lgray}[1]{\color{lightgray}{#1}}\) \(\newcommand{\rank}{\operatorname{rank}}\) \(\newcommand{\row}{\text{Row}}\) \(\newcommand{\col}{\text{Col}}\) \(\renewcommand{\row}{\text{Row}}\) \(\newcommand{\nul}{\text{Nul}}\) \(\newcommand{\var}{\text{Var}}\) \(\newcommand{\corr}{\text{corr}}\) \(\newcommand{\len}[1]{\left|#1\right|}\) \(\newcommand{\bbar}{\overline{\bvec}}\) \(\newcommand{\bhat}{\widehat{\bvec}}\) \(\newcommand{\bperp}{\bvec^\perp}\) \(\newcommand{\xhat}{\widehat{\xvec}}\) \(\newcommand{\vhat}{\widehat{\vvec}}\) \(\newcommand{\uhat}{\widehat{\uvec}}\) \(\newcommand{\what}{\widehat{\wvec}}\) \(\newcommand{\Sighat}{\widehat{\Sigma}}\) \(\newcommand{\lt}{<}\) \(\newcommand{\gt}{>}\) \(\newcommand{\amp}{&}\) \(\definecolor{fillinmathshade}{gray}{0.9}\)Our purpose here is not to describe at length of the details of modern telescope design, but just to give the basic principles of a simple telescope at a level needed to answer first-year examination questions and not necessarily to describe a telescope that one might actually be able to see anything through! An advanced astronomy student wanting details of real telescopes will have to search elsewhere. That said, the basic principles of a simple telescope still apply to real telescopes. Figure III.6, then, illustrates a telescope in its simplest form. Because of the difficulty of drawing diagrams with small angles, the telescope looks very stubby compared with a real one. To make a more realistic drawing, most of the angles should be less than about one degree.

We see at the left hand side of the figure a parallel beam of light coming in from a distant object off-axis. The first lens that it encounters is the object glass. Its function is to produce a real image in its focal plane, and the distance between the object glass and this primary image is \(f_1\), the focal length of the object glass. In a real bird-watching telescope, the object glass in reality is a crown-flint achromatic doublet that brings all colours to almost the same focus. In a large astronomical telescope, instead of a lens, the primary image is formed by a large concave mirror that is often paraboloidal rather than spherical in shape.
If the telescope is an astronomical telescope intended for photography, that is all there is to it. There is no second lens. The primary image falls directly on to a photographic plate or film or CCD. Let is suppose that we are looking at the Moon, whose angular radius is about a quarter of a degree and whose actual linear radius is about 1740 km. The distance of the Moon is about 384,000 km. We’ll suppose that the telescope is pointed straight at the centre of the Moon, and that the beam of light coming in from the left of figure III.6 is coming from the upper limb of the Moon. The image of the upper limb of the Moon is the tip of the thick arrow. The radius of the image of the Moon (i.e. the length of the thick arrow) is \(f_1 \tan \frac{1}{4}^\alpha\). We’ll suppose that we are using a fairly large telescope, with a focal length of ten metres. The radius of the primary image is then 4.4 cm, whereas the radius of the object (the Moon) is 1740 km. Thus the function of the object glass is to produce an image that is very, very, very much smaller that the object. The linear magnification is 4.4/174,000,000 or \(2.5 \times 10^{−8}\). This is also equal to image distance divided by object distance, which is 10/384,000,000. And you thought that a telescope magnifies!
However, rather than using the telescope for photography, we want to “look through” the telescope. We don’t want a photographic plate at the position of the real image. Instead, all we have to do is to look at the real image with a magnifying glass, and that is what the second lens in Figure III.6 is. This second lens, which is just a magnifying glass (which, we have seen in Section 3.3, doesn’t magnify either!) is called the eyepiece. As is usual with a magnifying glass, the thing we are looking at (which is the primary image produced by the object glass, but which serves as an object for the eyepiece) is placed in the focal plane of the eyepiece, so that parallel light emerges from the eyepiece. As explained in Section 3.3 you don’t have to think about this – your ciliary muscles are most relaxed when the eye is ready to receive parallel light. The eyepiece of a telescope can usually be moved in and out until the image appears sharp to your relaxed eye. Thus the primary image is in the focal plane of the object glass and also of the eyepiece, and the distance between object glass and eyepiece is \(f_1 + f_2\), where \(f_1\) and \(f_2\) are the focal lengths of object glass and eyepiece respectively. I have drawn the usual two rays from the primary image (which is the object for the eyepiece), namely one that goes straight through the centre of the lens, and one parallel to the axis, which subsequently passes through the focal point of the eyepiece.
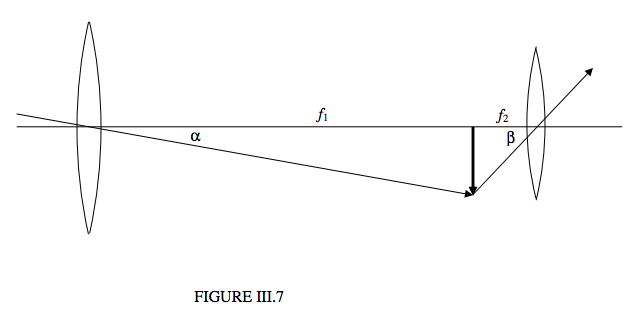
Figure III.7 is Figure III.6 redrawn with all but two rays removed, namely the ray that passes through the centre of the object glass and the ray that passes through the centre of the eyepiece.

Although, as we have seen, the linear size of the primary image is very much smaller than (i.e. centimetres rather than thousands of kilometres!) the object, what counts when we are looking through a telescope is the angular magnification, which is the ratio of the angular size of the image to the angular size of the object – that is the ratio \(\beta/\alpha\). And since, as usual, we are dealing with small angles (the angular diameter of the Moon is only about half a degree) – even though it is difficult to draw a realistic diagram with such small angles − this ratio is just equal to \(f_1/f_2\). Note that the definition of the angular magnification is the ratio of the angular size of the image to the angular size of the object (and this time we don’t add “when the object is at the near point”!), while \(f_1/f_2\) is how we can calculate it. Thus, if you are asked what is meant by the angular magnification of a telescope, and you say “\(f_1/f_2\)” you will get nought out of ten – and deservedly so.
In any case, for large magnification, you need an object glass of long focal length and an eyepiece of short focal length. Generally you have a choice of several eyepieces to choose from.
It should be pointed out that magnification is not the most important attribute of a large astronomical telescope. Large astronomical telescopes have large primary mirrors mainly to collect as much light as possible.
Exercise \(\PageIndex{1}\)
A telescope is used with an eyepiece that magnifies 8 times. The angular magnification of the telescope when used with this eyepiece is 200. What is the distance between object glass and eyepiece?
- Answer
-
628.125 cm.
One thing is odd about the “telescope” described so far – the image is upside down! In fact for astronomical purposes this doesn’t matter at all, and there is nothing “wrong”. For a telescopes designed for terrestrial use, however, such as for bird-watching, we want the image to be the right way up. In older telescopes this was done with two additional lenses; in modern telescopes the image is reversed with additional prisms.
The astute reader may notice that there is something else wrong with Figures III.6 and 7. The object glass produces a real primary image, and then we examine that real primary image with a magnifying glass. But look at the ray that goes from the tip of the primary image through the centre of the eyepiece. Where did it come from? It doesn’t seem ever to have passed through the object glass! Part of the answer to this is that angles in the drawings are grossly exaggerated (it is too difficult to draw diagrams with realistically small angles), and that if the angles were correctly drawn, this rogue ray would indeed be seen to have passed through the object glass. But this is only part of the answer, and a telescope with just the two lenses shown would have a very small field of view.
In practice an eyepiece consists of two lenses separated by a short distance. These two lenses are called the field lens and the eye lens. In one arrangement the field lens coincides with the primary image – i.e. the primary image formed by the object glass falls exactly on the field lens. The field lens does not affect the magnification at all; it merely serves to bend some of the light from the object glass into the eye lens. The rogue ray to which we have called attention has been bent towards the eye lens by the field lens. This arrangement would work, although one problem that would arise is that bits of dust on the surface of the field lens would be in sharp focus when viewed with the eye lens. Thus the field lens is often arranged so as not to coincide exactly with the primary image. It can also be shown (Section 2.12) that if the separation of the field and eye lenses is equal to half the sum of their focal lengths, the eyepiece is free of chromatic aberration. Eyepiece design could easily occupy an entire chapter, and it is not uncommon for a good eyepiece to have six or more components; we just mention this particular problem to illustrate some of the points to be considered in optical design.
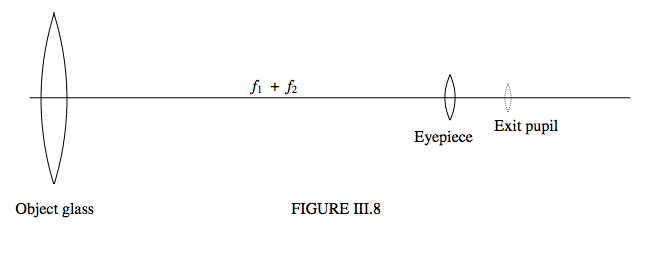
Let us return to our simple telescope of just two lenses. Let us look at things from the point of view of the eyepiece (which, in our simple telescope, consists of just the eye lens). If we now regard the object glass as an object, we can understand that the eyepiece will produce a real image of this “object”. See Figure III.8.

The real image of the object glass produced by the eyepiece is called the exit pupil of the telescope, and the object glass is the entrance pupil of the telescope. All light that passes through the entrance pupil also passes through the exit pupil. You can easily see the exit pupil a few millimetres from the eyepiece if you hold a pair of binoculars in front of you at arm’s length. The notation such as “10 % 50”, which you see on a pair of binoculars means that the angular magnification is 10 and the diameter of the object glass is 50 mm. If you look at the exit pupils of a pair of binoculars that you are considering buying, make sure that they are circular and not square. If they are square, some of the light that passed through the entrance pupil is being obstructed, probably by inadequate prisms inside the binoculars, and you are not getting your full 50 millimetres’ worth. The size of the exit pupil should be approximately equal to the size of the entrance pupil of your eye. This is about 4mm in sunlight and about 7 mm at night – so you have to consider whether you are going to be using the binoculars mainly for birdwatching or mainly for stargazing.
Just where is the exit pupil, and how big is it? “Where?” is just as important a question as “how big?” – the distance between the eyepiece and the exit pupil is the eye relief. You want this distance to be small if you do not wear glasses. If you are merely myopic or hypermetropic, there is no need for you to wear your glasses when using binoculars or a telescope – you can merely adjust the focus of the telescope. If you wear glasses to correct for astigmatism, however, you will still need your glasses when using the binoculars or telescope, so you will need a larger eye relief.
To find the eye relief, or distance of the exit pupil from the eye lens, recall that the distance between object glass and eyepiece is \(f_1 + f_2\), and the focal length of the eyepiece is \(f_2\). The eye relief is therefore given by
\[\dfrac{1}{q}= -\dfrac{1}{f_1+f_2}+\frac{1}{f_2}\]
or
\[q = \dfrac{f_2(f_1+f_2)}{f_1}.\]
The ratio of the size of the entrance pupil to the size of the exit pupil is equal to the ratio of their distances from the eyepiece. This is just \(f_1/f_2\), which is the angular magnification of the telescope. Thus the diameter of the exit pupil of a pair of \(10 \times 50\) binoculars is 5 mm – just divide the diameter of the object glass by the magnification.


