13.7: Use of Conservation Laws
- Page ID
- 33172
\( \newcommand{\vecs}[1]{\overset { \scriptstyle \rightharpoonup} {\mathbf{#1}} } \)
\( \newcommand{\vecd}[1]{\overset{-\!-\!\rightharpoonup}{\vphantom{a}\smash {#1}}} \)
\( \newcommand{\id}{\mathrm{id}}\) \( \newcommand{\Span}{\mathrm{span}}\)
( \newcommand{\kernel}{\mathrm{null}\,}\) \( \newcommand{\range}{\mathrm{range}\,}\)
\( \newcommand{\RealPart}{\mathrm{Re}}\) \( \newcommand{\ImaginaryPart}{\mathrm{Im}}\)
\( \newcommand{\Argument}{\mathrm{Arg}}\) \( \newcommand{\norm}[1]{\| #1 \|}\)
\( \newcommand{\inner}[2]{\langle #1, #2 \rangle}\)
\( \newcommand{\Span}{\mathrm{span}}\)
\( \newcommand{\id}{\mathrm{id}}\)
\( \newcommand{\Span}{\mathrm{span}}\)
\( \newcommand{\kernel}{\mathrm{null}\,}\)
\( \newcommand{\range}{\mathrm{range}\,}\)
\( \newcommand{\RealPart}{\mathrm{Re}}\)
\( \newcommand{\ImaginaryPart}{\mathrm{Im}}\)
\( \newcommand{\Argument}{\mathrm{Arg}}\)
\( \newcommand{\norm}[1]{\| #1 \|}\)
\( \newcommand{\inner}[2]{\langle #1, #2 \rangle}\)
\( \newcommand{\Span}{\mathrm{span}}\) \( \newcommand{\AA}{\unicode[.8,0]{x212B}}\)
\( \newcommand{\vectorA}[1]{\vec{#1}} % arrow\)
\( \newcommand{\vectorAt}[1]{\vec{\text{#1}}} % arrow\)
\( \newcommand{\vectorB}[1]{\overset { \scriptstyle \rightharpoonup} {\mathbf{#1}} } \)
\( \newcommand{\vectorC}[1]{\textbf{#1}} \)
\( \newcommand{\vectorD}[1]{\overrightarrow{#1}} \)
\( \newcommand{\vectorDt}[1]{\overrightarrow{\text{#1}}} \)
\( \newcommand{\vectE}[1]{\overset{-\!-\!\rightharpoonup}{\vphantom{a}\smash{\mathbf {#1}}}} \)
\( \newcommand{\vecs}[1]{\overset { \scriptstyle \rightharpoonup} {\mathbf{#1}} } \)
\( \newcommand{\vecd}[1]{\overset{-\!-\!\rightharpoonup}{\vphantom{a}\smash {#1}}} \)
\(\newcommand{\avec}{\mathbf a}\) \(\newcommand{\bvec}{\mathbf b}\) \(\newcommand{\cvec}{\mathbf c}\) \(\newcommand{\dvec}{\mathbf d}\) \(\newcommand{\dtil}{\widetilde{\mathbf d}}\) \(\newcommand{\evec}{\mathbf e}\) \(\newcommand{\fvec}{\mathbf f}\) \(\newcommand{\nvec}{\mathbf n}\) \(\newcommand{\pvec}{\mathbf p}\) \(\newcommand{\qvec}{\mathbf q}\) \(\newcommand{\svec}{\mathbf s}\) \(\newcommand{\tvec}{\mathbf t}\) \(\newcommand{\uvec}{\mathbf u}\) \(\newcommand{\vvec}{\mathbf v}\) \(\newcommand{\wvec}{\mathbf w}\) \(\newcommand{\xvec}{\mathbf x}\) \(\newcommand{\yvec}{\mathbf y}\) \(\newcommand{\zvec}{\mathbf z}\) \(\newcommand{\rvec}{\mathbf r}\) \(\newcommand{\mvec}{\mathbf m}\) \(\newcommand{\zerovec}{\mathbf 0}\) \(\newcommand{\onevec}{\mathbf 1}\) \(\newcommand{\real}{\mathbb R}\) \(\newcommand{\twovec}[2]{\left[\begin{array}{r}#1 \\ #2 \end{array}\right]}\) \(\newcommand{\ctwovec}[2]{\left[\begin{array}{c}#1 \\ #2 \end{array}\right]}\) \(\newcommand{\threevec}[3]{\left[\begin{array}{r}#1 \\ #2 \\ #3 \end{array}\right]}\) \(\newcommand{\cthreevec}[3]{\left[\begin{array}{c}#1 \\ #2 \\ #3 \end{array}\right]}\) \(\newcommand{\fourvec}[4]{\left[\begin{array}{r}#1 \\ #2 \\ #3 \\ #4 \end{array}\right]}\) \(\newcommand{\cfourvec}[4]{\left[\begin{array}{c}#1 \\ #2 \\ #3 \\ #4 \end{array}\right]}\) \(\newcommand{\fivevec}[5]{\left[\begin{array}{r}#1 \\ #2 \\ #3 \\ #4 \\ #5 \\ \end{array}\right]}\) \(\newcommand{\cfivevec}[5]{\left[\begin{array}{c}#1 \\ #2 \\ #3 \\ #4 \\ #5 \\ \end{array}\right]}\) \(\newcommand{\mattwo}[4]{\left[\begin{array}{rr}#1 \amp #2 \\ #3 \amp #4 \\ \end{array}\right]}\) \(\newcommand{\laspan}[1]{\text{Span}\{#1\}}\) \(\newcommand{\bcal}{\cal B}\) \(\newcommand{\ccal}{\cal C}\) \(\newcommand{\scal}{\cal S}\) \(\newcommand{\wcal}{\cal W}\) \(\newcommand{\ecal}{\cal E}\) \(\newcommand{\coords}[2]{\left\{#1\right\}_{#2}}\) \(\newcommand{\gray}[1]{\color{gray}{#1}}\) \(\newcommand{\lgray}[1]{\color{lightgray}{#1}}\) \(\newcommand{\rank}{\operatorname{rank}}\) \(\newcommand{\row}{\text{Row}}\) \(\newcommand{\col}{\text{Col}}\) \(\renewcommand{\row}{\text{Row}}\) \(\newcommand{\nul}{\text{Nul}}\) \(\newcommand{\var}{\text{Var}}\) \(\newcommand{\corr}{\text{corr}}\) \(\newcommand{\len}[1]{\left|#1\right|}\) \(\newcommand{\bbar}{\overline{\bvec}}\) \(\newcommand{\bhat}{\widehat{\bvec}}\) \(\newcommand{\bperp}{\bvec^\perp}\) \(\newcommand{\xhat}{\widehat{\xvec}}\) \(\newcommand{\vhat}{\widehat{\vvec}}\) \(\newcommand{\uhat}{\widehat{\uvec}}\) \(\newcommand{\what}{\widehat{\wvec}}\) \(\newcommand{\Sighat}{\widehat{\Sigma}}\) \(\newcommand{\lt}{<}\) \(\newcommand{\gt}{>}\) \(\newcommand{\amp}{&}\) \(\definecolor{fillinmathshade}{gray}{0.9}\)The gravitational force is conservative, so two point masses \(M \) and \(m \) separated by a distance \(r \) have a potential energy:
\[U=-\frac{G M m}{r}\label{13.12}\]
It is easily verified that differentiation recovers the gravitational force.
The conservation of energy and angular momentum in planetary motions can be used to solve many practical problems involving motion under the influence of gravity. For instance, suppose a bullet is shot straight upward from the surface of the moon. One might ask what initial velocity is needed to insure that the bullet will escape from the gravity of the moon. Since total energy \(E \) is conserved, the sum of the initial kinetic and potential energies must equal the sum of the final kinetic and potential energies:
\[E=K_{\text {initial }}+U_{\text {initial }}=K_{\text {final }}+U_{\text {final }}\label{13.13}\]
For the bullet to escape the moon, its kinetic energy must remain positive no matter how far it gets from the moon. Since the potential energy is always negative, asymptoting to zero at infinite distance (i. e., \(U\) final = 0), the minimum total energy consistent with this condition is zero. For zero total energy we have
\[\frac{m v_{\text {initial }}^{2}}{2}=K_{\text {initial }}=-U_{\text {initial }}=+\frac{G M m}{R},\label{13.14}\]
where \(m \) is the mass of the bullet, \(M \) is the mass of the moon, \(R \) is the radius of the moon, and \(v\) initial is the minimum initial velocity required for the bullet to escape. Solving for \(v\) initial yields
\[v_{\text {initial }}=\left(\frac{2 G M}{R}\right)^{1 / 2}\label{13.15}\]
This is called the escape velocity. Notice that the escape velocity from a given radius is a factor of 21∕2 larger than the velocity needed for a circular orbit at that radius.
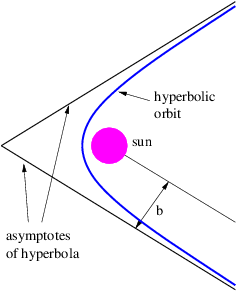
An object is energetically bound to the sun if its kinetic plus potential energy is less than zero. In this case the object follows an elliptical orbit around the sun as shown by Kepler. However, if the kinetic plus potential energy is zero, the object follows a parabolic orbit, and if it is greater than zero, a hyperbolic orbit results. In the latter two cases the sun also resides at a focus of the parabola or hyperbola. Figure 13.8 shows a typical hyperbolic orbit. The impact parameter, defined in this figure, is the closest the object would have come to the center of the sun if it hadn’t been deflected by gravity.
Sometimes energy and angular momentum conservation can be used together to solve problems. For instance, suppose we know the energy and angular momentum of an asteroid of mass \(m \) and we wish to infer the maximum and minimum distances of the asteroid from the sun, the so-called aphelion and perihelion distances. Since the asteroid is gravitationally bound to the sun, it is convenient to characterize the total energy by \(E\) b = -\(E\), the so-called binding energy. If \(v \) is the orbital speed of the asteroid and \(r \) is its distance from the sun, then the binding energy can be written in terms of the kinetic and potential energies:
\[ -E_{b}=\frac{m v^{2}}{2}-\frac{G M m}{r}\label{13.16}\]
The magnitude of the angular momentum of the asteroid is \(L \) = \(mv\) t\(r\), where \(v\) t is the tangential component of the asteroid’s velocity. At aphelion and perihelion, the radial part of the velocity of the asteroid is zero and the speed equals the tangential component of the velocity, \(v \) = \(v\) t. Thus, at aphelion and perihelion we can eliminate \(v \) in favor of the angular momentum:
\[-E_{b}=\frac{L^{2}}{2 m r^{2}}-\frac{G M m}{r} \quad \text { (aphelion and perihelion). }\label{13.17}\]
This can be rearranged into a quadratic equation
\[r^{2}-\frac{G M m}{E_{b}} r+\frac{L^{2}}{2 m E_{b}}=0\label{13.18}\]
which can be solved to yield
\[r=\frac{1}{2}\left[\frac{G M m}{E_{b}} \pm\left(\frac{G^{2} M^{2} m^{2}}{E_{b}^{2}}-\frac{2 L^{2}}{m E_{b}}\right)^{1 / 2}\right]\label{13.19}\]
The larger of the two solutions yields the aphelion value of the radius while the smaller yields the perihelion.
Equation \ref{13.19} tells us something else interesting. The quantity inside the square root cannot be negative, which means that we must have
\[L^{2} \leq \frac{G^{2} M^{2} m^{3}}{2 E_{b}}\label{13.20}\]
In other words, for a given value of the binding energy \(E\)b there is a maximum value for the angular momentum. This maximum value makes the square root zero, which means that the aphelion and the perihelion are the same — i. e., the orbit is circular. Thus, among all orbits with a given binding energy, the circular orbit has the maximum angular momentum.