
11.1: Introduction to Interference


- Last updated
- Aug 19, 2023
- Save as PDF

\newcommand{\vecs}[1]{\overset { \scriptstyle \rightharpoonup} {\mathbf{#1}} }
\newcommand{\vecd}[1]{\overset{-\!-\!\rightharpoonup}{\vphantom{a}\smash {#1}}}
\newcommand{\id}{\mathrm{id}} \newcommand{\Span}{\mathrm{span}}
( \newcommand{\kernel}{\mathrm{null}\,}\) \newcommand{\range}{\mathrm{range}\,}
\newcommand{\RealPart}{\mathrm{Re}} \newcommand{\ImaginaryPart}{\mathrm{Im}}
\newcommand{\Argument}{\mathrm{Arg}} \newcommand{\norm}[1]{\| #1 \|}
\newcommand{\inner}[2]{\langle #1, #2 \rangle}
\newcommand{\Span}{\mathrm{span}}
\newcommand{\id}{\mathrm{id}}
\newcommand{\Span}{\mathrm{span}}
\newcommand{\kernel}{\mathrm{null}\,}
\newcommand{\range}{\mathrm{range}\,}
\newcommand{\RealPart}{\mathrm{Re}}
\newcommand{\ImaginaryPart}{\mathrm{Im}}
\newcommand{\Argument}{\mathrm{Arg}}
\newcommand{\norm}[1]{\| #1 \|}
\newcommand{\inner}[2]{\langle #1, #2 \rangle}
\newcommand{\Span}{\mathrm{span}} \newcommand{\AA}{\unicode[.8,0]{x212B}}
\newcommand{\vectorA}[1]{\vec{#1}} % arrow
\newcommand{\vectorAt}[1]{\vec{\text{#1}}} % arrow
\newcommand{\vectorB}[1]{\overset { \scriptstyle \rightharpoonup} {\mathbf{#1}} }
\newcommand{\vectorC}[1]{\textbf{#1}}
\newcommand{\vectorD}[1]{\overrightarrow{#1}}
\newcommand{\vectorDt}[1]{\overrightarrow{\text{#1}}}
\newcommand{\vectE}[1]{\overset{-\!-\!\rightharpoonup}{\vphantom{a}\smash{\mathbf {#1}}}}
\newcommand{\vecs}[1]{\overset { \scriptstyle \rightharpoonup} {\mathbf{#1}} }
\newcommand{\vecd}[1]{\overset{-\!-\!\rightharpoonup}{\vphantom{a}\smash {#1}}}
\newcommand{\avec}{\mathbf a} \newcommand{\bvec}{\mathbf b} \newcommand{\cvec}{\mathbf c} \newcommand{\dvec}{\mathbf d} \newcommand{\dtil}{\widetilde{\mathbf d}} \newcommand{\evec}{\mathbf e} \newcommand{\fvec}{\mathbf f} \newcommand{\nvec}{\mathbf n} \newcommand{\pvec}{\mathbf p} \newcommand{\qvec}{\mathbf q} \newcommand{\svec}{\mathbf s} \newcommand{\tvec}{\mathbf t} \newcommand{\uvec}{\mathbf u} \newcommand{\vvec}{\mathbf v} \newcommand{\wvec}{\mathbf w} \newcommand{\xvec}{\mathbf x} \newcommand{\yvec}{\mathbf y} \newcommand{\zvec}{\mathbf z} \newcommand{\rvec}{\mathbf r} \newcommand{\mvec}{\mathbf m} \newcommand{\zerovec}{\mathbf 0} \newcommand{\onevec}{\mathbf 1} \newcommand{\real}{\mathbb R} \newcommand{\twovec}[2]{\left[\begin{array}{r}#1 \\ #2 \end{array}\right]} \newcommand{\ctwovec}[2]{\left[\begin{array}{c}#1 \\ #2 \end{array}\right]} \newcommand{\threevec}[3]{\left[\begin{array}{r}#1 \\ #2 \\ #3 \end{array}\right]} \newcommand{\cthreevec}[3]{\left[\begin{array}{c}#1 \\ #2 \\ #3 \end{array}\right]} \newcommand{\fourvec}[4]{\left[\begin{array}{r}#1 \\ #2 \\ #3 \\ #4 \end{array}\right]} \newcommand{\cfourvec}[4]{\left[\begin{array}{c}#1 \\ #2 \\ #3 \\ #4 \end{array}\right]} \newcommand{\fivevec}[5]{\left[\begin{array}{r}#1 \\ #2 \\ #3 \\ #4 \\ #5 \\ \end{array}\right]} \newcommand{\cfivevec}[5]{\left[\begin{array}{c}#1 \\ #2 \\ #3 \\ #4 \\ #5 \\ \end{array}\right]} \newcommand{\mattwo}[4]{\left[\begin{array}{rr}#1 \amp #2 \\ #3 \amp #4 \\ \end{array}\right]} \newcommand{\laspan}[1]{\text{Span}\{#1\}} \newcommand{\bcal}{\cal B} \newcommand{\ccal}{\cal C} \newcommand{\scal}{\cal S} \newcommand{\wcal}{\cal W} \newcommand{\ecal}{\cal E} \newcommand{\coords}[2]{\left\{#1\right\}_{#2}} \newcommand{\gray}[1]{\color{gray}{#1}} \newcommand{\lgray}[1]{\color{lightgray}{#1}} \newcommand{\rank}{\operatorname{rank}} \newcommand{\row}{\text{Row}} \newcommand{\col}{\text{Col}} \renewcommand{\row}{\text{Row}} \newcommand{\nul}{\text{Nul}} \newcommand{\var}{\text{Var}} \newcommand{\corr}{\text{corr}} \newcommand{\len}[1]{\left|#1\right|} \newcommand{\bbar}{\overline{\bvec}} \newcommand{\bhat}{\widehat{\bvec}} \newcommand{\bperp}{\bvec^\perp} \newcommand{\xhat}{\widehat{\xvec}} \newcommand{\vhat}{\widehat{\vvec}} \newcommand{\uhat}{\widehat{\uvec}} \newcommand{\what}{\widehat{\wvec}} \newcommand{\Sighat}{\widehat{\Sigma}} \newcommand{\lt}{<} \newcommand{\gt}{>} \newcommand{\amp}{&} \definecolor{fillinmathshade}{gray}{0.9}The most certain indication of a wave is interference. This wave characteristic is most prominent when the wave interacts with an object that is not large compared with the wavelength. Interference is observed for water waves, sound waves, light waves, and, in fact, all types of waves.
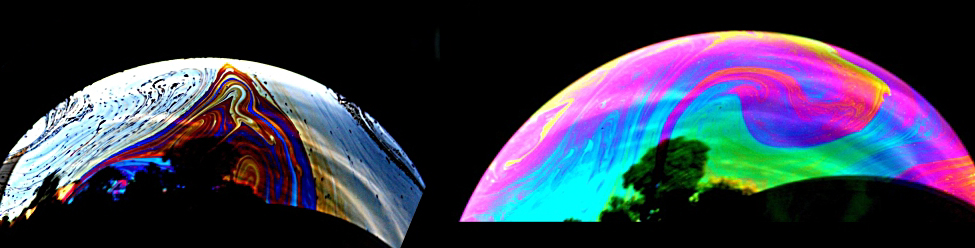
If you have ever looked at the reds, blues, and greens in a sunlit soap bubble and wondered how straw-colored soapy water could produce them, you have hit upon one of the many phenomena that can only be explained by the wave character of light (Figure \PageIndex{1}). The same is true for the colors seen in an oil slick or in the light reflected from a DVD disc. In these cases, light interacts with objects and exhibits wave characteristics.
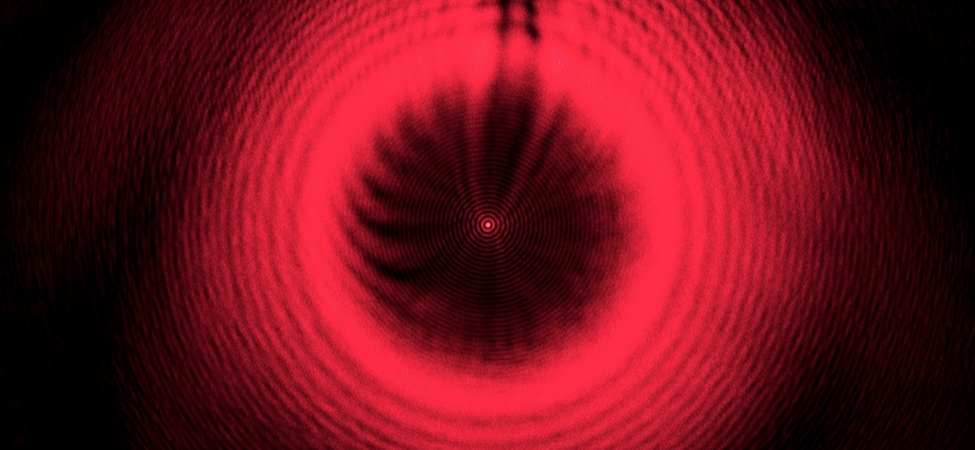
We will learn in this chapter that a wave can behave not as one wave but as an infinite number of point sources of waves. These waves can interfere with each other, resulting in interference patterns. Thus, a monochromatic light beam through a narrow opening—a slit just a little wider than the wavelength of the light would not cast a simple shadow of the slit on the screen, an interference pattern appears in what we will refer to as diffraction. An example of diffraction is what is depicted in Figure \PageIndex{2}. Diffraction plays a major role in the way we interpret the output of optical instruments and on the was we design instruments that are based on the use of light.