Physics LibreTexts

11.7: The Camera

  • Page ID
    32257
  • \( \newcommand{\vecs}[1]{\overset { \scriptstyle \rightharpoonup} {\mathbf{#1}} } \)

    \( \newcommand{\vecd}[1]{\overset{-\!-\!\rightharpoonup}{\vphantom{a}\smash {#1}}} \)

    \( \newcommand{\id}{\mathrm{id}}\) \( \newcommand{\Span}{\mathrm{span}}\)

    ( \newcommand{\kernel}{\mathrm{null}\,}\) \( \newcommand{\range}{\mathrm{range}\,}\)

    \( \newcommand{\RealPart}{\mathrm{Re}}\) \( \newcommand{\ImaginaryPart}{\mathrm{Im}}\)

    \( \newcommand{\Argument}{\mathrm{Arg}}\) \( \newcommand{\norm}[1]{\| #1 \|}\)

    \( \newcommand{\inner}[2]{\langle #1, #2 \rangle}\)

    \( \newcommand{\Span}{\mathrm{span}}\)

    \( \newcommand{\id}{\mathrm{id}}\)

    \( \newcommand{\Span}{\mathrm{span}}\)

    \( \newcommand{\kernel}{\mathrm{null}\,}\)

    \( \newcommand{\range}{\mathrm{range}\,}\)

    \( \newcommand{\RealPart}{\mathrm{Re}}\)

    \( \newcommand{\ImaginaryPart}{\mathrm{Im}}\)

    \( \newcommand{\Argument}{\mathrm{Arg}}\)

    \( \newcommand{\norm}[1]{\| #1 \|}\)

    \( \newcommand{\inner}[2]{\langle #1, #2 \rangle}\)

    \( \newcommand{\Span}{\mathrm{span}}\) \( \newcommand{\AA}{\unicode[.8,0]{x212B}}\)

    \( \newcommand{\vectorA}[1]{\vec{#1}}      % arrow\)

    \( \newcommand{\vectorAt}[1]{\vec{\text{#1}}}      % arrow\)

    \( \newcommand{\vectorB}[1]{\overset { \scriptstyle \rightharpoonup} {\mathbf{#1}} } \)

    \( \newcommand{\vectorC}[1]{\textbf{#1}} \)

    \( \newcommand{\vectorD}[1]{\overrightarrow{#1}} \)

    \( \newcommand{\vectorDt}[1]{\overrightarrow{\text{#1}}} \)

    \( \newcommand{\vectE}[1]{\overset{-\!-\!\rightharpoonup}{\vphantom{a}\smash{\mathbf {#1}}}} \)

    \( \newcommand{\vecs}[1]{\overset { \scriptstyle \rightharpoonup} {\mathbf{#1}} } \)

    \( \newcommand{\vecd}[1]{\overset{-\!-\!\rightharpoonup}{\vphantom{a}\smash {#1}}} \)

    \(\newcommand{\avec}{\mathbf a}\) \(\newcommand{\bvec}{\mathbf b}\) \(\newcommand{\cvec}{\mathbf c}\) \(\newcommand{\dvec}{\mathbf d}\) \(\newcommand{\dtil}{\widetilde{\mathbf d}}\) \(\newcommand{\evec}{\mathbf e}\) \(\newcommand{\fvec}{\mathbf f}\) \(\newcommand{\nvec}{\mathbf n}\) \(\newcommand{\pvec}{\mathbf p}\) \(\newcommand{\qvec}{\mathbf q}\) \(\newcommand{\svec}{\mathbf s}\) \(\newcommand{\tvec}{\mathbf t}\) \(\newcommand{\uvec}{\mathbf u}\) \(\newcommand{\vvec}{\mathbf v}\) \(\newcommand{\wvec}{\mathbf w}\) \(\newcommand{\xvec}{\mathbf x}\) \(\newcommand{\yvec}{\mathbf y}\) \(\newcommand{\zvec}{\mathbf z}\) \(\newcommand{\rvec}{\mathbf r}\) \(\newcommand{\mvec}{\mathbf m}\) \(\newcommand{\zerovec}{\mathbf 0}\) \(\newcommand{\onevec}{\mathbf 1}\) \(\newcommand{\real}{\mathbb R}\) \(\newcommand{\twovec}[2]{\left[\begin{array}{r}#1 \\ #2 \end{array}\right]}\) \(\newcommand{\ctwovec}[2]{\left[\begin{array}{c}#1 \\ #2 \end{array}\right]}\) \(\newcommand{\threevec}[3]{\left[\begin{array}{r}#1 \\ #2 \\ #3 \end{array}\right]}\) \(\newcommand{\cthreevec}[3]{\left[\begin{array}{c}#1 \\ #2 \\ #3 \end{array}\right]}\) \(\newcommand{\fourvec}[4]{\left[\begin{array}{r}#1 \\ #2 \\ #3 \\ #4 \end{array}\right]}\) \(\newcommand{\cfourvec}[4]{\left[\begin{array}{c}#1 \\ #2 \\ #3 \\ #4 \end{array}\right]}\) \(\newcommand{\fivevec}[5]{\left[\begin{array}{r}#1 \\ #2 \\ #3 \\ #4 \\ #5 \\ \end{array}\right]}\) \(\newcommand{\cfivevec}[5]{\left[\begin{array}{c}#1 \\ #2 \\ #3 \\ #4 \\ #5 \\ \end{array}\right]}\) \(\newcommand{\mattwo}[4]{\left[\begin{array}{rr}#1 \amp #2 \\ #3 \amp #4 \\ \end{array}\right]}\) \(\newcommand{\laspan}[1]{\text{Span}\{#1\}}\) \(\newcommand{\bcal}{\cal B}\) \(\newcommand{\ccal}{\cal C}\) \(\newcommand{\scal}{\cal S}\) \(\newcommand{\wcal}{\cal W}\) \(\newcommand{\ecal}{\cal E}\) \(\newcommand{\coords}[2]{\left\{#1\right\}_{#2}}\) \(\newcommand{\gray}[1]{\color{gray}{#1}}\) \(\newcommand{\lgray}[1]{\color{lightgray}{#1}}\) \(\newcommand{\rank}{\operatorname{rank}}\) \(\newcommand{\row}{\text{Row}}\) \(\newcommand{\col}{\text{Col}}\) \(\renewcommand{\row}{\text{Row}}\) \(\newcommand{\nul}{\text{Nul}}\) \(\newcommand{\var}{\text{Var}}\) \(\newcommand{\corr}{\text{corr}}\) \(\newcommand{\len}[1]{\left|#1\right|}\) \(\newcommand{\bbar}{\overline{\bvec}}\) \(\newcommand{\bhat}{\widehat{\bvec}}\) \(\newcommand{\bperp}{\bvec^\perp}\) \(\newcommand{\xhat}{\widehat{\xvec}}\) \(\newcommand{\vhat}{\widehat{\vvec}}\) \(\newcommand{\uhat}{\widehat{\uvec}}\) \(\newcommand{\what}{\widehat{\wvec}}\) \(\newcommand{\Sighat}{\widehat{\Sigma}}\) \(\newcommand{\lt}{<}\) \(\newcommand{\gt}{>}\) \(\newcommand{\amp}{&}\) \(\definecolor{fillinmathshade}{gray}{0.9}\)
    Learning Objectives

    By the end of this section, you will be able to:

    • Describe the optics of a camera
    • Characterize the image created by a camera

    Cameras are very common in our everyday life. Between 1825 and 1827, French inventor Nicéphore Niépce successfully photographed an image created by a primitive camera. Since then, enormous progress has been achieved in the design of cameras and camera-based detectors.

    Initially, photographs were recorded by using the light-sensitive reaction of silver-based compounds such as silver chloride or silver bromide. Silver-based photographic paper was in common use until the advent of digital photography in the 1980s, which is intimately connected to charge-coupled device (CCD) detectors. In a nutshell, a CCD is a semiconductor chip that records images as a matrix of tiny pixels, each pixel located in a “bin” in the surface. Each pixel is capable of detecting the intensity of light impinging on it. Color is brought into play by putting red-, blue-, and green-colored filters over the pixels, resulting in colored digital images (Figure \(\PageIndex{1}\)). At its best resolution, one CCD pixel corresponds to one pixel of the image. To reduce the resolution and decrease the size of the file, we can “bin” several CCD pixels into one, resulting in a smaller but “pixelated” image.
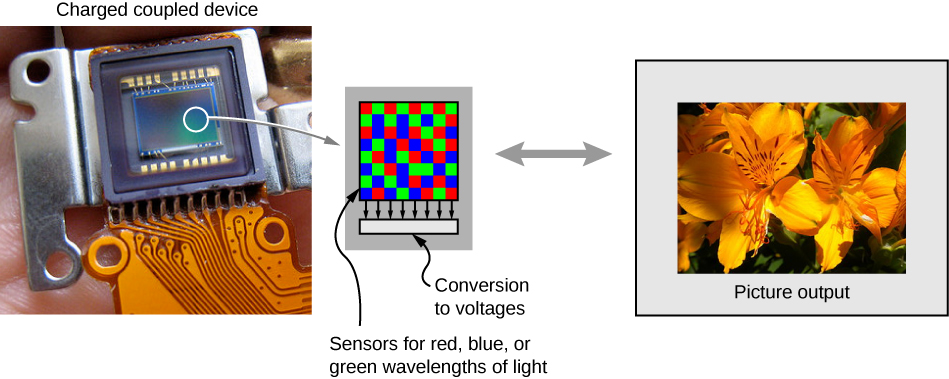
    A photograph of a charge coupled device is shown. A small part of this is enlarged and shows several pixels with red, blue and green squares. This is labeled “sensors for red, blue or green wavelengths of light” and “conversion to voltages”. A photograph of flowers is shown, labeled “picture output”.
    Figure \(\PageIndex{1}\): A charge-coupled device (CCD) converts light signals into electronic signals, enabling electronic processing and storage of visual images. This is the basis for electronic imaging in all digital cameras, from cell phones to movie cameras. (credit left: modification of work by Bruce Turner)

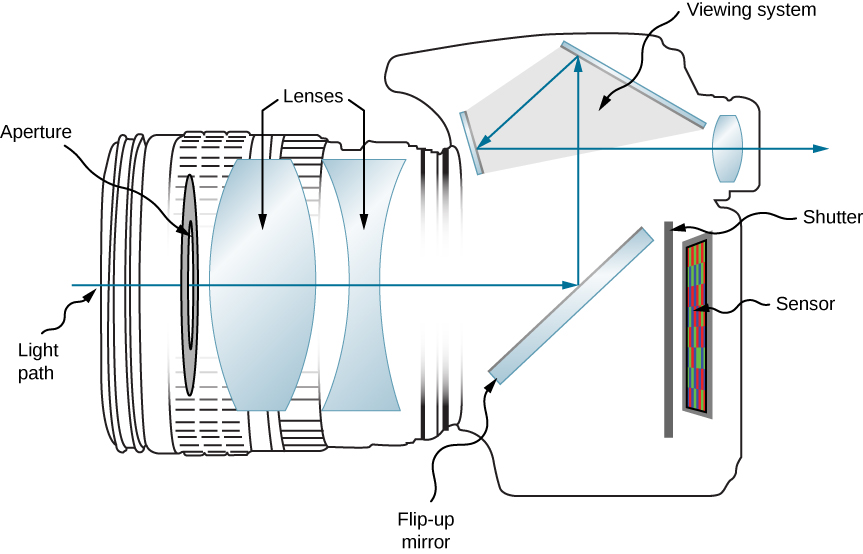
    Clearly, electronics is a big part of a digital camera; however, the underlying physics is basic optics. As a matter of fact, the optics of a camera are pretty much the same as those of a single lens with an object distance that is significantly larger than the lens’s focal distance (Figure \(\PageIndex{2}\)).

    Figure shows the side view of a digital camera. At the front of the camera is a disc labeled aperture, followed by a bi-convex lens, a bi-concave lens, a slanted mirror labeled flip-up mirror, a shutter and a sensor. The light path is shown such that light enters the camera through the aperture and lenses and strikes the mirror. It is reflected upwards to the viewing system. Here it reflects from two more mirrors before going through a bi-convex lens and emerging out of the camera.
    Figure \(\PageIndex{2}\): Modern digital cameras have several lenses to produce a clear image with minimal aberration and use red, blue, and green filters to produce a color image.

    For instance, let us consider the camera in a smartphone. An average smartphone camera is equipped with a stationary wide-angle lens with a focal length of about 4–5 mm. (This focal length is about equal to the thickness of the phone.) The image created by the lens is focused on the CCD detector mounted at the opposite side of the phone. In a cell phone, the lens and the CCD cannot move relative to each other. So how do we make sure that both the images of a distant and a close object are in focus?

    Recall that a human eye can accommodate for distant and close images by changing its focal distance. A cell phone camera cannot do that because the distance from the lens to the detector is fixed. Here is where the small focal distance becomes important. Let us assume we have a camera with a 5-mm focal distance. What is the image distance for a selfie? The object distance for a selfie (the length of the hand holding the phone) is about 50 cm. Using the thin-lens equation, we can write

    \[\frac{1}{5mm}=\frac{1}{500mm}+\frac{1}{d_i} \nonumber \]

    We then obtain the image distance:

    \[\frac{1}{d_i}=\frac{1}{5mm}−\frac{1}{500mm} \nonumber \]

    Note that the object distance is 100 times larger than the focal distance. We can clearly see that the 1/(500 mm) term is significantly smaller than 1/(5 mm), which means that the image distance is pretty much equal to the lens’s focal length. An actual calculation gives us the image distance di=5.05mm. This value is extremely close to the lens’s focal distance.

    Now let us consider the case of a distant object. Let us say that we would like to take a picture of a person standing about 5 m from us. Using the thin-lens equation again, we obtain the image distance of 5.005 mm. The farther the object is from the lens, the closer the image distance is to the focal distance. At the limiting case of an infinitely distant object, we obtain the image distance exactly equal to the focal distance of the lens.

    As you can see, the difference between the image distance for a selfie and the image distance for a distant object is just about 0.05 mm or 50 microns. Even a short object distance such as the length of your hand is two orders of magnitude larger than the lens’s focal length, resulting in minute variations of the image distance. (The 50-micron difference is smaller than the thickness of an average sheet of paper.) Such a small difference can be easily accommodated by the same detector, positioned at the focal distance of the lens. Image analysis software can help improve image quality.

    Conventional point-and-shoot cameras often use a movable lens to change the lens-to-image distance. Complex lenses of the more expensive mirror reflex cameras allow for superb quality photographic images. The optics of these camera lenses is beyond the scope of this textbook.


    This page titled 11.7: The Camera is shared under a CC BY license and was authored, remixed, and/or curated by OpenStax.

    • Was this article helpful?