4.5: Thin Lenses
- Page ID
- 18463
\( \newcommand{\vecs}[1]{\overset { \scriptstyle \rightharpoonup} {\mathbf{#1}} } \)
\( \newcommand{\vecd}[1]{\overset{-\!-\!\rightharpoonup}{\vphantom{a}\smash {#1}}} \)
\( \newcommand{\id}{\mathrm{id}}\) \( \newcommand{\Span}{\mathrm{span}}\)
( \newcommand{\kernel}{\mathrm{null}\,}\) \( \newcommand{\range}{\mathrm{range}\,}\)
\( \newcommand{\RealPart}{\mathrm{Re}}\) \( \newcommand{\ImaginaryPart}{\mathrm{Im}}\)
\( \newcommand{\Argument}{\mathrm{Arg}}\) \( \newcommand{\norm}[1]{\| #1 \|}\)
\( \newcommand{\inner}[2]{\langle #1, #2 \rangle}\)
\( \newcommand{\Span}{\mathrm{span}}\)
\( \newcommand{\id}{\mathrm{id}}\)
\( \newcommand{\Span}{\mathrm{span}}\)
\( \newcommand{\kernel}{\mathrm{null}\,}\)
\( \newcommand{\range}{\mathrm{range}\,}\)
\( \newcommand{\RealPart}{\mathrm{Re}}\)
\( \newcommand{\ImaginaryPart}{\mathrm{Im}}\)
\( \newcommand{\Argument}{\mathrm{Arg}}\)
\( \newcommand{\norm}[1]{\| #1 \|}\)
\( \newcommand{\inner}[2]{\langle #1, #2 \rangle}\)
\( \newcommand{\Span}{\mathrm{span}}\) \( \newcommand{\AA}{\unicode[.8,0]{x212B}}\)
\( \newcommand{\vectorA}[1]{\vec{#1}} % arrow\)
\( \newcommand{\vectorAt}[1]{\vec{\text{#1}}} % arrow\)
\( \newcommand{\vectorB}[1]{\overset { \scriptstyle \rightharpoonup} {\mathbf{#1}} } \)
\( \newcommand{\vectorC}[1]{\textbf{#1}} \)
\( \newcommand{\vectorD}[1]{\overrightarrow{#1}} \)
\( \newcommand{\vectorDt}[1]{\overrightarrow{\text{#1}}} \)
\( \newcommand{\vectE}[1]{\overset{-\!-\!\rightharpoonup}{\vphantom{a}\smash{\mathbf {#1}}}} \)
\( \newcommand{\vecs}[1]{\overset { \scriptstyle \rightharpoonup} {\mathbf{#1}} } \)
\( \newcommand{\vecd}[1]{\overset{-\!-\!\rightharpoonup}{\vphantom{a}\smash {#1}}} \)
\(\newcommand{\avec}{\mathbf a}\) \(\newcommand{\bvec}{\mathbf b}\) \(\newcommand{\cvec}{\mathbf c}\) \(\newcommand{\dvec}{\mathbf d}\) \(\newcommand{\dtil}{\widetilde{\mathbf d}}\) \(\newcommand{\evec}{\mathbf e}\) \(\newcommand{\fvec}{\mathbf f}\) \(\newcommand{\nvec}{\mathbf n}\) \(\newcommand{\pvec}{\mathbf p}\) \(\newcommand{\qvec}{\mathbf q}\) \(\newcommand{\svec}{\mathbf s}\) \(\newcommand{\tvec}{\mathbf t}\) \(\newcommand{\uvec}{\mathbf u}\) \(\newcommand{\vvec}{\mathbf v}\) \(\newcommand{\wvec}{\mathbf w}\) \(\newcommand{\xvec}{\mathbf x}\) \(\newcommand{\yvec}{\mathbf y}\) \(\newcommand{\zvec}{\mathbf z}\) \(\newcommand{\rvec}{\mathbf r}\) \(\newcommand{\mvec}{\mathbf m}\) \(\newcommand{\zerovec}{\mathbf 0}\) \(\newcommand{\onevec}{\mathbf 1}\) \(\newcommand{\real}{\mathbb R}\) \(\newcommand{\twovec}[2]{\left[\begin{array}{r}#1 \\ #2 \end{array}\right]}\) \(\newcommand{\ctwovec}[2]{\left[\begin{array}{c}#1 \\ #2 \end{array}\right]}\) \(\newcommand{\threevec}[3]{\left[\begin{array}{r}#1 \\ #2 \\ #3 \end{array}\right]}\) \(\newcommand{\cthreevec}[3]{\left[\begin{array}{c}#1 \\ #2 \\ #3 \end{array}\right]}\) \(\newcommand{\fourvec}[4]{\left[\begin{array}{r}#1 \\ #2 \\ #3 \\ #4 \end{array}\right]}\) \(\newcommand{\cfourvec}[4]{\left[\begin{array}{c}#1 \\ #2 \\ #3 \\ #4 \end{array}\right]}\) \(\newcommand{\fivevec}[5]{\left[\begin{array}{r}#1 \\ #2 \\ #3 \\ #4 \\ #5 \\ \end{array}\right]}\) \(\newcommand{\cfivevec}[5]{\left[\begin{array}{c}#1 \\ #2 \\ #3 \\ #4 \\ #5 \\ \end{array}\right]}\) \(\newcommand{\mattwo}[4]{\left[\begin{array}{rr}#1 \amp #2 \\ #3 \amp #4 \\ \end{array}\right]}\) \(\newcommand{\laspan}[1]{\text{Span}\{#1\}}\) \(\newcommand{\bcal}{\cal B}\) \(\newcommand{\ccal}{\cal C}\) \(\newcommand{\scal}{\cal S}\) \(\newcommand{\wcal}{\cal W}\) \(\newcommand{\ecal}{\cal E}\) \(\newcommand{\coords}[2]{\left\{#1\right\}_{#2}}\) \(\newcommand{\gray}[1]{\color{gray}{#1}}\) \(\newcommand{\lgray}[1]{\color{lightgray}{#1}}\) \(\newcommand{\rank}{\operatorname{rank}}\) \(\newcommand{\row}{\text{Row}}\) \(\newcommand{\col}{\text{Col}}\) \(\renewcommand{\row}{\text{Row}}\) \(\newcommand{\nul}{\text{Nul}}\) \(\newcommand{\var}{\text{Var}}\) \(\newcommand{\corr}{\text{corr}}\) \(\newcommand{\len}[1]{\left|#1\right|}\) \(\newcommand{\bbar}{\overline{\bvec}}\) \(\newcommand{\bhat}{\widehat{\bvec}}\) \(\newcommand{\bperp}{\bvec^\perp}\) \(\newcommand{\xhat}{\widehat{\xvec}}\) \(\newcommand{\vhat}{\widehat{\vvec}}\) \(\newcommand{\uhat}{\widehat{\uvec}}\) \(\newcommand{\what}{\widehat{\wvec}}\) \(\newcommand{\Sighat}{\widehat{\Sigma}}\) \(\newcommand{\lt}{<}\) \(\newcommand{\gt}{>}\) \(\newcommand{\amp}{&}\) \(\definecolor{fillinmathshade}{gray}{0.9}\)Building a Lens
While it is interesting to see how images are formed as light passes from one index of refraction to another through a spherical surface, this only rarely happens in the real world. It is far more common for light to come from an object that is in the air (\(n=1.00\)), pass through a transparent region with a higher index of refraction, then return again to the air before being observed. The light will then be refracted at both surfaces of the region during its journey from the object to the point of observation. If both surfaces of the region are spherical, then the light will either converge or diverge at each surface (depending upon which of the four cases of Section 4.4 applies). Such an optical device is called a lens.
Let's take a look at a glass lens that is convex on both sides, which is in air. When light enters one side, it is going from a lower index of refraction (air) to a higher one (glass) that is convex, which means we have case #1, which is a converging refraction. Now the light is inside the glass, and its next encounter is with a concave surface (from the perspective of inside the glass), passing from a higher index of refraction to a lower one. This is case #3, which is also a converging refraction. [See Figure 4.4.2 for references to the four possible cases.] A double-convex lens is therefore a converging lens.
Figure 4.5.1 – Double Convex Lens
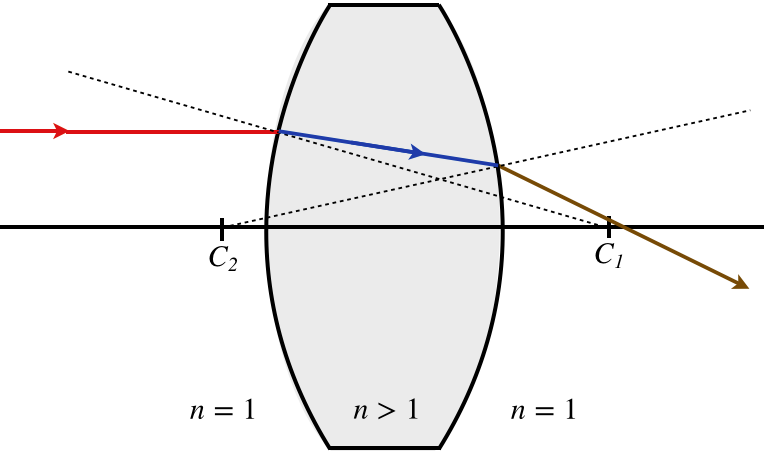
Note that the two surfaces do not necessarily have the same radius of curvature. The surface with the shorter radius (the one that is more sharply-curved) will bend the light more than the other surface.
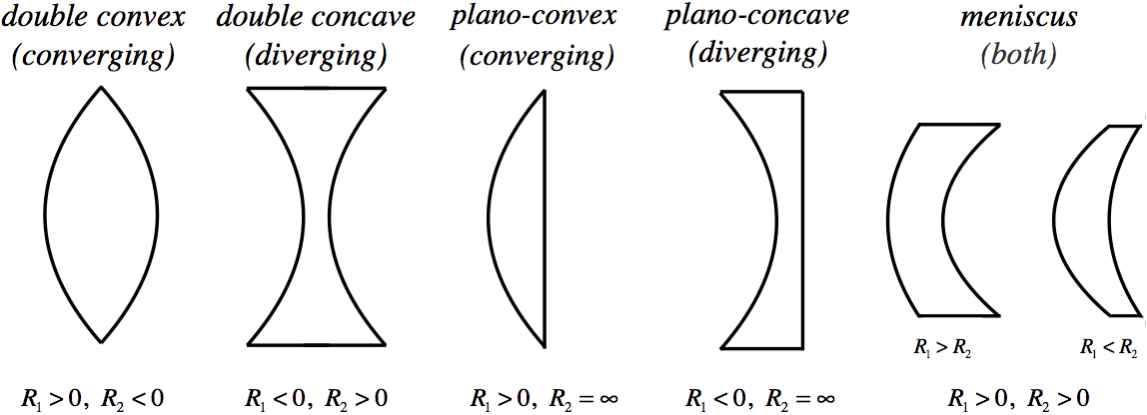
We can in fact put together any combination of surfaces we like in the construction of a lens. A double concave lens will result in the light experiencing cases 2 and 4, both of which are diverging, causing the light rays that pass through the lens to diverge. The various combinations of surfaces is shown in the diagram below. Note that the signs of the radii given are found using the sign convention and assuming that the light is passing from left to right, and that a flat plane can be described as a spherical surface with an infinite radius.
Figure 4.5.2 – Varieties of Lenses
Tracing a ray through a lens is a daunting bit of geometry, and as always, when a calculation is daunting, we make a simplifying approximation. In this case, the simplifying principle is called the thin lens approximation. This asserts, not surprisingly, that the lens is very thin, which means that the bending of the light that occurs at each surface essentially happens at the same position. The two refractions are still successive (a refraction occurs at one surface then the other), but the light travels no distance getting from the point where it changes direction the first time to where it changes direction a second time. This simplifies things greatly, because measurements of quantities like object and image distances are all referenced to the same place, no matter which surface is in play.
Defining a Single Focal Length for a Lens
We already know that each surface of a lens has its own focal length, but when light that comes upon the lens parallel to the optical axis, it must go somewhere after it passes through, which means that the lens as a whole must have a unique focal length. We now seek what this will be for a lens of index of refraction \(n\) in air with radii of curvature of its two sides equal to \(R_1\) and \(R_2\).
The key trick to use here is that after light passes through the first surface, it appears to be coming from somewhere else (i.e. from the position of its image). The second surface then receives the light, and as far as it "knows," the light is coming from this new position. That means that the object position for the second surface is the image position of the first surface. All that remains is to do two successive image locations, while getting all the sign conventions right, and the final image position will be what is seen as the apparent origin of light that has passed through both surfaces of the lens.
Okay, so if we are looking for the focal length of the lens, we naturally start with a ray that comes into the lens parallel, and look for the distance from the lens that it crosses the axis. A parallel ray is equivalent to an object distance of infinity (\(s_1=\infty\)), the first medium is air (\(n_1=1\)), and the second medium is that of the lens (\(n_2=n\)), so the image for the first surface (with radius \(R_1\)) is easy enough to find using Equation 4.4.4:
The image position for this first surface now becomes the object position for the second surface. Because of our thin lens approximation, the magnitude of the image distance for the first surface equals the magnitude of the object distance of the second surface, but now the issue of the signs must be addressed.
Suppose the first surface is concave. Then this surface is case 4, and the ray is made to diverge at this surface, resulting in an image that is to the left of the lens (we are still assuming the light is moving left-to-right). With this image to the left of the second surface and the light moving left-to-right, the object distance for the second surface is positive (on the incoming side). But the image distance calculated was negative (the divergence caused a virtual image), so while the image distance \(s_1'\) for the first surface and the object distance for the second surface \(s_2\) are equal in magnitude, they have opposite signs. We can therefore make the substitution \(s_2=-s_1'\) for the equation at the second surface. Note that this time the light is passing from a region with index of refraction \(n\) to air:
\[\dfrac{1-n}{R_2} = \dfrac{n}{s_2} + \dfrac{1}{s_2'} = \dfrac{n}{-s_1'} + \dfrac{1}{s_2'}\]
Plugging in the result of Equation 4.5.1 and noting that the final image position is the focal point of the whole lens gives:
This gives us a prescription for building a lens – given the index of refraction of the material, we can grind the two spherical surfaces to radii of \(R_1\) and \(R_2\) to achieve a focal length given by \(f\). For this reason, this is called the lensmaker equation.
The reader may be troubled that we assumed that the first surface is concave. Does a convex first surface result in a different lensmaker equation? The answer is no! If the first surface is convex, then the image of the incoming parallel light lands to the right of the lens. This is a positive-valued image distance: \(s_1'>0\). Making this image the object for the second surface gets confusing. With the image already to the right of the second surface, does the light even pass through the second surface? Does it turn around and go right-to-left? The answer is neither of these. While the idea may be difficult to visualize conceptually, mathematically the answer is simple – the light is still going left-to-right, and the object is not on the incoming side, so the object distance is negative: \(s_2<0\). This is sometimes referred to as a virtual object, and it can only occur when light is diverted (reflected or refracted) twice, so that the image of the first diversion lands beyond the surface that causes of the second diversion. Notice that with \(s_1'>0\) and \(s_2<0\), and their magnitudes equal, we once again get the \(s_2=-s_1'\) relation, and the same lensmaker equation results.
You may have noticed that the term "\(\frac{1}{f}\)" comes up a lot. It's clear that the smaller the value of \(f\) is, the more sharply the light is bent by the refraction, which means that the larger \(\frac{1}{f}\) is, the more "focusing power" the device has. Frequently the focusing power of a lens is measured with this inverse quantity rather than focal length. This quantity has the units of \(m^{-1}\), which are designated their own name of diopters (\(D\)).
Stacking Thin Lenses
With our assumption that lenses are very thin, it's fair to also assume that if two lenses are placed together, the combination is also very thin. With the ability to refract through one lens, and then immediately the other, parallel rays that come into this combination of two lenses will focus at a different point than either of the lenses individually. In essence, two (or more) stacked lenses simply form the equivalent of a new single lens. If we follow the same process as above to determine the focal length of multiple lenses, we get sum where every term looks something like \(\pm\left(\frac{n-1}{R}\right)\) for each refracting surface the light passes through. Rather than break down each lens into its two surfaces, however, we have a shortcut – just add the inverses of the individual lens focal lengths!
\[\dfrac{1}{f_{tot}} = \dfrac{1}{f_1} + \dfrac{1}{f_2} + \dots\]
Example \(\PageIndex{1}\)
You have a machine that grinds glass surfaces to a certain specified radius. You use it to make a double-convex lens out of a special glass with high index of refraction equal to \(2.75\). You then use it to make a double-concave lens out of a different type of glass with index of refraction equal to \(1.32\). Because the curved surfaces are the same radii, the two lenses fit together perfectly. When this is done, it forms a single lens that is half-convex, half concave, as in the diagram below.
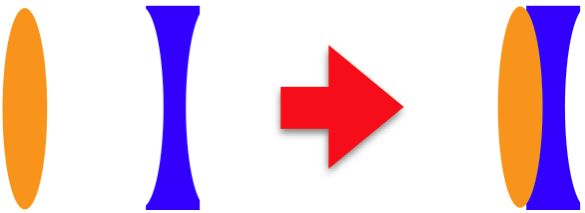
- If you wanted to grind a third lens with the same machine that had the same optical properties of the combined lens above, but instead use a single type of glass, then would it be double-convex or double concave? Explain.
- Compute the index of refraction needed to accomplish the task described in (a).
- Solution
-
a. The radius used everywhere is the same, so we will call it “\(R\).” The lens maker equation for these two lenses gives:
\[\begin{array}{l}\dfrac{1}{f_{convex}} = \left(n_{convex}-1\right)\left(\dfrac{1}{R}-\dfrac{1}{-R}\right) = 2\left(\dfrac{n_{convex}-1}{R}\right) \\ \dfrac{1}{f_{concave}} = \left(n_{concave}-1\right)\left(\dfrac{1}{-R}-\dfrac{1}{R}\right) = -2\left(\dfrac{n_{concave}-1}{R}\right) \end{array}\nonumber\]
When the two lenses are pushed together, the diopter strengths (inverses of the focal lengths) are added to get the new diopter strength, so since the index of refraction is greater for the converging lens, from the equations above we see that its diopter strength has a greater magnitude than its diverging counterpart, and the sum will come out positive. The combined lens will converge light.
b. The combined diopter strength is the sum of the diopter strengths, so we want to make a lens with a diopter strength equal to that sum.
\[\dfrac{1}{f_{tot}} = \dfrac{1}{f_{convex}} + \dfrac{1}{f_{concave}} = 2\left(\dfrac{n_{convex}-1}{R}\right)-2\left(\dfrac{n_{concave}-1}{R}\right) = 2\left(\dfrac{n_{convex}-n_{concave}}{R}\right)\nonumber\]
Setting this equal to the diopter strength of a single lens with the same radius and unknown index of refraction, we have:
\[2\left(\dfrac{n-1}{R}\right)=2\left(\dfrac{n_{convex}-n_{concave}}{R}\right) \;\;\;\Rightarrow\;\;\; n = n_{convex}-n_{concave}+1 = 2.43 \nonumber\]
Objects and Images
Rays that pass through lenses follow paths that have the same characteristics as ray paths for single refracting surfaces. Rays parallel to the optical axis all cross the axis at the same focal point on the other side of the lens. One would therefore expect the object and image distances to be related to the focal length by a formula similar to Equation 4.4.6. The only question is what happens to the indices of refraction. Well, with lenses, the object and image are in the same medium, which means that \(n_1\) and \(n_2\) are the same. It is true that the lens itself has a different index of refraction, but we have packaged all the refractions within the lens into a single change of direction at a single point, so those details don't come into play. Setting the indices of refraction in Equation 4.4.6 equal to each other gives a simple relation, known as the thin lens equation:
\[\dfrac{1}{s} + \dfrac{1}{s'} = \dfrac{1}{f}\]
If this looks familiar even without the \(n\)'s, it's because it is identical to Equation 4.3.5, which we used for spherical mirrors! It is important to note that if we dig into the details hidden within the variable \(f\), we find that for spherical mirrors the focal length is a simple function of the radius (\(f=\frac{R}{2}\)), while for lenses the focal length comes from the lensmaker equation (two radii and an index of refraction). But as along as the specific details of the focal length are not an issue, then this same equation works for both cases. What is more, we have been very careful in the wording of our sign conventions (all that language about "incoming/outgoing" and "not incoming/not outgoing" sides was carefully chosen), so that the sign conventions work perfectly well for both mirrors and lenses. And finally, the geometry of magnification also carries over to lenses, which means that Equation 4.3.7 also holds for lenses.
Principal Rays
While we have greatly economized the mathematics of geometrical optics to incorporate both mirrors and lenses, the physical processes involved are obviously different. We can express these differences by examining ray traces for lenses. We will see that while they obviously are a bit different from those we did for mirrors, there are many similarities in the logic.
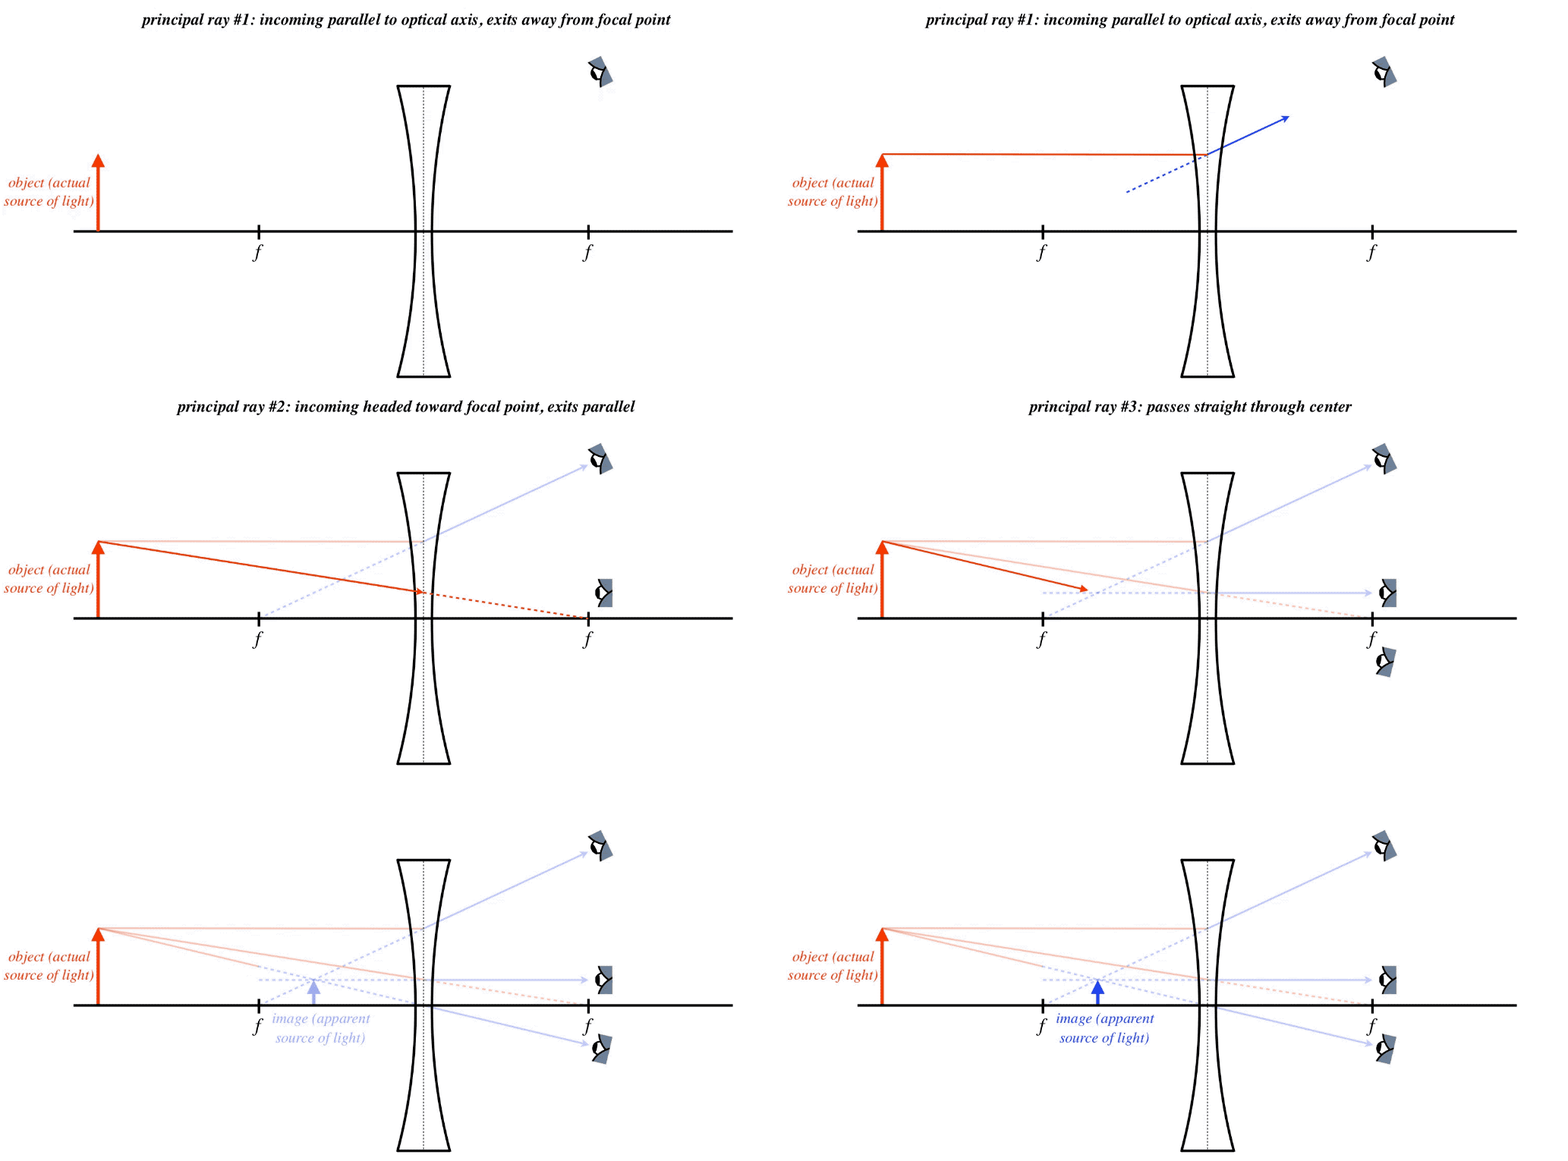
While for the mirror there were four principal rays, for lenses there are only three. As we saw with mirror ray traces, there are differences for the diverging and converging cases. We will start with the converging lens. [Note: In our diagrams, we will depict a converging lens with a double-convex structure, but it can have any combination of surfaces that results in a converging lens (\(f>0\)). Similarly, all diverging lenses are depicted as being double concave, though they too can be any combination of surfaces that results in a diverging lens (\(f<0\)). It should also be mentioned that although the diagrams will give these lenses an apparent thickness, we will be treating them as "thin," which means that the bending of rays will all occur at a single vertical plane through the center of the lens.]
A major difference between lenses and mirrors is that lenses can allow light to travel in either direction. Therefore, while a mirror has a single focal point on its concave side (no matter which side is reflecting), lenses have focal points on both sides. Two of the principal rays behave like we have seen already – one comes into the lens parallel to the optical axis and exits the lens toward (for converging lenses) or away from (for diverging lenses) the focal point. The other comes in to the lens through (for converging lenses) or toward (for diverging lenses) the focal point, and exits the lens parallel to the optical axis. The third principal ray passes directly through the vertex of the lens without diverting its path.
Figure 4.5.3 – Principal Rays, Converging Lens (Object Outside Focal Point)
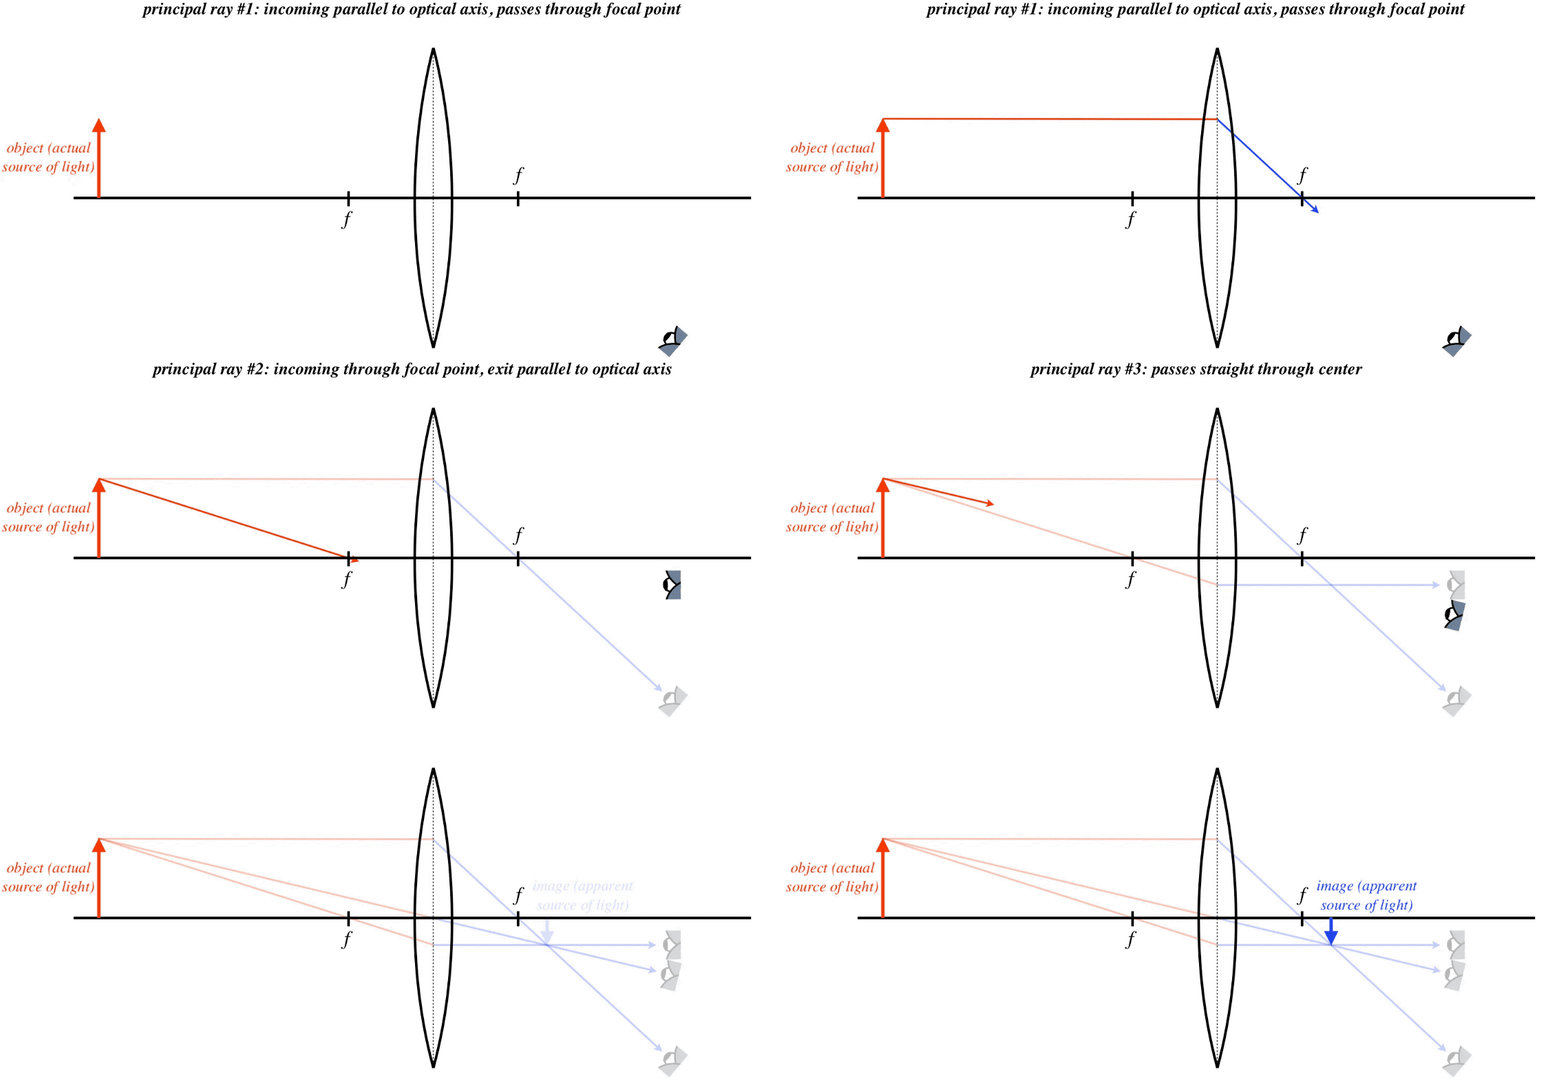
Figure 4.5.4 – Principal Rays, Converging Lens (Object Inside Focal Point)

Figure 4.5.5 – Principal Rays, Diverging Lens
Checking Ray Traces with the Thin Lens Equation
It is worthwhile to confirm that the ray traces shown above give results predicted by the thin lens equation (Equation 4.5.5) and our sign conventions.
- converging lens (\(f>0\)) with distant object (\(s>f\)) – With \(s>f\), we have \(\frac{1}{s}<\frac{1}{f}\), and combining this with the thin lens equation, we can conclude that \(s'>0\), which means that the image is on the outgoing side of the lens, making it a real image (lies at the intersection of actual light). Furthermore, with both \(s\) and \(s'\) positive, the lateral magnification \(M=-\frac{s'}{s}\) is negative, which means that the image is inverted. From the thin lens equation, we can deduce that when \(s>2f\), then the image comes out closer to the lens than the object (\(s'<s\)), and the lateral magnification formula tells us that this means that the image is diminished. All of these features are reflected in Figure 4.5.3.
- converging lens (\(f>0\)) with close object (\(s<f\)) – This time the thin lens equation results in an image distance that is negative, because \(\frac{1}{s}>\frac{1}{f}\). This indicates that the image will not be on the outgoing side of the lens, and is therefore virtual. The lateral magnification comes out positive in this case, indicating that the image must be upright. With a positive object distance and a negative image distance, for the focal length in the thin lens equation to come out positive, it must be true that \(\left|\frac{1}{s}\right|>\left|\frac{1}{s'}\right|\). This means that the image must be farther from the lens than the object, and again looking at the lateral magnification equation, this requires the image to be larger than the object. All of this is in perfect agreement with Figure 4.5.4.
- diverging lens (\(f<0\)) – With a positive object distance and a negative focal length, the only way that the thin lens equation can be satisfied is for the image distance to be negative, which means that the image is not on the outgoing side of the lens, and the image is virtual. Again the object and image distances having opposite signs means that the image is upright. With the positive object distance and negative image distance needing to produce a negative focal length in the thin lens equation, it must be true that \(\left|\frac{1}{s}\right|<\left|\frac{1}{s'}\right|\), which means that the image is closer to the lens than the object, and according to the lateral magnification equation, the image is diminished in size compared to the object. The math agrees with Figure 4.5.5.
Example \(\PageIndex{2}\)
Two identical objects are placed with the same orientation, separated by a distance of \(1.5m\). A lens is then placed along the line formed by the two objects such that all three of these items are equally-spaced, as in the diagram below. When one views the light coming from the objects through the lens, one sees two images of equal size (though they do not look like it, as the images are not the same distance away). One of these images is upright, and the other inverted

- Find the focal length of the lens, including the sign (indicating whether it is converging or diverging).
- Determine which of the two images appears larger to the observer.
- Solution
-
a. For an image to be upright for a single lens (where the object distance is always positive), it must be virtual (\(s'<0\)), and for it to be inverted, it must be real (\(s'>0\)). Single diverging lenses only create virtual images, so the fact that a real (inverted) image exists here means this lens must be converging. Real images for single converging lenses occur when the object is outside the focal length, and virtual images occur when the object is inside the focal length. Therefore the focal point of the lens must land between the two objects, giving it a range of between \(+1.5m\) and \(+3.0m\). Okay, so let's do the actual calculation:
With images of equal size but opposite orientation, their lateral magnifications must be negatives of each other. This gives us information about their image distances (we already know their object distances, which we can use):
\[M_1=-M_2\;\;\;\Rightarrow\;\;\; -\dfrac{s_1'}{s_1} = \dfrac{s_2'}{s_2}\;\;\;\Rightarrow\;\;\; \dfrac{s_1'}{s_2'}=-\dfrac{s_1}{s_2}=-2\nonumber\]
We also have the thin lens equations for both objects. Both involve the same lens, so \(f\) is the same in each case:
\[\dfrac{1}{s_1}+ \dfrac{1}{s_1'}=\dfrac{1}{f}\;\;\;\;\;\;\;\;\dfrac{1}{s_2}+ \dfrac{1}{s_2'}=\dfrac{1}{f}\nonumber\]
Plugging in \(2s_2\) for \(s_1\) and \(-2s_2'\) for \(s_1'\) in the thin lens equation for object #1, we get:
\[\dfrac{1}{2s_2}+ \dfrac{1}{-2s_2'}=\dfrac{1}{f} \;\;\;\Rightarrow\;\;\; \dfrac{1}{s_2} - \dfrac{1}{s_2'}=\dfrac{2}{f}\nonumber\]
Adding this equation to the thin lens equation for object #2, we get:
\[\left(\dfrac{1}{s_2} + \dfrac{1}{s_2'}\right) + \left(\dfrac{1}{s_2} - \dfrac{1}{s_2'}\right) = \dfrac{1}{f} + \dfrac{2}{f} \;\;\;\Rightarrow\;\;\; \dfrac{2}{s_2} = \dfrac{3}{f} \;\;\;\Rightarrow\;\;\; f = \dfrac{3}{2} s_2 = 2.25m \nonumber\]
b. The lateral magnifications are equal, but the one that appears bigger is the one that results in a larger angular magnification. This honor belongs to the image that is closer to the observer. Since one of the images is real, it moves to the other side of the lens, where the observer is located. The virtual image remains on the same side of the lens, so clearly the real image must look larger to the observer. For a converging lens, all real images require objects be farther from the lens than the focal length, and virtual images closer than the focal length. Therefore object #1 produces the real image, and image #1 appears larger.


