3.2: The Photoelectric Effect
( \newcommand{\kernel}{\mathrm{null}\,}\)
Light Interacting with Conductors
The common denominator of the problems that would plague physics for the early years of the 20th century involved light’s interaction with matter. As the blackbody radiation puzzle showed, the simple view developed from Maxwell’s EM and Boltzmann’s thermodynamics were not sufficient to handle these problems. A whole new way of thinking about light and matter was needed. Planck started the revolution (without thinking it was correct), and the next bit of evidence would come from a 1905 paper by Einstein (yes, the same year as his paper on special relativity!), explaining a phenomenon relating to light striking a conducting surface.
In the study of classical EM, it is customary to assume that charges on the surfaces of conductors remained on those conductors. But this belies the fact that we sometimes see charges leap from a conducting surface (a spark) due to a strong external field. So we know that given enough additional energy (in the case of the spark, electrical potential energy), an electron will exit the surface of a metal (the protons are of course fixed within the lattice of the metal). Different metals will hold their electrons with differing degrees of “tightness,” and this tightness is measured in terms of the minimum amount of energy needed to just barely free the most loosely-held electrons. This minimum energy for a given metal is called the metal’s work function, typically represented by the symbol ϕ. Naturally an external static electric field is not the only way to give additional energy to these electrons, and it was known for quite some time that shining light on the metal can also add enough energy to the electrons to kick some off. When light accomplishes this, it is called the photoelectric effect.
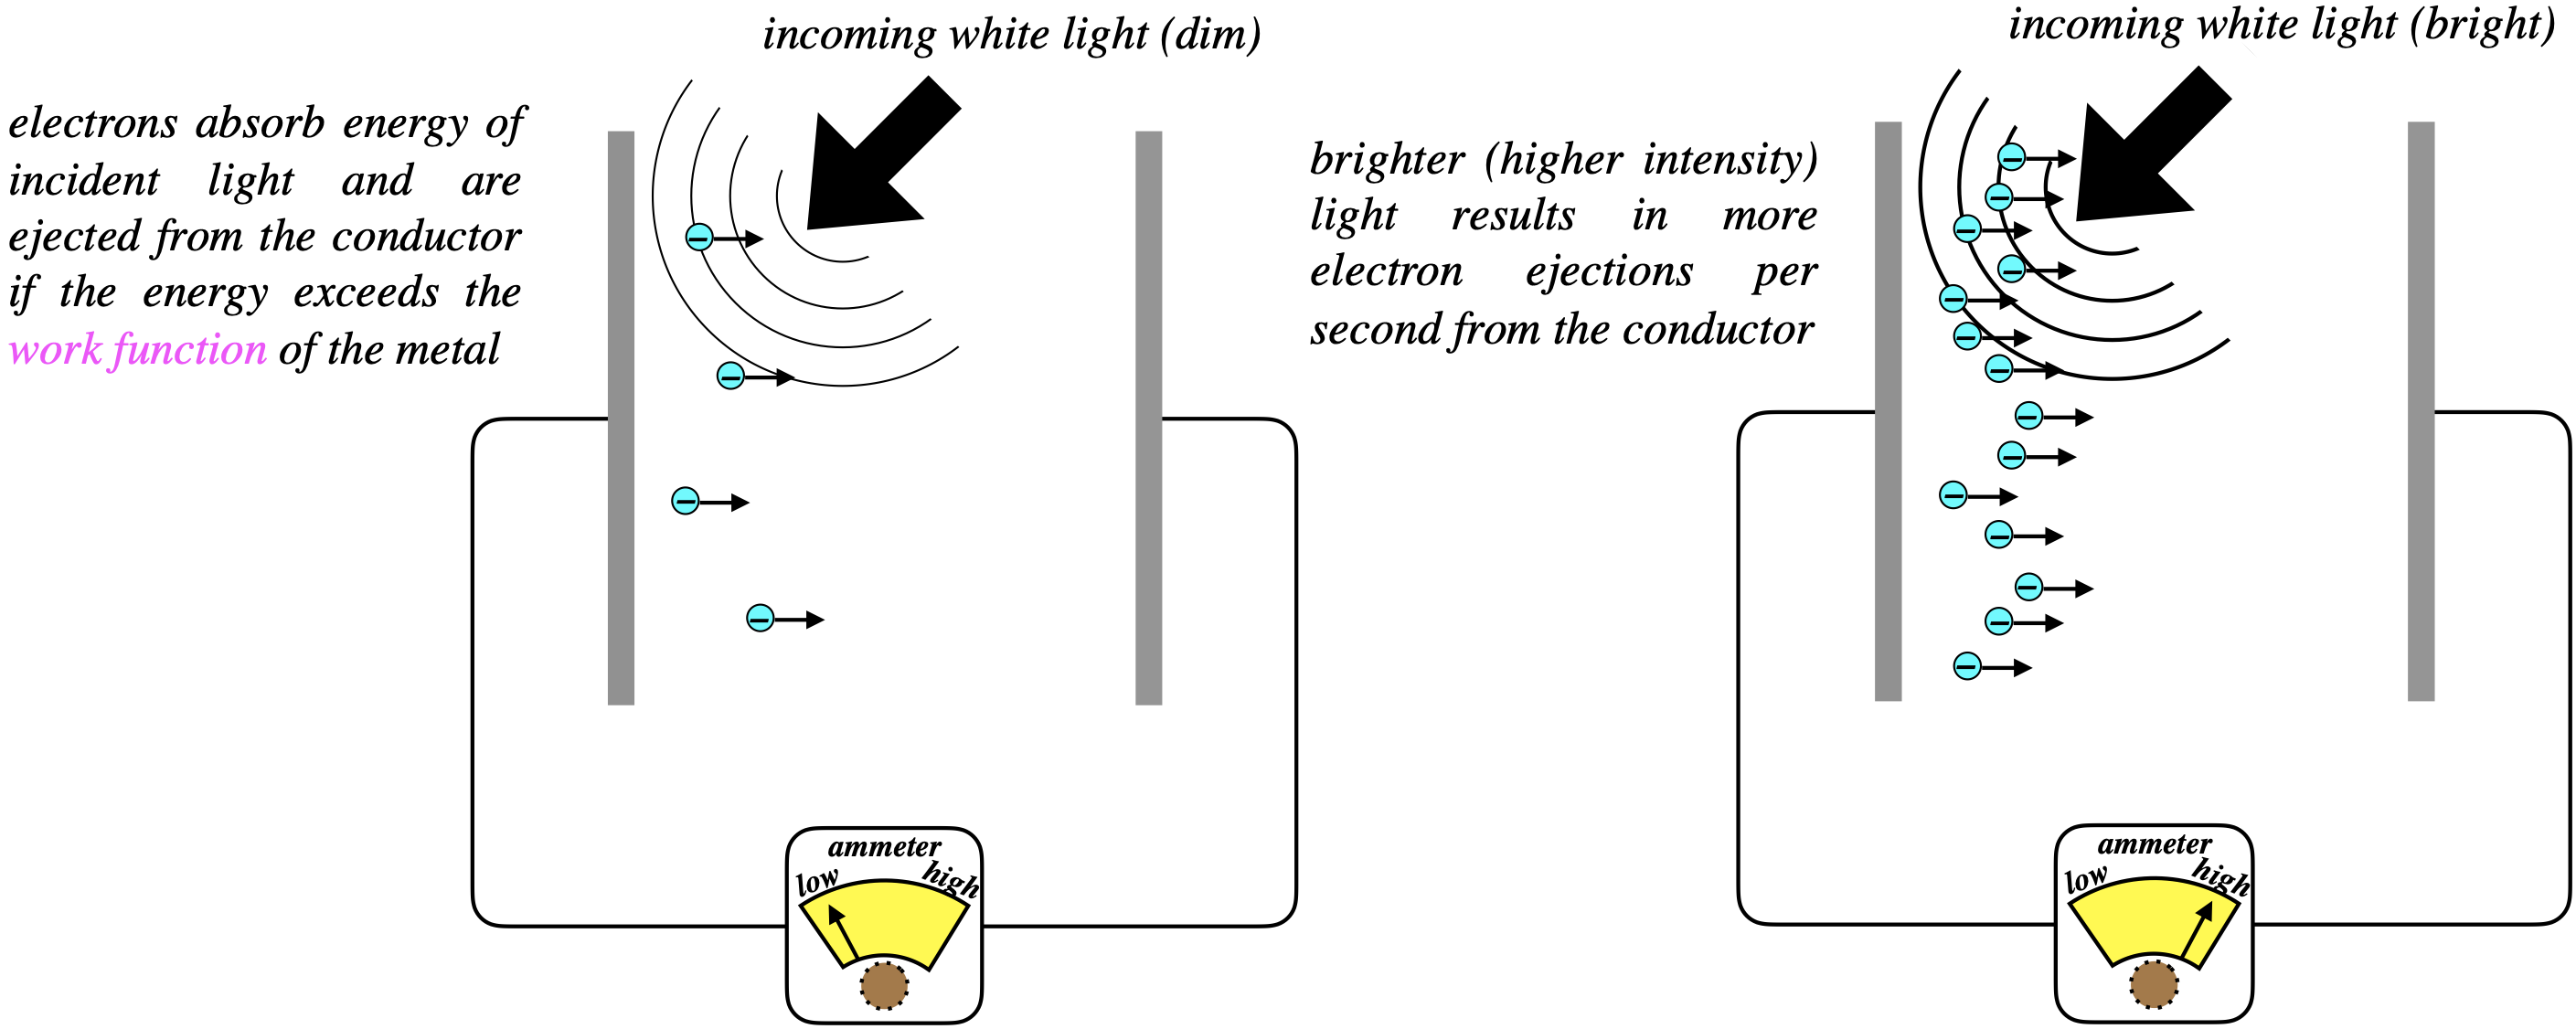
At first glance, this phenomenon makes perfect sense – there is no sign of any of the "weirdness" that came out of Planck's explanation of the blackbody radiation curve a few years earlier. When light is shone onto the negative plate of a capacitor, some electrons are ejected and make their way to the positive plate. When the the missing electrons are replaced on the plate form the battery, the electron flow can be measured by an ammeter. If we turn up the brightness of the light, the measured current rises.
Figure 3.2.1 - Photoelectric Effect (Unsurprising)

Digging Deeper
Physics is uninteresting if we are never surprised, so let’s dig a little deeper and determine two other pieces of information, namely:
- Does this effect have any frequency dependence?
- What determines how much kinetic energy the electrons have after they exit the conductor?
So rather than just use white light, let’s compare some monochromatic cases.
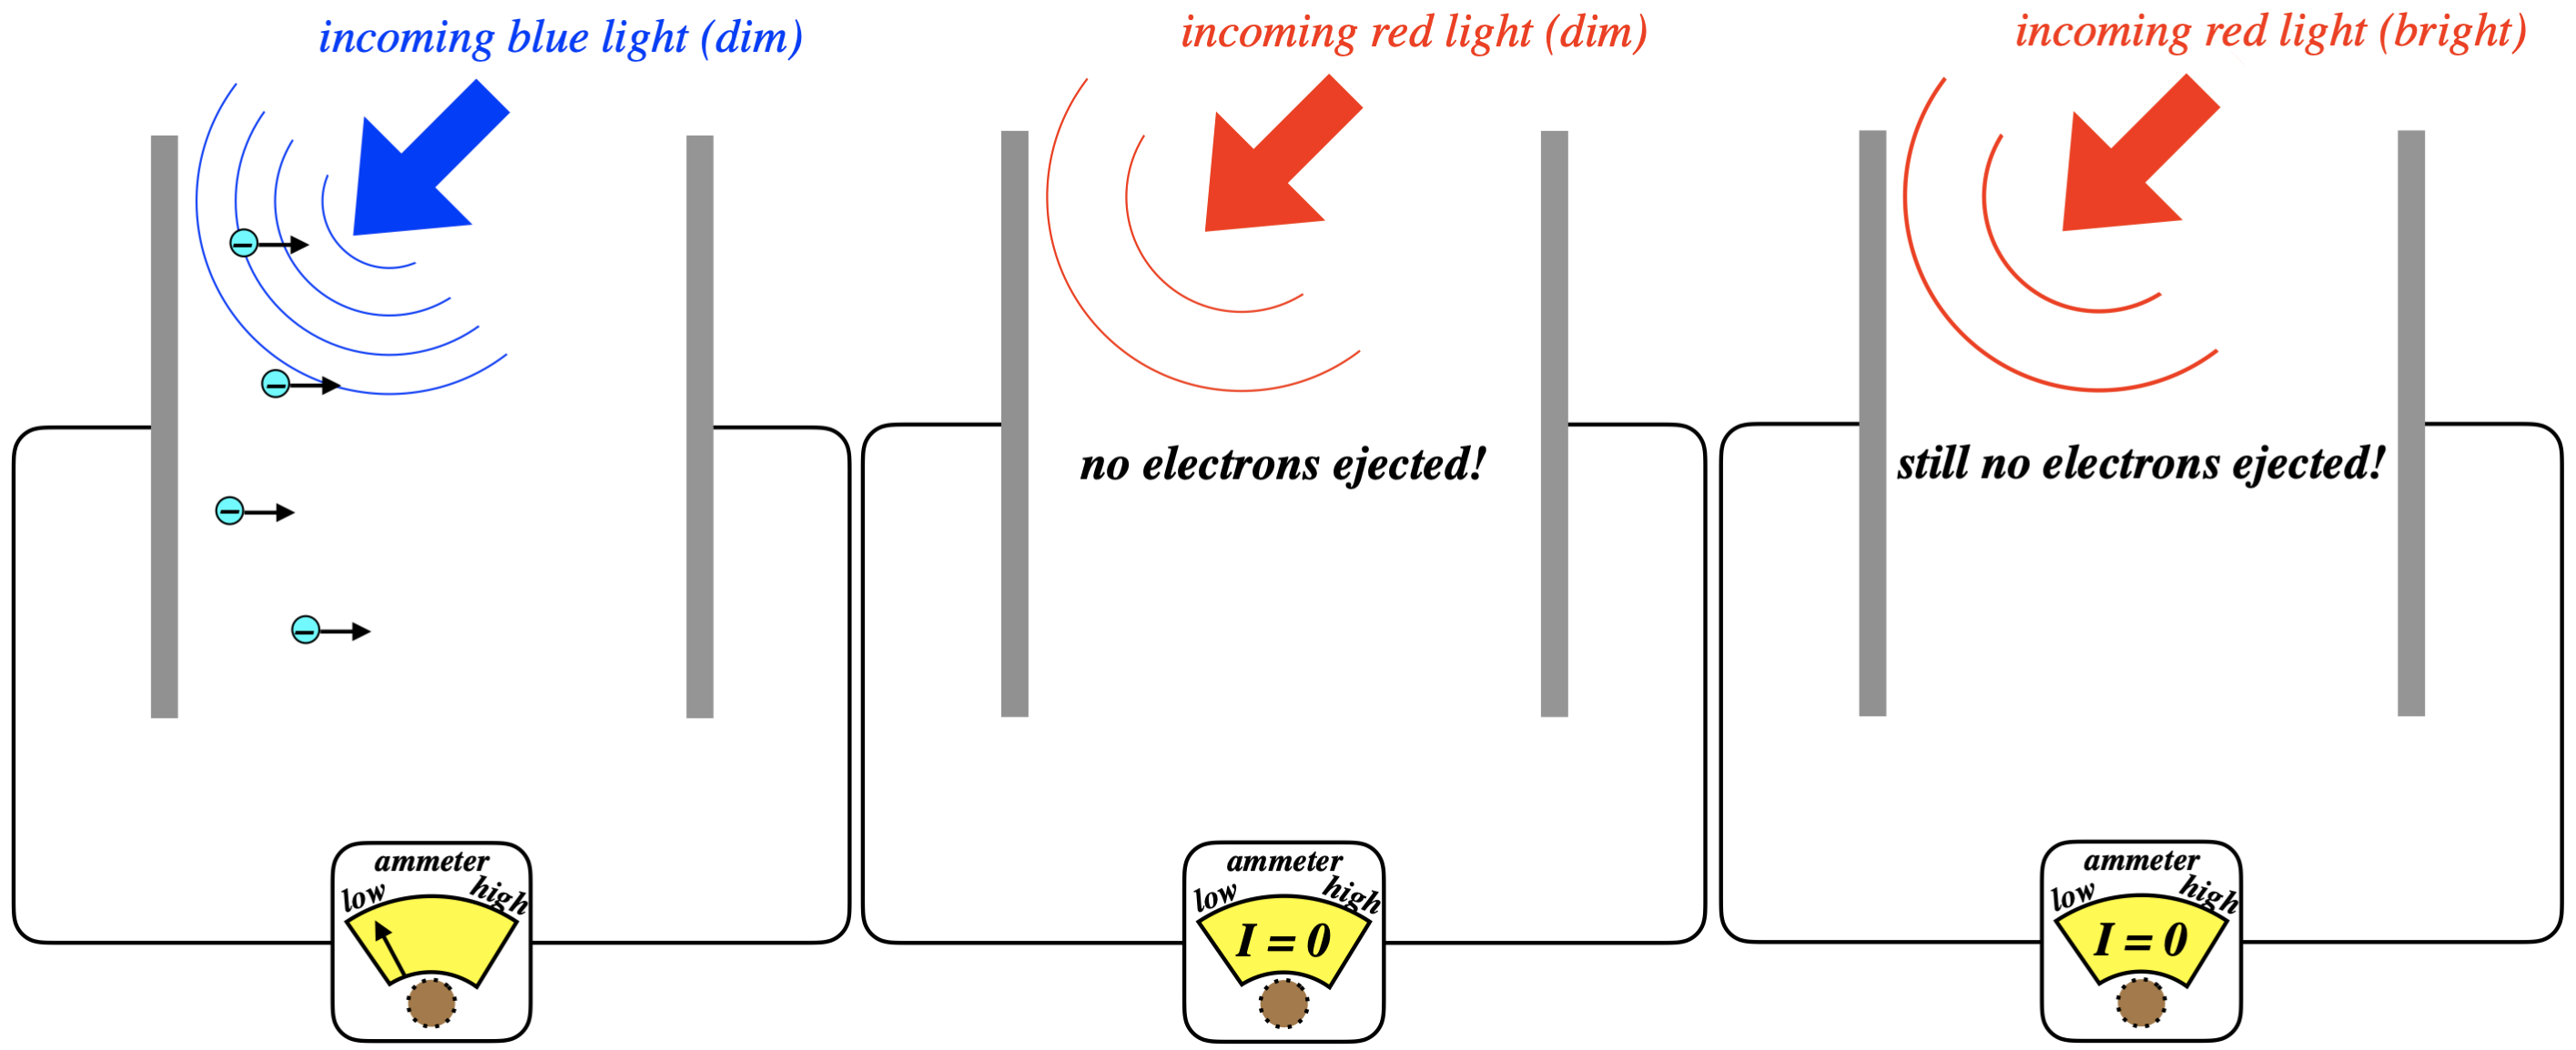
Figure 3.2.2 - Frequency Dependence of Photoelectric Effect

The blue light ejects electrons even when dim, as the white light did, but dim red light does not. This tells us that it was the blue part of the spectrum that was ejecting the electrons when the white light was shone on the metal earlier. While this result is peculiar from our standard understanding of EM, we can simply look at it as a confirmation of Planck’s result from blackbody radiation: Blue light carries more energy than red light, since it is providing enough energy for the electrons to overcome the work function. So in order to see the same effect with red light as we saw with blue light, we just need to crank up the intensity of the red light to make up for the energy deficiency, right? No, it turns out it doesn’t work this way at all!
Einstein explained the phenomenon in the following way: Notwithstanding light’s obvious wavelike nature, in this setting it behaves like a particle (which we now call a photon), inasmuch as it can only be absorbed by a single electron, and only one photon strikes an electron at a time. We can call this the “one per customer” rule. This photon has an energy equal to hf (just as Planck found), and it gives all this energy to the electron it strikes.
Notice how perfectly this explains what we see. Any given electron must receive an amount of energy greater than the work function in order to be set free, but the most it can receive is hf, and if f is too low, then it won’t be enough. The light doesn’t behave like a wave in this case, which could continuously and gradually add energy to the electron until it has enough, but rather like a particle, in an all-or-nothing fashion. Furthermore, the intensity of the light is simply determined by the number of photons arriving per second. If the photons have enough energy to kick off electrons, then greater intensity means more electrons will be kicked per second, but if the individual photons don’t have enough energy to kick off electrons, then adding more of them will not have any effect – they cannot "double-up" on an electron – there's only one per customer. Furthermore, a particularly energetic (high frequency) photon cannot split its energy between two electrons and eject them both.
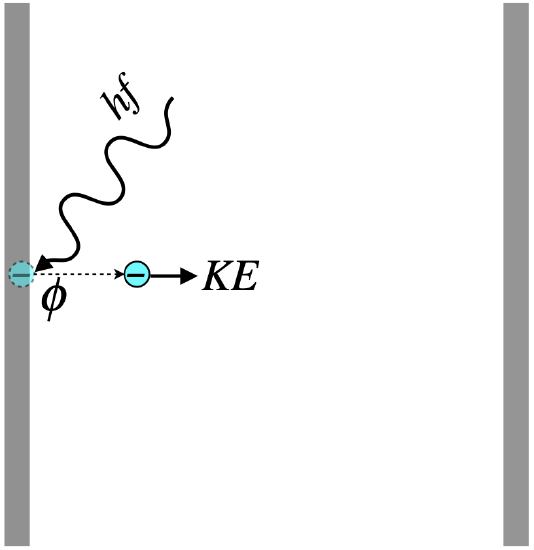
This answers the effect of frequency, but what about the second "digging deeper" question regarding the energy of the electrons that are ejected? Einstein’s solution gives us that answer as well. Applying conservation of energy to this process gives us immediately what we seek:
Figure 3.2.3 - Photoelectric Effect Energy Accounting

From conservation of energy, we see immediately that of the energy introduced by the photon, some of it goes into the potential energy that is the work function of the metal (freeing the charge), and the remainder into the electron’s kinetic energy. It should be noted that the work function is not a constant that applies to every electron – some will be bound more tightly to the metal than others. The work function is defined as the minimum binding energy for that metal – the energy required to tear away the easiest-to-remove electrons. This work function is found by measuring something called the stopping potential, which works like this:
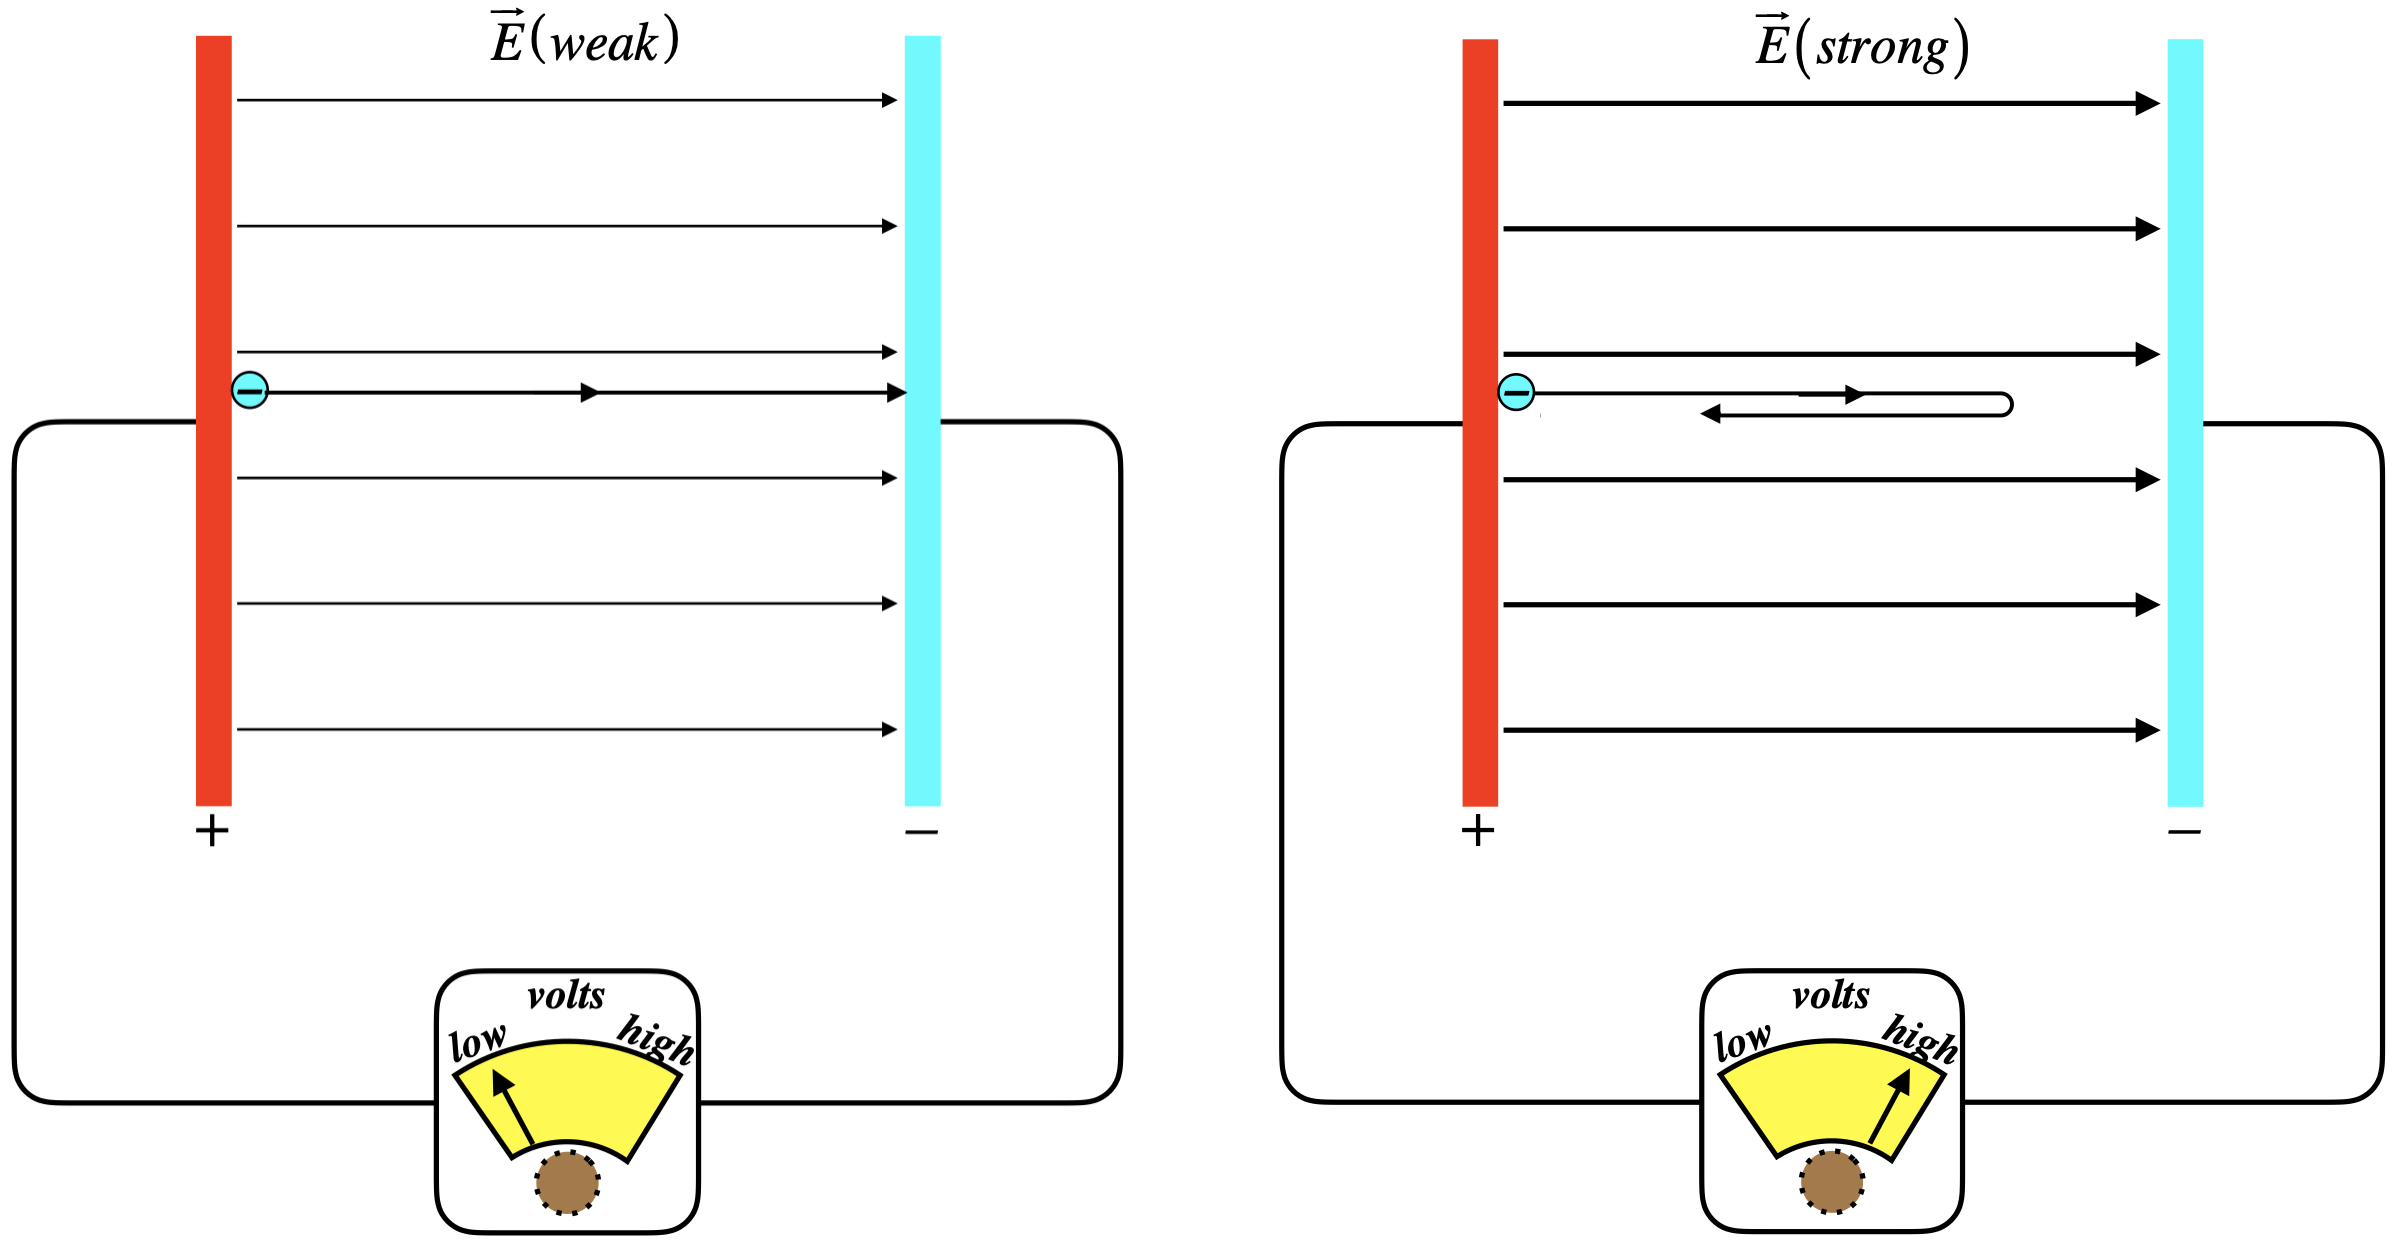
Figure 3.2.4 - Stopping Potential

Here we are shining onto the positively-charged plate, ejecting electrons. The electrons come off the plate with some kinetic energy, but the electric field opposes their motion. If the field between the plates is weak, then some electrons will get across, and we can measure the flow. As we dial-up the strength of the field, however, fewer and fewer of the electrons will successfully make the journey. When the field is just barely strong enough to stop even the most energetically-ejected particles, then the potential energy that those electrons have to climb equals the kinetic energy at which they were ejected. As monochromatic light was used, every electron was given the same energy, so those that are ejected with the most kinetic energy are the ones held most weakly to the conductor. This minimum potential energy of the conductor is what we define to be its work function. Mathematically, the energy accounting looks like this:
eΔVstopping=KEmax=hf−ϕ
This equation is read this way: "The electron charge multiplied by the stopping (electrostatic) potential is the potential energy change that barely stops the electrons with the greatest amount of kinetic energy, and this equals the energy given to the electron by the photon, minus the work function (the potential energy holding the electron to the surface of the conductor)."
Since different electrons require different added energies to be torn away from the metal surface, this result is best described as a definition of the metal's work function. That is, the work function is the weakest "potential energy grip" that the metal has on all of its electrons:
ϕ≡hf−KEmax
Applications
The applications of this effect are of course endless, as you can undoubtedly think of countless devices that involve detection of light. One interesting application is a device known as a photomultiplier tube. Suppose you wish to be able to detect and amplify very low intensities of light (in any part of the spectrum). Assuming you can find a metal with a low enough work function for the frequency of light you want to see, at low intensities the photons are only going to knock off a handful of electrons, which may not be particularly easy to detect. But the nice thing about converting a signal from photons to electrons is that we can add energy to electrons using electric fields, and electrons are also quite good (when propelled at sufficient KE) at knocking more electrons off a surface. Then those can do the same, and so on.
This device is indispensable for high-energy particle physics experimentation, when it is important to see where even a single photon produced in a certain collision lands. But it also works for common-use devices, such as night vision goggles. In this case, you have lots of photons landing in different places (i.e. an image focused by a lens), and each place where the photon lands has its own tiny photomultiplier tube. Each tube constitutes one pixel, so all the tubes put together form an amplified image. This device is a step above an infrared sensing apparatus for applications that require better resolution of the image (we’ll see why this is later), though it is constructed specifically for the visible spectrum, so it can’t see through objects opaque to visible light, while some of those same objects may be (partly) transparent to infrared light.


