Barometer
- Page ID
- 5383
\( \newcommand{\vecs}[1]{\overset { \scriptstyle \rightharpoonup} {\mathbf{#1}} } \)
\( \newcommand{\vecd}[1]{\overset{-\!-\!\rightharpoonup}{\vphantom{a}\smash {#1}}} \)
\( \newcommand{\dsum}{\displaystyle\sum\limits} \)
\( \newcommand{\dint}{\displaystyle\int\limits} \)
\( \newcommand{\dlim}{\displaystyle\lim\limits} \)
\( \newcommand{\id}{\mathrm{id}}\) \( \newcommand{\Span}{\mathrm{span}}\)
( \newcommand{\kernel}{\mathrm{null}\,}\) \( \newcommand{\range}{\mathrm{range}\,}\)
\( \newcommand{\RealPart}{\mathrm{Re}}\) \( \newcommand{\ImaginaryPart}{\mathrm{Im}}\)
\( \newcommand{\Argument}{\mathrm{Arg}}\) \( \newcommand{\norm}[1]{\| #1 \|}\)
\( \newcommand{\inner}[2]{\langle #1, #2 \rangle}\)
\( \newcommand{\Span}{\mathrm{span}}\)
\( \newcommand{\id}{\mathrm{id}}\)
\( \newcommand{\Span}{\mathrm{span}}\)
\( \newcommand{\kernel}{\mathrm{null}\,}\)
\( \newcommand{\range}{\mathrm{range}\,}\)
\( \newcommand{\RealPart}{\mathrm{Re}}\)
\( \newcommand{\ImaginaryPart}{\mathrm{Im}}\)
\( \newcommand{\Argument}{\mathrm{Arg}}\)
\( \newcommand{\norm}[1]{\| #1 \|}\)
\( \newcommand{\inner}[2]{\langle #1, #2 \rangle}\)
\( \newcommand{\Span}{\mathrm{span}}\) \( \newcommand{\AA}{\unicode[.8,0]{x212B}}\)
\( \newcommand{\vectorA}[1]{\vec{#1}} % arrow\)
\( \newcommand{\vectorAt}[1]{\vec{\text{#1}}} % arrow\)
\( \newcommand{\vectorB}[1]{\overset { \scriptstyle \rightharpoonup} {\mathbf{#1}} } \)
\( \newcommand{\vectorC}[1]{\textbf{#1}} \)
\( \newcommand{\vectorD}[1]{\overrightarrow{#1}} \)
\( \newcommand{\vectorDt}[1]{\overrightarrow{\text{#1}}} \)
\( \newcommand{\vectE}[1]{\overset{-\!-\!\rightharpoonup}{\vphantom{a}\smash{\mathbf {#1}}}} \)
\( \newcommand{\vecs}[1]{\overset { \scriptstyle \rightharpoonup} {\mathbf{#1}} } \)
\(\newcommand{\longvect}{\overrightarrow}\)
\( \newcommand{\vecd}[1]{\overset{-\!-\!\rightharpoonup}{\vphantom{a}\smash {#1}}} \)
\(\newcommand{\avec}{\mathbf a}\) \(\newcommand{\bvec}{\mathbf b}\) \(\newcommand{\cvec}{\mathbf c}\) \(\newcommand{\dvec}{\mathbf d}\) \(\newcommand{\dtil}{\widetilde{\mathbf d}}\) \(\newcommand{\evec}{\mathbf e}\) \(\newcommand{\fvec}{\mathbf f}\) \(\newcommand{\nvec}{\mathbf n}\) \(\newcommand{\pvec}{\mathbf p}\) \(\newcommand{\qvec}{\mathbf q}\) \(\newcommand{\svec}{\mathbf s}\) \(\newcommand{\tvec}{\mathbf t}\) \(\newcommand{\uvec}{\mathbf u}\) \(\newcommand{\vvec}{\mathbf v}\) \(\newcommand{\wvec}{\mathbf w}\) \(\newcommand{\xvec}{\mathbf x}\) \(\newcommand{\yvec}{\mathbf y}\) \(\newcommand{\zvec}{\mathbf z}\) \(\newcommand{\rvec}{\mathbf r}\) \(\newcommand{\mvec}{\mathbf m}\) \(\newcommand{\zerovec}{\mathbf 0}\) \(\newcommand{\onevec}{\mathbf 1}\) \(\newcommand{\real}{\mathbb R}\) \(\newcommand{\twovec}[2]{\left[\begin{array}{r}#1 \\ #2 \end{array}\right]}\) \(\newcommand{\ctwovec}[2]{\left[\begin{array}{c}#1 \\ #2 \end{array}\right]}\) \(\newcommand{\threevec}[3]{\left[\begin{array}{r}#1 \\ #2 \\ #3 \end{array}\right]}\) \(\newcommand{\cthreevec}[3]{\left[\begin{array}{c}#1 \\ #2 \\ #3 \end{array}\right]}\) \(\newcommand{\fourvec}[4]{\left[\begin{array}{r}#1 \\ #2 \\ #3 \\ #4 \end{array}\right]}\) \(\newcommand{\cfourvec}[4]{\left[\begin{array}{c}#1 \\ #2 \\ #3 \\ #4 \end{array}\right]}\) \(\newcommand{\fivevec}[5]{\left[\begin{array}{r}#1 \\ #2 \\ #3 \\ #4 \\ #5 \\ \end{array}\right]}\) \(\newcommand{\cfivevec}[5]{\left[\begin{array}{c}#1 \\ #2 \\ #3 \\ #4 \\ #5 \\ \end{array}\right]}\) \(\newcommand{\mattwo}[4]{\left[\begin{array}{rr}#1 \amp #2 \\ #3 \amp #4 \\ \end{array}\right]}\) \(\newcommand{\laspan}[1]{\text{Span}\{#1\}}\) \(\newcommand{\bcal}{\cal B}\) \(\newcommand{\ccal}{\cal C}\) \(\newcommand{\scal}{\cal S}\) \(\newcommand{\wcal}{\cal W}\) \(\newcommand{\ecal}{\cal E}\) \(\newcommand{\coords}[2]{\left\{#1\right\}_{#2}}\) \(\newcommand{\gray}[1]{\color{gray}{#1}}\) \(\newcommand{\lgray}[1]{\color{lightgray}{#1}}\) \(\newcommand{\rank}{\operatorname{rank}}\) \(\newcommand{\row}{\text{Row}}\) \(\newcommand{\col}{\text{Col}}\) \(\renewcommand{\row}{\text{Row}}\) \(\newcommand{\nul}{\text{Nul}}\) \(\newcommand{\var}{\text{Var}}\) \(\newcommand{\corr}{\text{corr}}\) \(\newcommand{\len}[1]{\left|#1\right|}\) \(\newcommand{\bbar}{\overline{\bvec}}\) \(\newcommand{\bhat}{\widehat{\bvec}}\) \(\newcommand{\bperp}{\bvec^\perp}\) \(\newcommand{\xhat}{\widehat{\xvec}}\) \(\newcommand{\vhat}{\widehat{\vvec}}\) \(\newcommand{\uhat}{\widehat{\uvec}}\) \(\newcommand{\what}{\widehat{\wvec}}\) \(\newcommand{\Sighat}{\widehat{\Sigma}}\) \(\newcommand{\lt}{<}\) \(\newcommand{\gt}{>}\) \(\newcommand{\amp}{&}\) \(\definecolor{fillinmathshade}{gray}{0.9}\)
The Mercury Barometer
In this document we discuss measuring atmospheric pressure using a Mercury Barometer. This instrument is also known as a Fortin Barometer. This type of instrument was first used by Torricelli in 1643; Fortin slightly modified the original design in 1810.
Requirements
In order to effectively use this page, your browser needs to be capable of viewing Flash animations, also known as swf files. The Flash player is available free from http://www.macromedia.com/. Our animations are for Version 5 of the player or later.
You will also want to have either the Real Media or QuickTime video player installed on your computer. The Real Media player is available free from http://www.realnetworks.com/. The QuickTime player is available free from http://www.apple.com/quicktime/.
A document of the soundtrack of the video is also available below. It is in pdf format. Accessing this document will require that you have the Acrobat Reader, which is available free from http://www.adobe.com
Finally, a small document on vernier scales is accessed from a link below. Part of this document requires that your browser is capable of using Java applets.
Background
A barometer is a type of manometer. A document on manometers may be accessed by clicking on the blue button to![]() the right; it will appear in a separate window.
the right; it will appear in a separate window.
Y![]() ou will also need to know how to read a vernier scale. A document on this may be accessed by clicking on the green button to the right; it too will appear in a separate window.
ou will also need to know how to read a vernier scale. A document on this may be accessed by clicking on the green button to the right; it too will appear in a separate window.
The Apparatus
 The figure to the left is a diagram of a barometer; the overall length of the apparatus is a little greater than one meter.
We have prepared a video in various formats to introduce you to the apparatus; running time of the video is 2 minutes, 50 seconds. Links to the video appear below. You will wish to adjust the volume of the speakers on your computer so that you can easily hear the soundtrack. For the higher resolution RealMedia version, you may also wish to increase the size of the video using the controls provided by the player.
You may download a pdf version of the soundtrack of the video by clicking on the red button to the right. It will appear in a![]() separate window, and has a file size of 61k.
separate window, and has a file size of 61k.
The Streaming video will be played by the RealMedia player as it is delivered to your computer by the network. The Download versions of the video will be downloaded to a temporary area on your local hard disc and then shown if your browser is configured to use the appropriate player. You may save these Download versions to a more permanent place that you specify on your computer's discs by right clicking on the link and then saving the Target (Internet Explorer) or Link (Netscape).
RealMedia Streaming
![]() RealMedia Download
RealMedia Download
| Less Resolution (695k): | Click here |
| More Resolution (1.7M): | Click here |
![]() Quicktime Download
Quicktime Download
| Less Resolution (813k): | Click here |
| More Resolution (1.8M): | Click here |
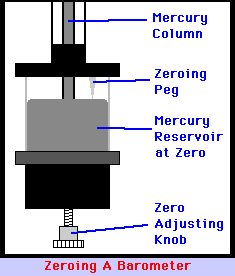
| The figure to the right is a close-up of the bottom of the barometer. As discussed in the video, there is a Zero Adjusting Knob that is used to adjust the height of the Mercury Reservoir so that it is just touching the bottom of the Zeroing Peg. |  |
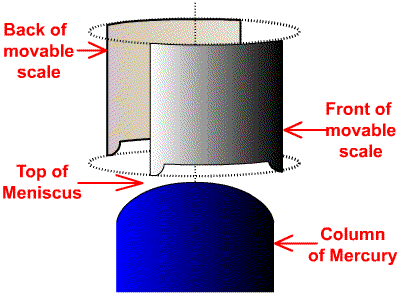
 As also discussed in the video, there is a movable scale which moves up and down as the knob on the side of the apparatus is turned. This scale is sketched in the figure to the right.
Note that the the front and back of the movable scale are identical. This will allow you to be sure that when you align the position of the scale to the column of mercury that you are looking horizontally.
Also note that the top of the column of Mercury is rounded. This is called a meniscus, and is due to the surface tension of the Mercury. The top of the meniscus will be the point to which you will align the bottom of the movable scale.
When atmospheric pressure is increasing, the places where the mercury is in contact with the glass tube can lag the rise of the top of the meniscus: in this case the height of the meniscus is too large. When atmospheric pressure is decreasing the height of the meniscus can be too small.
There is a Flash animation of the movable scale moving up and down. It may be accessed by clicking on the figure; it will appear in a separate window. The size of the animation file is 14k.
Note that in the animation both the front and back of the movable scale are shown, and when the bottom of the scale aligns with the top of the meniscus the back of the scale is not visible. You will also see that you use the vernier on the movable scale to read the height of the column of mercury.
Doing the Measurement
Here, then, are the steps to be done in using the barometer to measure atmospheric pressure:
- Lightly tap the barometer so that the height of the meniscus is neither too large or too small.
- Use the Zero Adjusting Knob so that the top of the Mercury Reservoir is just touching the tip of the Zeroing Peg.
- Adjust the height of the Movable Scale so that the bottom of both the front and back of the scale are just even with the top of the meniscus.
- Read the height using the vernier on the movable scale.
- Read the temperature using the thermometer mounted on the barometer.
Corrections
Depending on the required accuracy of the measurement of atmospheric pressure, some corrections to the "raw" value obtained above may be necessary.
Temperature Correction
The metal housing of the barometer and the mercury both expand as the temperature increases. However, they expand at different rates. If you are a Physics student at the University of Toronto you may have studied the expansion of materials with changing temperature in the Thermal Expansion experiment.
The barometer is calibrated for 0oC. For different temperatures a correction must be applied to compensate for the different expansions of the housing and the mercury. The following table shows the correction, in mm, that should be subtracted from the reading of atmospheric pressure:
| Temperature oC | Observed Height (mm)
| |||||||||||||||||||||||||||||||||||||||||||||||||||||||||||||||||||||||||||||
|---|---|---|---|---|---|---|---|---|---|---|---|---|---|---|---|---|---|---|---|---|---|---|---|---|---|---|---|---|---|---|---|---|---|---|---|---|---|---|---|---|---|---|---|---|---|---|---|---|---|---|---|---|---|---|---|---|---|---|---|---|---|---|---|---|---|---|---|---|---|---|---|---|---|---|---|---|---|---|
|
| |||||||||||||||||||||||||||||||||||||||||||||||||||||||||||||||||||||||||||||
For Observed Heights between the listed values, you may interpolate to determine the required correction. If the temperature and observed height are not in the range of this table, other sources such as The Handbook of Chemistry and Physics have more complete data.
If you are doing the Boyle's Law experiment in the Physics Laboratory at the University of Toronto, an almost identical expansion occurs in the apparatus for the experiment. Thus, you should not apply a temperature correction to your determination of atmospheric pressure. If you convert your pressure from units of mm of Mercury to pascals you will need to use a corrected value for the density of Mercury, which depends on temperature.
Latitude Correction
Because the Earth is not a perfect sphere, the acceleration due to gravity depends on latitude. The radius of the earth is greater at the equator than at the poles. This means that g is least at the equator and greatest at the poles. Thus at smaller latitudes the mercury in the tube weighs less, and will require a greater length to balance a given pressure. The barometer is calibrated for a latitude of 45o.
Toronto is located at 43 degrees, 40 minutes North, which means the latitude correction in Toronto is almost negligible: for an observed height of 760 mm, the correction is about -0.07 mm.
Nonetheless, for completeness, the following table shows the latitude corrections in mm. For latitudes less than 45o the correction should be subtracted from the observed height; for latitudes greater than 45o the correction should be added.
| Latitude | Observed Height (mm)
| ||||||||||||||||||||
|---|---|---|---|---|---|---|---|---|---|---|---|---|---|---|---|---|---|---|---|---|---|
|
|
As with the temperature correction, more complete tables of data for latitude corrections may be found in sources such as The Handbook of Chemistry and Physics.

