
2.8.4: Dispersion and chromatic aberration
- Page ID
- 138914
\( \newcommand{\vecs}[1]{\overset { \scriptstyle \rightharpoonup} {\mathbf{#1}} } \)
\( \newcommand{\vecd}[1]{\overset{-\!-\!\rightharpoonup}{\vphantom{a}\smash {#1}}} \)
\( \newcommand{\dsum}{\displaystyle\sum\limits} \)
\( \newcommand{\dint}{\displaystyle\int\limits} \)
\( \newcommand{\dlim}{\displaystyle\lim\limits} \)
\( \newcommand{\id}{\mathrm{id}}\) \( \newcommand{\Span}{\mathrm{span}}\)
( \newcommand{\kernel}{\mathrm{null}\,}\) \( \newcommand{\range}{\mathrm{range}\,}\)
\( \newcommand{\RealPart}{\mathrm{Re}}\) \( \newcommand{\ImaginaryPart}{\mathrm{Im}}\)
\( \newcommand{\Argument}{\mathrm{Arg}}\) \( \newcommand{\norm}[1]{\| #1 \|}\)
\( \newcommand{\inner}[2]{\langle #1, #2 \rangle}\)
\( \newcommand{\Span}{\mathrm{span}}\)
\( \newcommand{\id}{\mathrm{id}}\)
\( \newcommand{\Span}{\mathrm{span}}\)
\( \newcommand{\kernel}{\mathrm{null}\,}\)
\( \newcommand{\range}{\mathrm{range}\,}\)
\( \newcommand{\RealPart}{\mathrm{Re}}\)
\( \newcommand{\ImaginaryPart}{\mathrm{Im}}\)
\( \newcommand{\Argument}{\mathrm{Arg}}\)
\( \newcommand{\norm}[1]{\| #1 \|}\)
\( \newcommand{\inner}[2]{\langle #1, #2 \rangle}\)
\( \newcommand{\Span}{\mathrm{span}}\) \( \newcommand{\AA}{\unicode[.8,0]{x212B}}\)
\( \newcommand{\vectorA}[1]{\vec{#1}} % arrow\)
\( \newcommand{\vectorAt}[1]{\vec{\text{#1}}} % arrow\)
\( \newcommand{\vectorB}[1]{\overset { \scriptstyle \rightharpoonup} {\mathbf{#1}} } \)
\( \newcommand{\vectorC}[1]{\textbf{#1}} \)
\( \newcommand{\vectorD}[1]{\overrightarrow{#1}} \)
\( \newcommand{\vectorDt}[1]{\overrightarrow{\text{#1}}} \)
\( \newcommand{\vectE}[1]{\overset{-\!-\!\rightharpoonup}{\vphantom{a}\smash{\mathbf {#1}}}} \)
\( \newcommand{\vecs}[1]{\overset { \scriptstyle \rightharpoonup} {\mathbf{#1}} } \)
\(\newcommand{\longvect}{\overrightarrow}\)
\( \newcommand{\vecd}[1]{\overset{-\!-\!\rightharpoonup}{\vphantom{a}\smash {#1}}} \)
\(\newcommand{\avec}{\mathbf a}\) \(\newcommand{\bvec}{\mathbf b}\) \(\newcommand{\cvec}{\mathbf c}\) \(\newcommand{\dvec}{\mathbf d}\) \(\newcommand{\dtil}{\widetilde{\mathbf d}}\) \(\newcommand{\evec}{\mathbf e}\) \(\newcommand{\fvec}{\mathbf f}\) \(\newcommand{\nvec}{\mathbf n}\) \(\newcommand{\pvec}{\mathbf p}\) \(\newcommand{\qvec}{\mathbf q}\) \(\newcommand{\svec}{\mathbf s}\) \(\newcommand{\tvec}{\mathbf t}\) \(\newcommand{\uvec}{\mathbf u}\) \(\newcommand{\vvec}{\mathbf v}\) \(\newcommand{\wvec}{\mathbf w}\) \(\newcommand{\xvec}{\mathbf x}\) \(\newcommand{\yvec}{\mathbf y}\) \(\newcommand{\zvec}{\mathbf z}\) \(\newcommand{\rvec}{\mathbf r}\) \(\newcommand{\mvec}{\mathbf m}\) \(\newcommand{\zerovec}{\mathbf 0}\) \(\newcommand{\onevec}{\mathbf 1}\) \(\newcommand{\real}{\mathbb R}\) \(\newcommand{\twovec}[2]{\left[\begin{array}{r}#1 \\ #2 \end{array}\right]}\) \(\newcommand{\ctwovec}[2]{\left[\begin{array}{c}#1 \\ #2 \end{array}\right]}\) \(\newcommand{\threevec}[3]{\left[\begin{array}{r}#1 \\ #2 \\ #3 \end{array}\right]}\) \(\newcommand{\cthreevec}[3]{\left[\begin{array}{c}#1 \\ #2 \\ #3 \end{array}\right]}\) \(\newcommand{\fourvec}[4]{\left[\begin{array}{r}#1 \\ #2 \\ #3 \\ #4 \end{array}\right]}\) \(\newcommand{\cfourvec}[4]{\left[\begin{array}{c}#1 \\ #2 \\ #3 \\ #4 \end{array}\right]}\) \(\newcommand{\fivevec}[5]{\left[\begin{array}{r}#1 \\ #2 \\ #3 \\ #4 \\ #5 \\ \end{array}\right]}\) \(\newcommand{\cfivevec}[5]{\left[\begin{array}{c}#1 \\ #2 \\ #3 \\ #4 \\ #5 \\ \end{array}\right]}\) \(\newcommand{\mattwo}[4]{\left[\begin{array}{rr}#1 \amp #2 \\ #3 \amp #4 \\ \end{array}\right]}\) \(\newcommand{\laspan}[1]{\text{Span}\{#1\}}\) \(\newcommand{\bcal}{\cal B}\) \(\newcommand{\ccal}{\cal C}\) \(\newcommand{\scal}{\cal S}\) \(\newcommand{\wcal}{\cal W}\) \(\newcommand{\ecal}{\cal E}\) \(\newcommand{\coords}[2]{\left\{#1\right\}_{#2}}\) \(\newcommand{\gray}[1]{\color{gray}{#1}}\) \(\newcommand{\lgray}[1]{\color{lightgray}{#1}}\) \(\newcommand{\rank}{\operatorname{rank}}\) \(\newcommand{\row}{\text{Row}}\) \(\newcommand{\col}{\text{Col}}\) \(\renewcommand{\row}{\text{Row}}\) \(\newcommand{\nul}{\text{Nul}}\) \(\newcommand{\var}{\text{Var}}\) \(\newcommand{\corr}{\text{corr}}\) \(\newcommand{\len}[1]{\left|#1\right|}\) \(\newcommand{\bbar}{\overline{\bvec}}\) \(\newcommand{\bhat}{\widehat{\bvec}}\) \(\newcommand{\bperp}{\bvec^\perp}\) \(\newcommand{\xhat}{\widehat{\xvec}}\) \(\newcommand{\vhat}{\widehat{\vvec}}\) \(\newcommand{\uhat}{\widehat{\uvec}}\) \(\newcommand{\what}{\widehat{\wvec}}\) \(\newcommand{\Sighat}{\widehat{\Sigma}}\) \(\newcommand{\lt}{<}\) \(\newcommand{\gt}{>}\) \(\newcommand{\amp}{&}\) \(\definecolor{fillinmathshade}{gray}{0.9}\)his page supports the multimedia tutorial Geometrical Optics.
- Refraction depends on wavelength
- Therefore focal length depends on wavelength
- Chromatic aberration in lenses
- Links and further information
Refraction depends on wavelength
In this experiment, a beam of white light is incident on the glass-air interface at an angle close to the critical angle. The different wavelenths are refracted with different angles, blue further than red. From Snell's law (and because the refactive of air is close to oen), this shows that the refractive index of glass is greater for glass than for air. |
||
Therefore focal length depends on wavelength
This experiment uses two-dimensional lenses: their surfaces are cylindrical, rather than spherical. Here, we show successively (i) three parallel rays of white light, (ii) the same with a red filter and (iii) the same with a blue filter. This shows the different focal length for red light is longer than for blue light.
|
||
Chromatic aberration in lenses
The film above (from simple refracting telescope) shows an image made with simple lenses, rather than achromatic lenses. the effects of chromatic aberration are evident. |

By the end of this section, you will be able to:
- Explain the cause of dispersion in a prism
- Describe the effects of dispersion in producing rainbows
- Summarize the advantages and disadvantages of dispersion
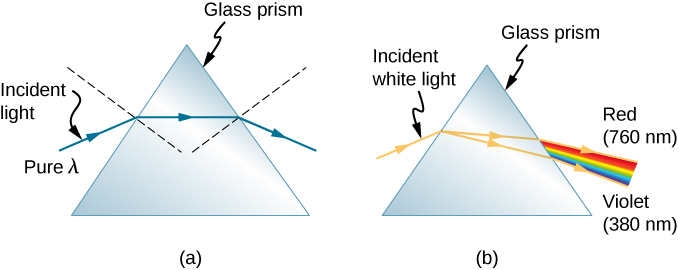
Everyone enjoys the spectacle of a rainbow glimmering against a dark stormy sky. How does sunlight falling on clear drops of rain get broken into the rainbow of colors we see? The same process causes white light to be broken into colors by a clear glass prism or a diamond (Figure \(\PageIndex{1}\)).

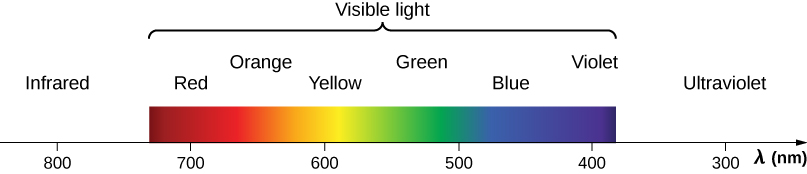
We see about six colors in a rainbow—red, orange, yellow, green, blue, and violet; sometimes indigo is listed, too. These colors are associated with different wavelengths of light, as shown in Figure \(\PageIndex{2}\). When our eye receives pure-wavelength light, we tend to see only one of the six colors, depending on wavelength. The thousands of other hues we can sense in other situations are our eye’s response to various mixtures of wavelengths. White light, in particular, is a fairly uniform mixture of all visible wavelengths. Sunlight, considered to be white, actually appears to be a bit yellow, because of its mixture of wavelengths, but it does contain all visible wavelengths. The sequence of colors in rainbows is the same sequence as the colors shown in the figure. This implies that white light is spread out in a rainbow according to wavelength. Dispersion is defined as the spreading of white light into its full spectrum of wavelengths. More technically, dispersion occurs whenever the propagation of light depends on wavelength.
Any type of wave can exhibit dispersion. For example, sound waves, all types of electromagnetic waves, and water waves can be dispersed according to wavelength. Dispersion may require special circumstances and can result in spectacular displays such as in the production of a rainbow. This is also true for sound, since all frequencies ordinarily travel at the same speed. If you listen to sound through a long tube, such as a vacuum cleaner hose, you can easily hear it dispersed by interaction with the tube. Dispersion, in fact, can reveal a great deal about what the wave has encountered that disperses its wavelengths. The dispersion of electromagnetic radiation from outer space, for example, has revealed much about what exists between the stars—the so-called interstellar medium.
Nick Moore’s video discusses dispersion of a pulse as he taps a long spring. Follow his explanation as Moore replays the high-speed footage showing high frequency waves outrunning the lower frequency waves. https://www.youtube.com/watch?v=KbmOcT5sX7I
Refraction is responsible for dispersion in rainbows and many other situations. The angle of refraction depends on the index of refraction, as we know from Snell’s law. We know that the index of refraction n depends on the medium. But for a given medium, n also depends on wavelength (Table \(\PageIndex{1}\)).
| Medium | Red (660 nm) | Orange (610 nm) | Yellow (580 nm) | Green (550 nm) | Blue (470 nm) | Violet (410 nm) |
|---|---|---|---|---|---|---|
| Water | 1.331 | 1.332 | 1.333 | 1.335 | 1.338 | 1.342 |
| Diamond | 2.410 | 2.415 | 2.417 | 2.426 | 2.444 | 2.458 |
| Glass, crown | 1.512 | 1.514 | 1.518 | 1.519 | 1.524 | 1.530 |
| Glass, flint | 1.662 | 1.665 | 1.667 | 1.674 | 1.684 | 1.698 |
| Polystyrene | 1.488 | 1.490 | 1.492 | 1.493 | 1.499 | 1.506 |
| Quartz, fused | 1.455 | 1.456 | 1.458 | 1.459 | 1.462 | 1.468 |
Note that for a given medium, n increases as wavelength decreases and is greatest for violet light. Thus, violet light is bent more than red light, as shown for a prism in Figure \(\PageIndex{3b}\). White light is dispersed into the same sequence of wavelengths as seen in Figures \(\PageIndex{1}\) and \(\PageIndex{2}\).
Example \(\PageIndex{1}\): Dispersion of White Light by Flint Glass
A beam of white light goes from air into flint glass at an incidence angle of 43.2°. What is the angle between the red (660 nm) and violet (410 nm) parts of the refracted light?
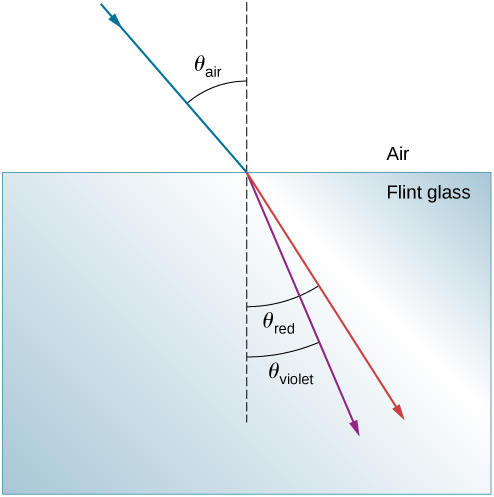
Strategy
Values for the indices of refraction for flint glass at various wavelengths are listed in Table \(\PageIndex{1}\). Use these values for calculate the angle of refraction for each color and then take the difference to find the dispersion angle.
Solution
Applying the law of refraction for the red part of the beam
\[n_{air}\sin θ_{air}=n_{red} \sinθ_{red}, \nonumber \]
we can solve for the angle of refraction as
\[θ_{red}=\sin^{−1}(\frac{n_{air}\sin θ_{air}}{n_{red}})=\sin^{−1}[\frac{(1.000)\sin43.2°}{(1.512)}]=27.0°. \nonumber \]
Similarly, the angle of incidence for the violet part of the beam is
\[θ_{violet}=\sin^{−1}(\frac{n_{air}sinθ_{air}}{n_{violet}})=\sin^{−1}[\frac{(1.000)\sin43.2°}{(1.530)}]=26.4°. \nonumber \]
The difference between these two angles is
\[θ_{red}−θ_{violet}=27.0°−26.4°=0.6°. \nonumber \]
Significance
Although 0.6° may seem like a negligibly small angle, if this beam is allowed to propagate a long enough distance, the dispersion of colors becomes quite noticeable.
In the preceding example, how much distance inside the block of flint glass would the red and the violet rays have to progress before they are separated by 1.0 mm?
- Answer
-
9.3 cm
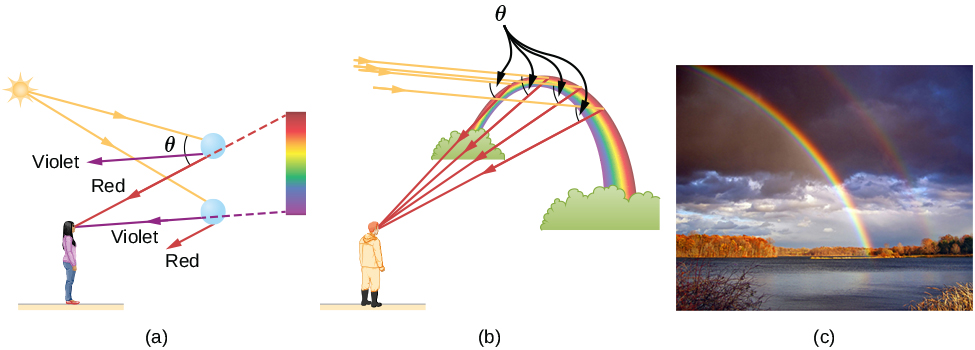
Rainbows are produced by a combination of refraction and reflection. You may have noticed that you see a rainbow only when you look away from the Sun. Light enters a drop of water and is reflected from the back of the drop (Figure \(\PageIndex{4}\)).
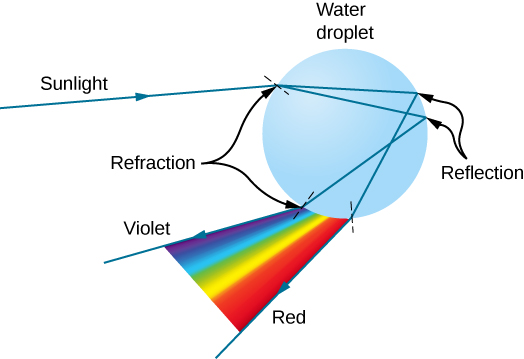
The light is refracted both as it enters and as it leaves the drop. Since the index of refraction of water varies with wavelength, the light is dispersed, and a rainbow is observed (Figure \(\PageIndex{4a}\)). (No dispersion occurs at the back surface, because the law of reflection does not depend on wavelength.) The actual rainbow of colors seen by an observer depends on the myriad rays being refracted and reflected toward the observer’s eyes from numerous drops of water. The effect is most spectacular when the background is dark, as in stormy weather, but can also be observed in waterfalls and lawn sprinklers. The arc of a rainbow comes from the need to be looking at a specific angle relative to the direction of the Sun, as illustrated in Figure \(\PageIndex{4b}\). If two reflections of light occur within the water drop, another “secondary” rainbow is produced. This rare event produces an arc that lies above the primary rainbow arc, as in Figure \(\PageIndex{4c}\), and produces colors in the reverse order of the primary rainbow, with red at the lowest angle and violet at the largest angle.
Dispersion may produce beautiful rainbows, but it can cause problems in optical systems. White light used to transmit messages in a fiber is dispersed, spreading out in time and eventually overlapping with other messages. Since a laser produces a nearly pure wavelength, its light experiences little dispersion, an advantage over white light for transmission of information. In contrast, dispersion of electromagnetic waves coming to us from outer space can be used to determine the amount of matter they pass through.