
5.13: Pressure at the Centre of a Uniform Sphere


- Last updated
- Mar 5, 2022
- Save as PDF

( \newcommand{\kernel}{\mathrm{null}\,}\)
What is the pressure at the centre of a sphere of radius a and of uniform density ρ?
(Preliminary thought: Show by dimensional analysis that it must be something times Gρ2a2.)
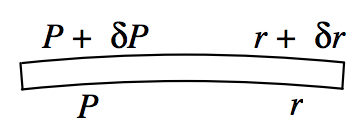
FIGURE V.27
Consider a portion of the sphere between radii r and r+δr and cross-sectional area A. Its volume is Aδr and its mass is ρAδr. (Were the density not uniform throughout the sphere, we would here have to write ρ(r)Aδr. ) Its weight is ρgAδr, where g=GMr/r2=43πGρr. We suppose that the pressure at radius r is P and the pressure at radius r+δr is P+δP. (δP is negative.) Equating the downward forces to the upward force, we have
A(P+δP)+43πAGρ2rδr=AP.
That is: δP=−43πGρ2rδr.
Integrate from the centre to the surface:
∫0P0dP=−43πGρ2∫a0rdr.
Thus: P=23πGρ2a2.