25.5: Orbits of the Two Bodies
- Page ID
- 25593
\( \newcommand{\vecs}[1]{\overset { \scriptstyle \rightharpoonup} {\mathbf{#1}} } \)
\( \newcommand{\vecd}[1]{\overset{-\!-\!\rightharpoonup}{\vphantom{a}\smash {#1}}} \)
\( \newcommand{\id}{\mathrm{id}}\) \( \newcommand{\Span}{\mathrm{span}}\)
( \newcommand{\kernel}{\mathrm{null}\,}\) \( \newcommand{\range}{\mathrm{range}\,}\)
\( \newcommand{\RealPart}{\mathrm{Re}}\) \( \newcommand{\ImaginaryPart}{\mathrm{Im}}\)
\( \newcommand{\Argument}{\mathrm{Arg}}\) \( \newcommand{\norm}[1]{\| #1 \|}\)
\( \newcommand{\inner}[2]{\langle #1, #2 \rangle}\)
\( \newcommand{\Span}{\mathrm{span}}\)
\( \newcommand{\id}{\mathrm{id}}\)
\( \newcommand{\Span}{\mathrm{span}}\)
\( \newcommand{\kernel}{\mathrm{null}\,}\)
\( \newcommand{\range}{\mathrm{range}\,}\)
\( \newcommand{\RealPart}{\mathrm{Re}}\)
\( \newcommand{\ImaginaryPart}{\mathrm{Im}}\)
\( \newcommand{\Argument}{\mathrm{Arg}}\)
\( \newcommand{\norm}[1]{\| #1 \|}\)
\( \newcommand{\inner}[2]{\langle #1, #2 \rangle}\)
\( \newcommand{\Span}{\mathrm{span}}\) \( \newcommand{\AA}{\unicode[.8,0]{x212B}}\)
\( \newcommand{\vectorA}[1]{\vec{#1}} % arrow\)
\( \newcommand{\vectorAt}[1]{\vec{\text{#1}}} % arrow\)
\( \newcommand{\vectorB}[1]{\overset { \scriptstyle \rightharpoonup} {\mathbf{#1}} } \)
\( \newcommand{\vectorC}[1]{\textbf{#1}} \)
\( \newcommand{\vectorD}[1]{\overrightarrow{#1}} \)
\( \newcommand{\vectorDt}[1]{\overrightarrow{\text{#1}}} \)
\( \newcommand{\vectE}[1]{\overset{-\!-\!\rightharpoonup}{\vphantom{a}\smash{\mathbf {#1}}}} \)
\( \newcommand{\vecs}[1]{\overset { \scriptstyle \rightharpoonup} {\mathbf{#1}} } \)
\( \newcommand{\vecd}[1]{\overset{-\!-\!\rightharpoonup}{\vphantom{a}\smash {#1}}} \)
\(\newcommand{\avec}{\mathbf a}\) \(\newcommand{\bvec}{\mathbf b}\) \(\newcommand{\cvec}{\mathbf c}\) \(\newcommand{\dvec}{\mathbf d}\) \(\newcommand{\dtil}{\widetilde{\mathbf d}}\) \(\newcommand{\evec}{\mathbf e}\) \(\newcommand{\fvec}{\mathbf f}\) \(\newcommand{\nvec}{\mathbf n}\) \(\newcommand{\pvec}{\mathbf p}\) \(\newcommand{\qvec}{\mathbf q}\) \(\newcommand{\svec}{\mathbf s}\) \(\newcommand{\tvec}{\mathbf t}\) \(\newcommand{\uvec}{\mathbf u}\) \(\newcommand{\vvec}{\mathbf v}\) \(\newcommand{\wvec}{\mathbf w}\) \(\newcommand{\xvec}{\mathbf x}\) \(\newcommand{\yvec}{\mathbf y}\) \(\newcommand{\zvec}{\mathbf z}\) \(\newcommand{\rvec}{\mathbf r}\) \(\newcommand{\mvec}{\mathbf m}\) \(\newcommand{\zerovec}{\mathbf 0}\) \(\newcommand{\onevec}{\mathbf 1}\) \(\newcommand{\real}{\mathbb R}\) \(\newcommand{\twovec}[2]{\left[\begin{array}{r}#1 \\ #2 \end{array}\right]}\) \(\newcommand{\ctwovec}[2]{\left[\begin{array}{c}#1 \\ #2 \end{array}\right]}\) \(\newcommand{\threevec}[3]{\left[\begin{array}{r}#1 \\ #2 \\ #3 \end{array}\right]}\) \(\newcommand{\cthreevec}[3]{\left[\begin{array}{c}#1 \\ #2 \\ #3 \end{array}\right]}\) \(\newcommand{\fourvec}[4]{\left[\begin{array}{r}#1 \\ #2 \\ #3 \\ #4 \end{array}\right]}\) \(\newcommand{\cfourvec}[4]{\left[\begin{array}{c}#1 \\ #2 \\ #3 \\ #4 \end{array}\right]}\) \(\newcommand{\fivevec}[5]{\left[\begin{array}{r}#1 \\ #2 \\ #3 \\ #4 \\ #5 \\ \end{array}\right]}\) \(\newcommand{\cfivevec}[5]{\left[\begin{array}{c}#1 \\ #2 \\ #3 \\ #4 \\ #5 \\ \end{array}\right]}\) \(\newcommand{\mattwo}[4]{\left[\begin{array}{rr}#1 \amp #2 \\ #3 \amp #4 \\ \end{array}\right]}\) \(\newcommand{\laspan}[1]{\text{Span}\{#1\}}\) \(\newcommand{\bcal}{\cal B}\) \(\newcommand{\ccal}{\cal C}\) \(\newcommand{\scal}{\cal S}\) \(\newcommand{\wcal}{\cal W}\) \(\newcommand{\ecal}{\cal E}\) \(\newcommand{\coords}[2]{\left\{#1\right\}_{#2}}\) \(\newcommand{\gray}[1]{\color{gray}{#1}}\) \(\newcommand{\lgray}[1]{\color{lightgray}{#1}}\) \(\newcommand{\rank}{\operatorname{rank}}\) \(\newcommand{\row}{\text{Row}}\) \(\newcommand{\col}{\text{Col}}\) \(\renewcommand{\row}{\text{Row}}\) \(\newcommand{\nul}{\text{Nul}}\) \(\newcommand{\var}{\text{Var}}\) \(\newcommand{\corr}{\text{corr}}\) \(\newcommand{\len}[1]{\left|#1\right|}\) \(\newcommand{\bbar}{\overline{\bvec}}\) \(\newcommand{\bhat}{\widehat{\bvec}}\) \(\newcommand{\bperp}{\bvec^\perp}\) \(\newcommand{\xhat}{\widehat{\xvec}}\) \(\newcommand{\vhat}{\widehat{\vvec}}\) \(\newcommand{\uhat}{\widehat{\uvec}}\) \(\newcommand{\what}{\widehat{\wvec}}\) \(\newcommand{\Sighat}{\widehat{\Sigma}}\) \(\newcommand{\lt}{<}\) \(\newcommand{\gt}{>}\) \(\newcommand{\amp}{&}\) \(\definecolor{fillinmathshade}{gray}{0.9}\)The orbit of the single body can be circular, elliptical, parabolic or hyperbolic, depending on the values of the two constants of the motion, the angular momentum and the energy. Once we have the explicit solution (in this discussion, \(r(\theta)\) ) for the single body, we can find the actual orbits of the two bodies.
Choose a coordinate system as we did for the reduction of the two-body problem (Figure 25.7).

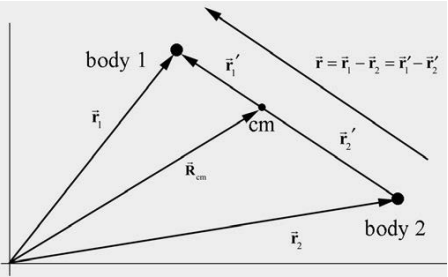
The center of mass of the system is given by
\[\overrightarrow{\mathbf{R}}_{\mathrm{cm}}=\frac{m_{1} \overrightarrow{\mathbf{r}}_{1}+m_{2} \overrightarrow{\mathbf{r}}_{2}}{m_{1}+m_{2}} \nonumber \]
Let \(\overrightarrow{\mathbf{r}}_{1}^{\prime}\) be the vector from the center of mass to body 1 and \(\overrightarrow{\mathbf{r}}_{2}^{\prime}\) be the vector from the center of mass to body 2. Then, by the geometry in Figure 25.6,
\[\overrightarrow{\mathbf{r}}=\overrightarrow{\mathbf{r}}_{1}-\overrightarrow{\mathbf{r}}_{2}=\overrightarrow{\mathbf{r}}_{1}^{\prime}-\overrightarrow{\mathbf{r}}_{2}^{\prime} \nonumber \]
and hence
\[\overrightarrow{\mathbf{r}}_{1}^{\prime}=\overrightarrow{\mathbf{r}}_{1}-\overrightarrow{\mathbf{R}}_{\mathrm{cm}}=\overrightarrow{\mathbf{r}}_{1}-\frac{m_{1} \overrightarrow{\mathbf{r}}_{1}+m_{2} \overrightarrow{\mathbf{r}}_{2}}{m_{1}+m_{2}}=\frac{m_{2}\left(\overrightarrow{\mathbf{r}}_{1}-\overrightarrow{\mathbf{r}}_{2}\right)}{m_{1}+m_{2}}=\frac{\mu}{m_{1}} \overrightarrow{\mathbf{r}} \nonumber \]
A similar calculation shows that
\[\overrightarrow{\mathbf{r}}_{2}^{\prime}=-\frac{\mu}{m_{2}} \overrightarrow{\mathbf{r}} \nonumber \]
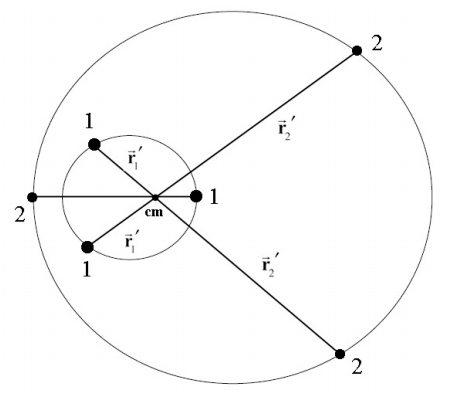
Thus each body undergoes a motion about the center of mass in the same manner that the single body moves about the central point given by Equation (25.3.12). The only difference is that the distance from either body to the center of mass is shortened by a factor \(\mu / m_{i}\). When the orbit of the single body is an ellipse, then the orbits of the two bodies are also ellipses, as shown in Figure 25.8. When one mass is much smaller than the other, for example m , then the reduced mass is approximately the smaller \(m_{1}<<m_{2}\) mass,
\[\mu=\frac{m_{1} m_{2}}{m_{1}+m_{2}} \cong \frac{m_{1} m_{2}}{m_{2}}=m_{1} \nonumber \]

The center of mass is located approximately at the position of the larger mass, body 2 of mass \(m_{2}\). Thus body 1 moves according to
\[\overrightarrow{\mathbf{r}}_{1}^{\prime}=\frac{\mu}{m_{1}} \overrightarrow{\mathbf{r}} \cong \overrightarrow{\mathbf{r}} \nonumber \]
and body 2 is approximately stationary,
\[\overrightarrow{\mathbf{r}}_{2}^{\prime}=-\frac{\mu}{m_{2}} \overrightarrow{\mathbf{r}}-\frac{m_{1}}{m_{2}} \overrightarrow{\mathbf{r}} \cong \overrightarrow{\mathbf{0}} \nonumber \]