

1.2: Plane Triangular Lamina
- Page ID
- 6926

\( \newcommand{\vecs}[1]{\overset { \scriptstyle \rightharpoonup} {\mathbf{#1}} } \)
\( \newcommand{\vecd}[1]{\overset{-\!-\!\rightharpoonup}{\vphantom{a}\smash {#1}}} \)
\( \newcommand{\dsum}{\displaystyle\sum\limits} \)
\( \newcommand{\dint}{\displaystyle\int\limits} \)
\( \newcommand{\dlim}{\displaystyle\lim\limits} \)
\( \newcommand{\id}{\mathrm{id}}\) \( \newcommand{\Span}{\mathrm{span}}\)
( \newcommand{\kernel}{\mathrm{null}\,}\) \( \newcommand{\range}{\mathrm{range}\,}\)
\( \newcommand{\RealPart}{\mathrm{Re}}\) \( \newcommand{\ImaginaryPart}{\mathrm{Im}}\)
\( \newcommand{\Argument}{\mathrm{Arg}}\) \( \newcommand{\norm}[1]{\| #1 \|}\)
\( \newcommand{\inner}[2]{\langle #1, #2 \rangle}\)
\( \newcommand{\Span}{\mathrm{span}}\)
\( \newcommand{\id}{\mathrm{id}}\)
\( \newcommand{\Span}{\mathrm{span}}\)
\( \newcommand{\kernel}{\mathrm{null}\,}\)
\( \newcommand{\range}{\mathrm{range}\,}\)
\( \newcommand{\RealPart}{\mathrm{Re}}\)
\( \newcommand{\ImaginaryPart}{\mathrm{Im}}\)
\( \newcommand{\Argument}{\mathrm{Arg}}\)
\( \newcommand{\norm}[1]{\| #1 \|}\)
\( \newcommand{\inner}[2]{\langle #1, #2 \rangle}\)
\( \newcommand{\Span}{\mathrm{span}}\) \( \newcommand{\AA}{\unicode[.8,0]{x212B}}\)
\( \newcommand{\vectorA}[1]{\vec{#1}} % arrow\)
\( \newcommand{\vectorAt}[1]{\vec{\text{#1}}} % arrow\)
\( \newcommand{\vectorB}[1]{\overset { \scriptstyle \rightharpoonup} {\mathbf{#1}} } \)
\( \newcommand{\vectorC}[1]{\textbf{#1}} \)
\( \newcommand{\vectorD}[1]{\overrightarrow{#1}} \)
\( \newcommand{\vectorDt}[1]{\overrightarrow{\text{#1}}} \)
\( \newcommand{\vectE}[1]{\overset{-\!-\!\rightharpoonup}{\vphantom{a}\smash{\mathbf {#1}}}} \)
\( \newcommand{\vecs}[1]{\overset { \scriptstyle \rightharpoonup} {\mathbf{#1}} } \)
\(\newcommand{\longvect}{\overrightarrow}\)
\( \newcommand{\vecd}[1]{\overset{-\!-\!\rightharpoonup}{\vphantom{a}\smash {#1}}} \)
\(\newcommand{\ket}[1]{\left| #1 \right>}\)
\(\newcommand{\bra}[1]{\left< #1 \right|}\)
\(\newcommand{\braket}[2]{\left< #1 \vphantom{#2} \right| \left. #2 \vphantom{#1} \right>}\)
\(\newcommand{\braopket}[3]{\left< #1 \vphantom{#2}\vphantom{#3} \right| #2 \vphantom{#1}\vphantom{#3} \left| #3 \vphantom{#1}\vphantom{#2} \right>}\)
\(\newcommand{\qmvec}[1]{\mathbf{\vec{#1}}}\)
\(\newcommand{\op}[1]{\hat{\mathbf{#1}}}\)
\(\newcommand{\expect}[1]{\langle #1 \rangle}\)
\(\newcommand{\dfn}[1]{\emph{\textbf{#1}}}\)
Definition: A median of a triangle is a line from a vertex to the midpoint of the opposite side.
Theorem I. The three medians of a triangle are concurrent (meet at a single, unique point) at a point that is two-thirds of the distance from a vertex to the midpoint of the opposite side.
Theorem II. The centre of mass of a uniform triangular lamina (or the centroid of a triangle) is at the meet of the medians.
The proof of I can be done with a nice vector argument (Figure I.1):
Let \(\bf{\text{A}}\) , \( \bf{\text{B}}\) be the vectors \( \text{OA}\) , \( \text{OB}\) . Then \( \bf{\text{A+B}}\) is the diagonal of the parallelogram of which \( OA\) and \( \text{OB}\) are two sides, and the position vector of the point \( \text{C}_{1}\) is \( \frac{1}{3}(\bf{\text{A+B}})\) .
To get \( \text{C}_{2}\), we see that
\( {\bf C}_2 = {\bf A} + \dfrac{2}{3}(\text{AM}_2) = {\bf A} + \dfrac{2}{3}({\bf M_2 - A}) = {\bf A} + \dfrac{2}{3}(\dfrac{1}{2}{\bf B- A}) = \dfrac{1}{3}( {\bf A+B})\)
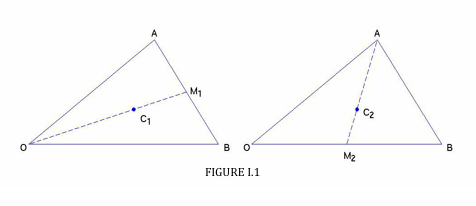
Thus the points \( \text{C}_{1}\) and \( \text{C}_{2}\) are identical, and the same would be true for the third median, so Theorem I is proved.
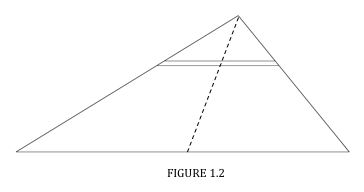
Now consider an elemental slice as in Figure I.2. The centre of mass of the slice is at its mid-point. The same is true of any similar slices parallel to it. Therefore the centre of mass is on the locus of the mid-points - i.e. on a median. Similarly, it is on each of the other medians, and Theorem II is proved.
That needed only some vector geometry. We now move on to some calculus.