
2.7: Three-dimensional Hollow Figures. Spheres, Cylinders, Cones


- Last updated
- Aug 8, 2022
- Save as PDF

( \newcommand{\kernel}{\mathrm{null}\,}\)
Hollowspherical shell, mass m, radius a
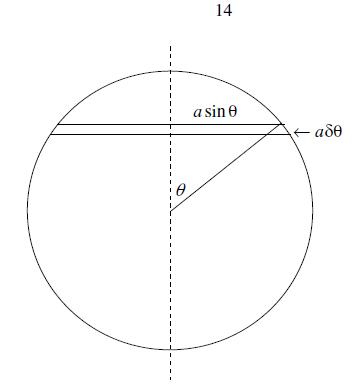
The area of the elemental zone is 2πa2sinθδθ. Its mass is
m×2πa2sinθδθ4πa2=12msinθδθ
Its moment of inertia is 12msinθδθ×a2sin2θ=12ma2sin3θδθ
The moment of inertia of the entire spherical shell is
12ma2∫π0sin3θδθ =23ma2
This result can be used to calculate, by integration, the moment of inertia 25ma2 of a solid sphere. Or, if you start with 25ma2 for a solid sphere, you can differentiate to find the result 23ma2 for a hollow sphere. Write the moment of inertia for a solid sphere in terms of its density rather than its mass. Then add a layer da and calculate the increase dI in the moment of inertia. We can also use the moment of inertia for a hollow sphere ( 23ma2 ) to calculate the moment of inertia of a nonuniform solid sphere in which the density varies as ρ=ρ(r). For example, if ρ=ρ0√1−(ra)2 , see if you can show that the mass of the sphere is 2.467ρ0a3 and that its moment of inertia is 13ma2 . A much easier method will be found in Section 19.
Using methods similar to that given for a solid cylinder, it is left as an exercise to show that the moment of inertia of an open hollow cylinder about an axis perpendicular to its length passing through its centre of mass is m(12a2+13l2), where a is the radius and 2l is the length.
The moment of inertia of a baseless hollow cone of mass m, base radius a, about the axis of the cone could be found by integration. However, those who have an understanding of the way in which the moment of inertia depends on the distribution of mass should readily see, without further ado, that the moment of inertia is 12ma2. (Look at the cone from above; it looks just like a disc, and indeed it has the same radial mass distribution as a uniform disc.)