5.6: Types of Equilibrium
- Page ID
- 17743
\( \newcommand{\vecs}[1]{\overset { \scriptstyle \rightharpoonup} {\mathbf{#1}} } \)
\( \newcommand{\vecd}[1]{\overset{-\!-\!\rightharpoonup}{\vphantom{a}\smash {#1}}} \)
\( \newcommand{\id}{\mathrm{id}}\) \( \newcommand{\Span}{\mathrm{span}}\)
( \newcommand{\kernel}{\mathrm{null}\,}\) \( \newcommand{\range}{\mathrm{range}\,}\)
\( \newcommand{\RealPart}{\mathrm{Re}}\) \( \newcommand{\ImaginaryPart}{\mathrm{Im}}\)
\( \newcommand{\Argument}{\mathrm{Arg}}\) \( \newcommand{\norm}[1]{\| #1 \|}\)
\( \newcommand{\inner}[2]{\langle #1, #2 \rangle}\)
\( \newcommand{\Span}{\mathrm{span}}\)
\( \newcommand{\id}{\mathrm{id}}\)
\( \newcommand{\Span}{\mathrm{span}}\)
\( \newcommand{\kernel}{\mathrm{null}\,}\)
\( \newcommand{\range}{\mathrm{range}\,}\)
\( \newcommand{\RealPart}{\mathrm{Re}}\)
\( \newcommand{\ImaginaryPart}{\mathrm{Im}}\)
\( \newcommand{\Argument}{\mathrm{Arg}}\)
\( \newcommand{\norm}[1]{\| #1 \|}\)
\( \newcommand{\inner}[2]{\langle #1, #2 \rangle}\)
\( \newcommand{\Span}{\mathrm{span}}\) \( \newcommand{\AA}{\unicode[.8,0]{x212B}}\)
\( \newcommand{\vectorA}[1]{\vec{#1}} % arrow\)
\( \newcommand{\vectorAt}[1]{\vec{\text{#1}}} % arrow\)
\( \newcommand{\vectorB}[1]{\overset { \scriptstyle \rightharpoonup} {\mathbf{#1}} } \)
\( \newcommand{\vectorC}[1]{\textbf{#1}} \)
\( \newcommand{\vectorD}[1]{\overrightarrow{#1}} \)
\( \newcommand{\vectorDt}[1]{\overrightarrow{\text{#1}}} \)
\( \newcommand{\vectE}[1]{\overset{-\!-\!\rightharpoonup}{\vphantom{a}\smash{\mathbf {#1}}}} \)
\( \newcommand{\vecs}[1]{\overset { \scriptstyle \rightharpoonup} {\mathbf{#1}} } \)
\( \newcommand{\vecd}[1]{\overset{-\!-\!\rightharpoonup}{\vphantom{a}\smash {#1}}} \)
\(\newcommand{\avec}{\mathbf a}\) \(\newcommand{\bvec}{\mathbf b}\) \(\newcommand{\cvec}{\mathbf c}\) \(\newcommand{\dvec}{\mathbf d}\) \(\newcommand{\dtil}{\widetilde{\mathbf d}}\) \(\newcommand{\evec}{\mathbf e}\) \(\newcommand{\fvec}{\mathbf f}\) \(\newcommand{\nvec}{\mathbf n}\) \(\newcommand{\pvec}{\mathbf p}\) \(\newcommand{\qvec}{\mathbf q}\) \(\newcommand{\svec}{\mathbf s}\) \(\newcommand{\tvec}{\mathbf t}\) \(\newcommand{\uvec}{\mathbf u}\) \(\newcommand{\vvec}{\mathbf v}\) \(\newcommand{\wvec}{\mathbf w}\) \(\newcommand{\xvec}{\mathbf x}\) \(\newcommand{\yvec}{\mathbf y}\) \(\newcommand{\zvec}{\mathbf z}\) \(\newcommand{\rvec}{\mathbf r}\) \(\newcommand{\mvec}{\mathbf m}\) \(\newcommand{\zerovec}{\mathbf 0}\) \(\newcommand{\onevec}{\mathbf 1}\) \(\newcommand{\real}{\mathbb R}\) \(\newcommand{\twovec}[2]{\left[\begin{array}{r}#1 \\ #2 \end{array}\right]}\) \(\newcommand{\ctwovec}[2]{\left[\begin{array}{c}#1 \\ #2 \end{array}\right]}\) \(\newcommand{\threevec}[3]{\left[\begin{array}{r}#1 \\ #2 \\ #3 \end{array}\right]}\) \(\newcommand{\cthreevec}[3]{\left[\begin{array}{c}#1 \\ #2 \\ #3 \end{array}\right]}\) \(\newcommand{\fourvec}[4]{\left[\begin{array}{r}#1 \\ #2 \\ #3 \\ #4 \end{array}\right]}\) \(\newcommand{\cfourvec}[4]{\left[\begin{array}{c}#1 \\ #2 \\ #3 \\ #4 \end{array}\right]}\) \(\newcommand{\fivevec}[5]{\left[\begin{array}{r}#1 \\ #2 \\ #3 \\ #4 \\ #5 \\ \end{array}\right]}\) \(\newcommand{\cfivevec}[5]{\left[\begin{array}{c}#1 \\ #2 \\ #3 \\ #4 \\ #5 \\ \end{array}\right]}\) \(\newcommand{\mattwo}[4]{\left[\begin{array}{rr}#1 \amp #2 \\ #3 \amp #4 \\ \end{array}\right]}\) \(\newcommand{\laspan}[1]{\text{Span}\{#1\}}\) \(\newcommand{\bcal}{\cal B}\) \(\newcommand{\ccal}{\cal C}\) \(\newcommand{\scal}{\cal S}\) \(\newcommand{\wcal}{\cal W}\) \(\newcommand{\ecal}{\cal E}\) \(\newcommand{\coords}[2]{\left\{#1\right\}_{#2}}\) \(\newcommand{\gray}[1]{\color{gray}{#1}}\) \(\newcommand{\lgray}[1]{\color{lightgray}{#1}}\) \(\newcommand{\rank}{\operatorname{rank}}\) \(\newcommand{\row}{\text{Row}}\) \(\newcommand{\col}{\text{Col}}\) \(\renewcommand{\row}{\text{Row}}\) \(\newcommand{\nul}{\text{Nul}}\) \(\newcommand{\var}{\text{Var}}\) \(\newcommand{\corr}{\text{corr}}\) \(\newcommand{\len}[1]{\left|#1\right|}\) \(\newcommand{\bbar}{\overline{\bvec}}\) \(\newcommand{\bhat}{\widehat{\bvec}}\) \(\newcommand{\bperp}{\bvec^\perp}\) \(\newcommand{\xhat}{\widehat{\xvec}}\) \(\newcommand{\vhat}{\widehat{\vvec}}\) \(\newcommand{\uhat}{\widehat{\uvec}}\) \(\newcommand{\what}{\widehat{\wvec}}\) \(\newcommand{\Sighat}{\widehat{\Sigma}}\) \(\newcommand{\lt}{<}\) \(\newcommand{\gt}{>}\) \(\newcommand{\amp}{&}\) \(\definecolor{fillinmathshade}{gray}{0.9}\)Stable Equilibrium
If a structure is pushed out of equilibrium we say it has been displaced from equilibrium. If the object tends to move back toward its equilibrium position then it must be in a region of stable equilibrium and the force that pushed it back is a restoring force.
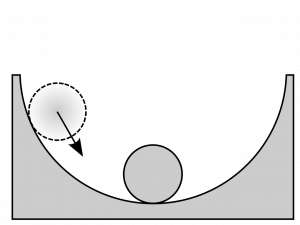
A marble in the bottom of a bowl is an example of stable equilibrium. Image credit:
As your arm hangs from your shoulder, it is in stable equilibrium. If your arm is lifted to the side and then let go it will fall back down to the hanging position. The hanging arm is a stable position because the center of gravity of the arm is located below the base of support, in this case the shoulder. When displaced (lifted a bit) the force of gravity acting on your arm will cause a torque that rotates your arm back down to the hanging position. In such cases, when an object is displaced from the equilibrium position and the resulting net forces (or torques they cause) move the object back toward the equilibrium position then these forces are called restoring forces. The sloth takes advantage of stable equilibrium to save energy that humans spend on staying upright. If the sloth is displaced in any direction, the force of gravity automatically acts as a restoring force and returns the slot to its equilibrium position.
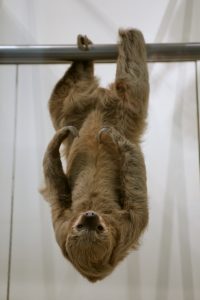
A two-toed sloth hangs from its feet in a stable equilibrium position. Image Credit: Cliff via Wikimedia Commons
Unstable Equilibrium
When a system in equilibrium is displaced and the resulting net force pushes the object even further away from the equilibrium position then it must have been in an unstable equilibrium. Technically, real systems cannot spend time at unstable equilibrium point because the tiniest vibration will cause them to move out of equilibrium not to mention that you could never place them perfectly into position in the first place. Trying to balance a marble on a hill is a good example:
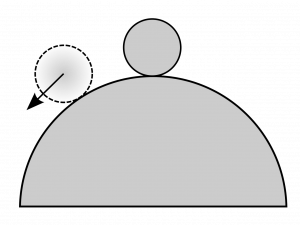
An example of unstable equilibrium is a marble placed on a hill. Image Credit: “Unstable Equilibrium” by Urutseg, via Wikimedia Commons.
Metastable Equilibrium
A person in a barely-stable equilibrium. Image Credit: Usien via Wikimedia Commons.
Some structures that are in stable equilibrium can be displaced relatively far before they are no longer in equilibrium compared to other structures that only require a small displacement to move out of equilibrium. We often call these systems stable and unstable, but this can be misleading because any standing structure is somewhat stable and a truly unstable structure would not stand still for any time. For example we expect that most people would say the person balancing on their head in the image above is unstable. However, they are actively adjusting the shape of their body to shift their center of gravityand to remain within a region of stable equilibrium and not pass a tipping point. We could say that this person is in a very narrow metastable equilibrium. Keeping your balance as you stand, sit, or walk is an act of maintaining metastable equilibrium.
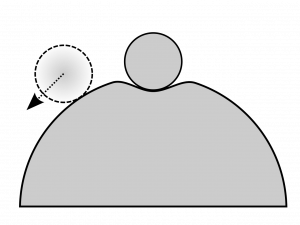
The marble is in meta-stable equilibrium as long as it doesn’t move outside the dip in the center. The peak at edge of the dip is analogous to the tipping point for a structure; beyond this point the marble will not move back toward the equilibrium position. Image credit: “Meta-stable Equilibrium” by Urutseg via Wikimedia Commons
- "Stable Equilibrium" by Urutseg, Wikimedia Commons is in the Public Domain, CC0↵
- By Cliff (Flickr: Two Toed Sloth (Choloepus didactylus)) [CC BY 2.0 (https://creativecommons.org/licenses/by/2.0)], via Wikimedia Commons ↵
- "Unstable Equilibrium" by Urutseg, Wikimedia Commons is in the Public Domain, CC0↵
- By Usien [CC BY-SA 3.0 (https://creativecommons.org/licenses/by-sa/3.0)], from Wikimedia Commons ↵
- "Meta-stable Equilibrium" by Urutseg, Wikimedia Commons is in the Public Domain, CC0↵