21.4: Nuclear Fusion and Fission
- Page ID
- 32884
\( \newcommand{\vecs}[1]{\overset { \scriptstyle \rightharpoonup} {\mathbf{#1}} } \)
\( \newcommand{\vecd}[1]{\overset{-\!-\!\rightharpoonup}{\vphantom{a}\smash {#1}}} \)
\( \newcommand{\dsum}{\displaystyle\sum\limits} \)
\( \newcommand{\dint}{\displaystyle\int\limits} \)
\( \newcommand{\dlim}{\displaystyle\lim\limits} \)
\( \newcommand{\id}{\mathrm{id}}\) \( \newcommand{\Span}{\mathrm{span}}\)
( \newcommand{\kernel}{\mathrm{null}\,}\) \( \newcommand{\range}{\mathrm{range}\,}\)
\( \newcommand{\RealPart}{\mathrm{Re}}\) \( \newcommand{\ImaginaryPart}{\mathrm{Im}}\)
\( \newcommand{\Argument}{\mathrm{Arg}}\) \( \newcommand{\norm}[1]{\| #1 \|}\)
\( \newcommand{\inner}[2]{\langle #1, #2 \rangle}\)
\( \newcommand{\Span}{\mathrm{span}}\)
\( \newcommand{\id}{\mathrm{id}}\)
\( \newcommand{\Span}{\mathrm{span}}\)
\( \newcommand{\kernel}{\mathrm{null}\,}\)
\( \newcommand{\range}{\mathrm{range}\,}\)
\( \newcommand{\RealPart}{\mathrm{Re}}\)
\( \newcommand{\ImaginaryPart}{\mathrm{Im}}\)
\( \newcommand{\Argument}{\mathrm{Arg}}\)
\( \newcommand{\norm}[1]{\| #1 \|}\)
\( \newcommand{\inner}[2]{\langle #1, #2 \rangle}\)
\( \newcommand{\Span}{\mathrm{span}}\) \( \newcommand{\AA}{\unicode[.8,0]{x212B}}\)
\( \newcommand{\vectorA}[1]{\vec{#1}} % arrow\)
\( \newcommand{\vectorAt}[1]{\vec{\text{#1}}} % arrow\)
\( \newcommand{\vectorB}[1]{\overset { \scriptstyle \rightharpoonup} {\mathbf{#1}} } \)
\( \newcommand{\vectorC}[1]{\textbf{#1}} \)
\( \newcommand{\vectorD}[1]{\overrightarrow{#1}} \)
\( \newcommand{\vectorDt}[1]{\overrightarrow{\text{#1}}} \)
\( \newcommand{\vectE}[1]{\overset{-\!-\!\rightharpoonup}{\vphantom{a}\smash{\mathbf {#1}}}} \)
\( \newcommand{\vecs}[1]{\overset { \scriptstyle \rightharpoonup} {\mathbf{#1}} } \)
\(\newcommand{\longvect}{\overrightarrow}\)
\( \newcommand{\vecd}[1]{\overset{-\!-\!\rightharpoonup}{\vphantom{a}\smash {#1}}} \)
\(\newcommand{\avec}{\mathbf a}\) \(\newcommand{\bvec}{\mathbf b}\) \(\newcommand{\cvec}{\mathbf c}\) \(\newcommand{\dvec}{\mathbf d}\) \(\newcommand{\dtil}{\widetilde{\mathbf d}}\) \(\newcommand{\evec}{\mathbf e}\) \(\newcommand{\fvec}{\mathbf f}\) \(\newcommand{\nvec}{\mathbf n}\) \(\newcommand{\pvec}{\mathbf p}\) \(\newcommand{\qvec}{\mathbf q}\) \(\newcommand{\svec}{\mathbf s}\) \(\newcommand{\tvec}{\mathbf t}\) \(\newcommand{\uvec}{\mathbf u}\) \(\newcommand{\vvec}{\mathbf v}\) \(\newcommand{\wvec}{\mathbf w}\) \(\newcommand{\xvec}{\mathbf x}\) \(\newcommand{\yvec}{\mathbf y}\) \(\newcommand{\zvec}{\mathbf z}\) \(\newcommand{\rvec}{\mathbf r}\) \(\newcommand{\mvec}{\mathbf m}\) \(\newcommand{\zerovec}{\mathbf 0}\) \(\newcommand{\onevec}{\mathbf 1}\) \(\newcommand{\real}{\mathbb R}\) \(\newcommand{\twovec}[2]{\left[\begin{array}{r}#1 \\ #2 \end{array}\right]}\) \(\newcommand{\ctwovec}[2]{\left[\begin{array}{c}#1 \\ #2 \end{array}\right]}\) \(\newcommand{\threevec}[3]{\left[\begin{array}{r}#1 \\ #2 \\ #3 \end{array}\right]}\) \(\newcommand{\cthreevec}[3]{\left[\begin{array}{c}#1 \\ #2 \\ #3 \end{array}\right]}\) \(\newcommand{\fourvec}[4]{\left[\begin{array}{r}#1 \\ #2 \\ #3 \\ #4 \end{array}\right]}\) \(\newcommand{\cfourvec}[4]{\left[\begin{array}{c}#1 \\ #2 \\ #3 \\ #4 \end{array}\right]}\) \(\newcommand{\fivevec}[5]{\left[\begin{array}{r}#1 \\ #2 \\ #3 \\ #4 \\ #5 \\ \end{array}\right]}\) \(\newcommand{\cfivevec}[5]{\left[\begin{array}{c}#1 \\ #2 \\ #3 \\ #4 \\ #5 \\ \end{array}\right]}\) \(\newcommand{\mattwo}[4]{\left[\begin{array}{rr}#1 \amp #2 \\ #3 \amp #4 \\ \end{array}\right]}\) \(\newcommand{\laspan}[1]{\text{Span}\{#1\}}\) \(\newcommand{\bcal}{\cal B}\) \(\newcommand{\ccal}{\cal C}\) \(\newcommand{\scal}{\cal S}\) \(\newcommand{\wcal}{\cal W}\) \(\newcommand{\ecal}{\cal E}\) \(\newcommand{\coords}[2]{\left\{#1\right\}_{#2}}\) \(\newcommand{\gray}[1]{\color{gray}{#1}}\) \(\newcommand{\lgray}[1]{\color{lightgray}{#1}}\) \(\newcommand{\rank}{\operatorname{rank}}\) \(\newcommand{\row}{\text{Row}}\) \(\newcommand{\col}{\text{Col}}\) \(\renewcommand{\row}{\text{Row}}\) \(\newcommand{\nul}{\text{Nul}}\) \(\newcommand{\var}{\text{Var}}\) \(\newcommand{\corr}{\text{corr}}\) \(\newcommand{\len}[1]{\left|#1\right|}\) \(\newcommand{\bbar}{\overline{\bvec}}\) \(\newcommand{\bhat}{\widehat{\bvec}}\) \(\newcommand{\bperp}{\bvec^\perp}\) \(\newcommand{\xhat}{\widehat{\xvec}}\) \(\newcommand{\vhat}{\widehat{\vvec}}\) \(\newcommand{\uhat}{\widehat{\uvec}}\) \(\newcommand{\what}{\widehat{\wvec}}\) \(\newcommand{\Sighat}{\widehat{\Sigma}}\) \(\newcommand{\lt}{<}\) \(\newcommand{\gt}{>}\) \(\newcommand{\amp}{&}\) \(\definecolor{fillinmathshade}{gray}{0.9}\)From Figure \(\PageIndex{4}\): it is clear that atomic nuclei with \(A < 60\) can combine to form more tightly bound nuclei and in so doing release energy. This is called nuclear fusion and it is the process that powers stars.

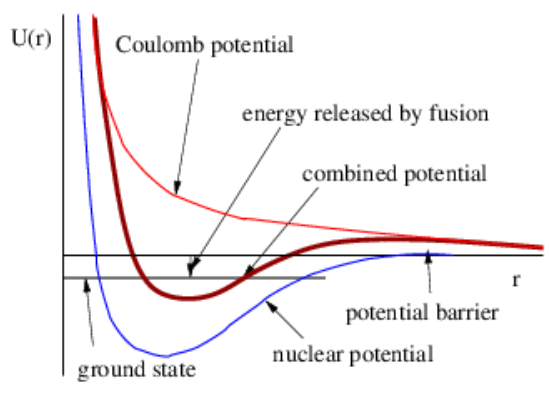
It is not easy to fuse two nuclei. As Figure \(\PageIndex{7}\): shows, the nuclear force, which is attractive but short in range, and the Coulomb force, which is repulsive, combine to create a potential barrier that must be surmounted in order to release energy from fusion. Nuclei must therefore somehow attain large kinetic energy for fusion to take place. We shall discover later that temperature is a measure of the translational kinetic energy of atoms and nuclei. Therefore, one way to create fusion is to heat the appropriate material to a very high temperature. The interiors of ordinary stars are hot enough to fuse hydrogen into helium. Somewhat hotter stars can create slightly heavier elements. However, we believe that only the interior of a type of exploding star called a supernova is hot enough to create the heavy elements we find in the universe. Thus, the iron in your automobile engine and the copper in your electrical wiring were created in some of the most spectacular explosions in the universe!
| Nucleus | Z | A | B (MeV) |
|---|---|---|---|
| deuterium | 1 | 2 | 2.22 |
| tritium | 1 | 3 | 8.48 |
| helium-3 | 2 | 3 | 7.72 |
| helium-4 | 2 | 4 | 28.30 |
| lithium-6 | 3 | 6 | 32.00 |
| lithium-7 | 3 | 7 | 39.25 |
In computing energy balances for light nuclei, it is important to use exact values of binding energies, not the approximate values obtained from the binding energy formula given by equation (21.2.1), as the values given by this equation for small A can be off by a large amount. Sample values for such nuclei are given in table 21.1.
It is possible for a heavy nucleus such as uranium, with atomic number and atomic mass number \((\mathrm{Z}, \mathrm{A})\) to spontaneously fission or split into two lighter nuclei with \(\left(\mathrm{Z}^{\prime}, \mathrm{A}^{\prime}\right)\) and \(\left(Z-Z^{\prime}, A-A^{\prime}\right)\) if there is a net energy release from this process:
\[Q \equiv B\left(Z-Z^{\prime}, A-A^{\prime}\right)+B\left(Z^{\prime}, A^{\prime}\right)-B(Z, A)>0 \quad \text { (fission possible) }\label{21.9}\]
An energy of order 160 MeV per nucleus can be released by causing uranium (Z = 92) or plutonium (Z = 94) to fission.

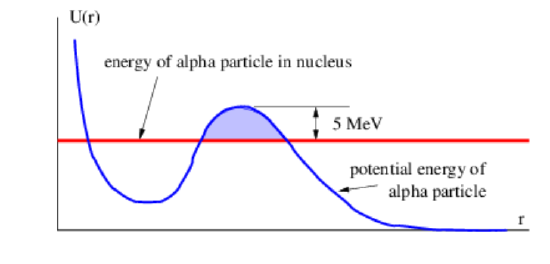
Even if \(Q > 0\), spontaneous fission generally occurs at a very slow rate. This is because a potential energy barrier of order 5 MeV typically must be overcome for this split to occur. Barrier penetration allows fission to occur spontaneously in the absence of the energy needed to overcome this barrier, as illustrated in Figure \(\PageIndex{8}\):, but is generally a slow process. Alpha decay is an example of spontaneous fission of a heavy nucleus by barrier penetration in which \(Z′ = 2\) and \(A′ = 4\).
If a heavy nucleus collides with an energetic particle such as a neutron, photon, or alpha particle, it can be induced to fission if the energy transferred to the nucleus exceeds the approximate 5 MeV needed to breach the potential barrier.
If the heavy nucleus has an odd number of neutrons, another way for fission to occur is for the nucleus to capture a slow neutron, i. e., one with energy much less than the 5 MeV needed to directly overcome the potential barrier. In this case neutron capture actually converts the nucleus from atomic number and mass (Z,A) to atomic number and mass \((\mathrm{Z}, \mathrm{A}+1)\).
The binding energy per nucleon of a nucleus with an even number of neutrons is greater than the binding energy per nucleon of one with an odd number, since in the former case all neutron spins are paired. Thus, if the initial nucleus has an odd number of neutrons, the capture of a slow neutron makes it more tightly bound than if the initial nucleus has an even number of neutrons. If the difference in binding energy between the initial nucleus and the nucleus modified by neutron capture exceeds the 5 MeV needed to overcome the potential barrier for spontaneous fission, then energy conservation leaves the new nucleus in a sufficiently high excited state that it instantly fissions. Examples of nuclei subject to fission by slow neutron absorption are uranium 235 and plutonium 239. Note that both have odd numbers of neutrons. In contrast, uranium 238 has an even number of neutrons and slow neutron bombardment does not cause fission.


