Physics LibreTexts

1.7: Huygens’s Principle

  • Page ID
    4490
  • \( \newcommand{\vecs}[1]{\overset { \scriptstyle \rightharpoonup} {\mathbf{#1}} } \)

    \( \newcommand{\vecd}[1]{\overset{-\!-\!\rightharpoonup}{\vphantom{a}\smash {#1}}} \)

    \( \newcommand{\id}{\mathrm{id}}\) \( \newcommand{\Span}{\mathrm{span}}\)

    ( \newcommand{\kernel}{\mathrm{null}\,}\) \( \newcommand{\range}{\mathrm{range}\,}\)

    \( \newcommand{\RealPart}{\mathrm{Re}}\) \( \newcommand{\ImaginaryPart}{\mathrm{Im}}\)

    \( \newcommand{\Argument}{\mathrm{Arg}}\) \( \newcommand{\norm}[1]{\| #1 \|}\)

    \( \newcommand{\inner}[2]{\langle #1, #2 \rangle}\)

    \( \newcommand{\Span}{\mathrm{span}}\)

    \( \newcommand{\id}{\mathrm{id}}\)

    \( \newcommand{\Span}{\mathrm{span}}\)

    \( \newcommand{\kernel}{\mathrm{null}\,}\)

    \( \newcommand{\range}{\mathrm{range}\,}\)

    \( \newcommand{\RealPart}{\mathrm{Re}}\)

    \( \newcommand{\ImaginaryPart}{\mathrm{Im}}\)

    \( \newcommand{\Argument}{\mathrm{Arg}}\)

    \( \newcommand{\norm}[1]{\| #1 \|}\)

    \( \newcommand{\inner}[2]{\langle #1, #2 \rangle}\)

    \( \newcommand{\Span}{\mathrm{span}}\) \( \newcommand{\AA}{\unicode[.8,0]{x212B}}\)

    \( \newcommand{\vectorA}[1]{\vec{#1}}      % arrow\)

    \( \newcommand{\vectorAt}[1]{\vec{\text{#1}}}      % arrow\)

    \( \newcommand{\vectorB}[1]{\overset { \scriptstyle \rightharpoonup} {\mathbf{#1}} } \)

    \( \newcommand{\vectorC}[1]{\textbf{#1}} \)

    \( \newcommand{\vectorD}[1]{\overrightarrow{#1}} \)

    \( \newcommand{\vectorDt}[1]{\overrightarrow{\text{#1}}} \)

    \( \newcommand{\vectE}[1]{\overset{-\!-\!\rightharpoonup}{\vphantom{a}\smash{\mathbf {#1}}}} \)

    \( \newcommand{\vecs}[1]{\overset { \scriptstyle \rightharpoonup} {\mathbf{#1}} } \)

    \( \newcommand{\vecd}[1]{\overset{-\!-\!\rightharpoonup}{\vphantom{a}\smash {#1}}} \)

    \(\newcommand{\avec}{\mathbf a}\) \(\newcommand{\bvec}{\mathbf b}\) \(\newcommand{\cvec}{\mathbf c}\) \(\newcommand{\dvec}{\mathbf d}\) \(\newcommand{\dtil}{\widetilde{\mathbf d}}\) \(\newcommand{\evec}{\mathbf e}\) \(\newcommand{\fvec}{\mathbf f}\) \(\newcommand{\nvec}{\mathbf n}\) \(\newcommand{\pvec}{\mathbf p}\) \(\newcommand{\qvec}{\mathbf q}\) \(\newcommand{\svec}{\mathbf s}\) \(\newcommand{\tvec}{\mathbf t}\) \(\newcommand{\uvec}{\mathbf u}\) \(\newcommand{\vvec}{\mathbf v}\) \(\newcommand{\wvec}{\mathbf w}\) \(\newcommand{\xvec}{\mathbf x}\) \(\newcommand{\yvec}{\mathbf y}\) \(\newcommand{\zvec}{\mathbf z}\) \(\newcommand{\rvec}{\mathbf r}\) \(\newcommand{\mvec}{\mathbf m}\) \(\newcommand{\zerovec}{\mathbf 0}\) \(\newcommand{\onevec}{\mathbf 1}\) \(\newcommand{\real}{\mathbb R}\) \(\newcommand{\twovec}[2]{\left[\begin{array}{r}#1 \\ #2 \end{array}\right]}\) \(\newcommand{\ctwovec}[2]{\left[\begin{array}{c}#1 \\ #2 \end{array}\right]}\) \(\newcommand{\threevec}[3]{\left[\begin{array}{r}#1 \\ #2 \\ #3 \end{array}\right]}\) \(\newcommand{\cthreevec}[3]{\left[\begin{array}{c}#1 \\ #2 \\ #3 \end{array}\right]}\) \(\newcommand{\fourvec}[4]{\left[\begin{array}{r}#1 \\ #2 \\ #3 \\ #4 \end{array}\right]}\) \(\newcommand{\cfourvec}[4]{\left[\begin{array}{c}#1 \\ #2 \\ #3 \\ #4 \end{array}\right]}\) \(\newcommand{\fivevec}[5]{\left[\begin{array}{r}#1 \\ #2 \\ #3 \\ #4 \\ #5 \\ \end{array}\right]}\) \(\newcommand{\cfivevec}[5]{\left[\begin{array}{c}#1 \\ #2 \\ #3 \\ #4 \\ #5 \\ \end{array}\right]}\) \(\newcommand{\mattwo}[4]{\left[\begin{array}{rr}#1 \amp #2 \\ #3 \amp #4 \\ \end{array}\right]}\) \(\newcommand{\laspan}[1]{\text{Span}\{#1\}}\) \(\newcommand{\bcal}{\cal B}\) \(\newcommand{\ccal}{\cal C}\) \(\newcommand{\scal}{\cal S}\) \(\newcommand{\wcal}{\cal W}\) \(\newcommand{\ecal}{\cal E}\) \(\newcommand{\coords}[2]{\left\{#1\right\}_{#2}}\) \(\newcommand{\gray}[1]{\color{gray}{#1}}\) \(\newcommand{\lgray}[1]{\color{lightgray}{#1}}\) \(\newcommand{\rank}{\operatorname{rank}}\) \(\newcommand{\row}{\text{Row}}\) \(\newcommand{\col}{\text{Col}}\) \(\renewcommand{\row}{\text{Row}}\) \(\newcommand{\nul}{\text{Nul}}\) \(\newcommand{\var}{\text{Var}}\) \(\newcommand{\corr}{\text{corr}}\) \(\newcommand{\len}[1]{\left|#1\right|}\) \(\newcommand{\bbar}{\overline{\bvec}}\) \(\newcommand{\bhat}{\widehat{\bvec}}\) \(\newcommand{\bperp}{\bvec^\perp}\) \(\newcommand{\xhat}{\widehat{\xvec}}\) \(\newcommand{\vhat}{\widehat{\vvec}}\) \(\newcommand{\uhat}{\widehat{\uvec}}\) \(\newcommand{\what}{\widehat{\wvec}}\) \(\newcommand{\Sighat}{\widehat{\Sigma}}\) \(\newcommand{\lt}{<}\) \(\newcommand{\gt}{>}\) \(\newcommand{\amp}{&}\) \(\definecolor{fillinmathshade}{gray}{0.9}\)
    Learning Objectives

    By the end of this section, you will be able to:

    • Describe Huygens’s principle
    • Use Huygens’s principle to explain the law of reflection
    • Use Huygens’s principle to explain the law of refraction
    • Use Huygens’s principle to explain diffraction

    So far in this chapter, we have been discussing optical phenomena using the ray model of light. However, some phenomena require analysis and explanations based on the wave characteristics of light. This is particularly true when the wavelength is not negligible compared to the dimensions of an optical device, such as a slit in the case of diffraction. Huygens’s principle is an indispensable tool for this analysis.

    Figure \(\PageIndex{1}\) shows how a transverse wave looks as viewed from above and from the side. A light wave can be imagined to propagate like this, although we do not actually see it wiggling through space. From above, we view the wave fronts (or wave crests) as if we were looking down on ocean waves. The side view would be a graph of the electric or magnetic field. The view from above is perhaps more useful in developing concepts about wave optics.

    Three figure contains three views of a wave. The first is a view from above. The wave is propagating to the right, and appears as a series of vertical strips that gradually alternate from dark to light and repeat. The next view is a view from the side. The wave again propagates to the right and appears as a sine curve oscillating above and below a black arrow pointing to the right that serves as the horizontal axis. The third is an overall view. This is a perspective view of a wave of the same wavelength as in the first two images and looks like an undulating surface..
    Figure \(\PageIndex{1}\): A transverse wave, such as an electromagnetic light wave, as viewed from above and from the side. The direction of propagation is perpendicular to the wave fronts (or wave crests) and is represented by a ray.

    The Dutch scientist Christiaan Huygens (1629–1695) developed a useful technique for determining in detail how and where waves propagate. Starting from some known position, Huygens’s principle states that every point on a wave front is a source of wavelets that spread out in the forward direction at the same speed as the wave itself. The new wave front is tangent to all of the wavelets.

    Figure \(\PageIndex{2}\) shows how Huygens’s principle is applied. A wave front is the long edge that moves, for example, with the crest or the trough. Each point on the wave front emits a semicircular wave that moves at the propagation speed \(v\). We can draw these wavelets at a time \(t\) later, so that they have moved a distance \(s=vt\). The new wave front is a plane tangent to the wavelets and is where we would expect the wave to be a time \(t\) later. Huygens’s principle works for all types of waves, including water waves, sound waves, and light waves. It is useful not only in describing how light waves propagate but also in explaining the laws of reflection and refraction. In addition, we will see that Huygens’s principle tells us how and where light rays interfere.
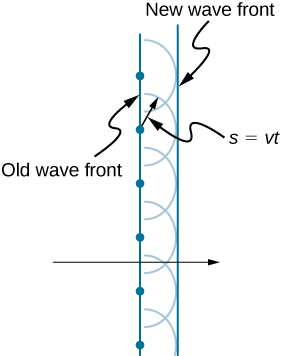
    This figure shows two straight vertical lines, with the left line labeled old wave front and the right line labeled new wave front. In the center of the image, a horizontal black arrow crosses both lines and points to the right. The old wave front line passes through six evenly spaced dots, with four dots above the black arrow and four dots below the black arrow. Each dot serves as the center of a corresponding semicircle, and all eight semicircles are the same size. The new wave front is tangent to the right edge of the semicircles. One of the center dots has a radial arrow pointing to a point on the corresponding semicircle. This radial arrow is labeled s equals v t.
    Figure \(\PageIndex{2}\): Huygens’s principle applied to a straight wave front. Each point on the wave front emits a semicircular wavelet that moves a distance s=vt. The new wave front is a line tangent to the wavelets.

    Reflection

    Figure \(\PageIndex{3}\) shows how a mirror reflects an incoming wave at an angle equal to the incident angle, verifying the law of reflection. As the wave front strikes the mirror, wavelets are first emitted from the left part of the mirror and then from the right. The wavelets closer to the left have had time to travel farther, producing a wave front traveling in the direction shown.
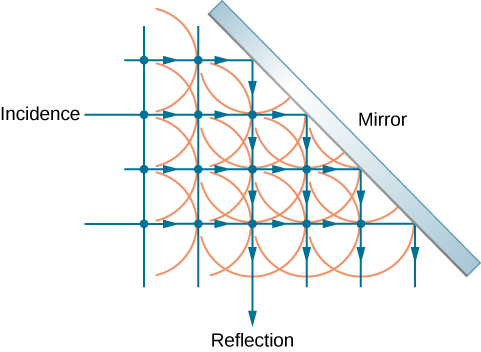
    The figure shows a grid of four horizontal, parallel, equally spaced rays incident on a mirror that is tilted at forty five degrees to the rays. The rays reflect downward from the mirror. Two additional reflected rays are included from incident rays above those shown in the figure. Dots are drawn at the intersections of incident and reflected rays. Semicircles facing to the right representing incident wavelets and semicircles facing down for reflecting wavelets are centered on the dots.
    Figure \(\PageIndex{3}\): Huygens’s principle applied to a plane wave front striking a mirror. The wavelets shown were emitted as each point on the wave front struck the mirror. The tangent to these wavelets shows that the new wave front has been reflected at an angle equal to the incident angle. The direction of propagation is perpendicular to the wave front, as shown by the downward-pointing arrows.

    Refraction

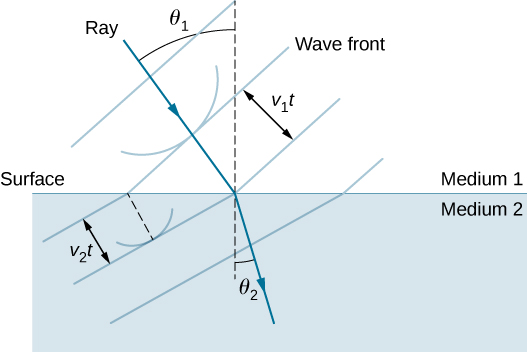
    The law of refraction can be explained by applying Huygens’s principle to a wave front passing from one medium to another (Figure \(\PageIndex{4}\)). Each wavelet in the figure was emitted when the wave front crossed the interface between the media. Since the speed of light is smaller in the second medium, the waves do not travel as far in a given time, and the new wave front changes direction as shown. This explains why a ray changes direction to become closer to the perpendicular when light slows down. Snell’s law can be derived from the geometry in Figure \(\PageIndex{5}\) (Example \(\PageIndex{1}\)).

    The figure shows two media separated by a horizontal line labeled surface. The upper medium is labeled medium one and the lower medium is labeled medium two. In medium one, a ray is incident on the surface, traveling down and to the right. A vertical dotted line, perpendicular to the surface, is drawn through both media where the ray hits the surface. The refracted ray bends down, toward this dotted line where it enters medium two. The path of the ray makes an angle theta sub one with the dotted line in medium one and an angle theta sub two with the dotted line in medium two, where theta sub two is less than theta sub one. Line segments, labeled wave front, are drawn perpendicular to the incident ray and the refracted ray. These line segments are equally spaced within each medium, but the three line segments in medium 1 are more widely spaced than the three line segments in medium 2. The separation of these line segments in medium 1 is labeled v sub one t and the separation in medium 2 is labeled v sub two t, with v sub two t being less than v sub one t.
    Figure \(\PageIndex{4}\): Huygens’s principle applied to a plane wave front traveling from one medium to another, where its speed is less. The ray bends toward the perpendicular, since the wavelets have a lower speed in the second medium.

    Example \(\PageIndex{1}\): Deriving the Law of Refraction

    By examining the geometry of the wave fronts, derive the law of refraction.

    Strategy

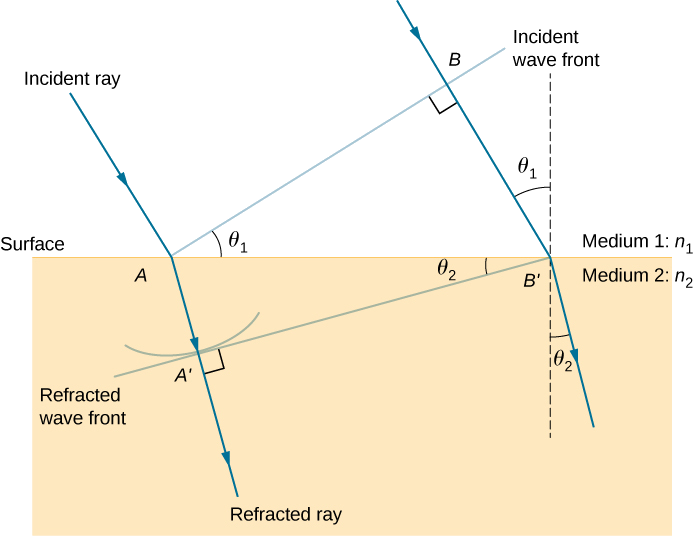
    Consider Figure \(\PageIndex{5}\), which expands upon Figure \(\PageIndex{4}\). It shows the incident wave front just reaching the surface at point A, while point B is still well within medium 1. In the time \(Δt\) it takes for a wavelet from \(B\) to reach \(B'\) on the surface at speed \(v_1=c/n_1\), a wavelet from \(A\) travels into medium 2 a distance of \(AA'=v_2Δt\), where \(v_2=c/n_2\). Note that in this example, \(v_2\) is slower than \(v_1\) because \(n_1<n_2\).

    This figure illustrates the geometry of the refraction of the rays and wave fronts. A horizontal surface is present between medium 1, with index of refraction n 1, and medium 2, with index of refraction n 2. An incident ray is shown coming in from medium 1 into medium 2. It hits the surface at point A and refracts toward the normal in medium 2. A line, labeled incident wave front, is drawn from point A extending away from the surface, perpendicular to the incident ray. The angle between the incident wave front and the surface is theta 1. A second incident ray is drawn parallel to the first one. This ray intersects the incident wave front at a point labeled as B and hits the surface at a point labeled as B prime. A dashed line is drawn perpendicular to the surface at B prime. The angle between this perpendicular line and the second ray is also theta one. The triangle formed by A, B, and B prime is a right triangle with angle theta one at A and a right angle at B. The refracted rays at A and B prime bend down, toward the downward perpendiculars to the surface, making an angle of theta two with the vertical direction. The refracted wave front that is perpendicular to the refracted rays and that hits the surface at B prime is drawn. This wave front hits the refraction of the first incident ray at a point marked A prime and makes an angle of theta two with the surface.
    Figure \(\PageIndex{5}\): Geometry of the law of refraction from medium 1 to medium 2.
    Solution

    The segment on the surface AB' is shared by both the triangle ABB' inside medium 1 and the triangle AA′B′ inside medium 2. Note that from the geometry, the angle ∠BAB' is equal to the angle of incidence, \(θ_1\). Similarly, \(∠AB'A'\) is \(θ_2\).

    The length of AB' is given in two ways as

    \[AB'=\dfrac{BB'}{\sin θ_1}=\dfrac{AA'}{\sin θ_2}. \nonumber \]

    Inverting the equation and substituting AA'=cΔt/n2 from above and similarly \(BB'=cΔt/n_1\), we obtain

    \[\dfrac{\sin θ_1}{c\Delta t/n_1}=\dfrac{\sin θ_2}{c\Delta t/n_2}. \nonumber \]

    Cancellation of \(cΔt\) allows us to simplify this equation into the familiar form

    \[\underbrace{n_1\sin θ_1=n_2 \sin θ_2}_{\text{Snell's law}}. \nonumber \]

    Significance

    Although the law of refraction was established experimentally by Snell, its derivation here requires Huygens’s principle and the understanding that the speed of light is different in different media.

    Exercise \(\PageIndex{1}\)

    In Example \(\PageIndex{1}\), we had \(n_1<n_2\). If \(n_2\) were decreased such that \(n_1>n_2\) and the speed of light in medium 2 is faster than in medium 1, what would happen to the length of AA'? What would happen to the wave front A'B' and the direction of the refracted ray?

    Answer

    AA′ becomes longer, A'B' tilts further away from the surface, and the refracted ray tilts away from the normal.

    This applet by Walter Fendt shows an animation of reflection and refraction using Huygens’s wavelets while you control the parameters. Be sure to click on “Next step” to display the wavelets. You can see the reflected and refracted wave fronts forming.

    Diffraction

    What happens when a wave passes through an opening, such as light shining through an open door into a dark room? For light, we observe a sharp shadow of the doorway on the floor of the room, and no visible light bends around corners into other parts of the room. When sound passes through a door, we hear it everywhere in the room and thus observe that sound spreads out when passing through such an opening (Figure \(\PageIndex{6}\)). What is the difference between the behavior of sound waves and light waves in this case? The answer is that light has very short wavelengths and acts like a ray. Sound has wavelengths on the order of the size of the door and bends around corners (for frequency of 1000 Hz,

    \[\lambda =\dfrac{c}{f}=\dfrac{330\,m/s}{1000\,s^{−1}}=0.33\,m, \nonumber \]

    about three times smaller than the width of the doorway).
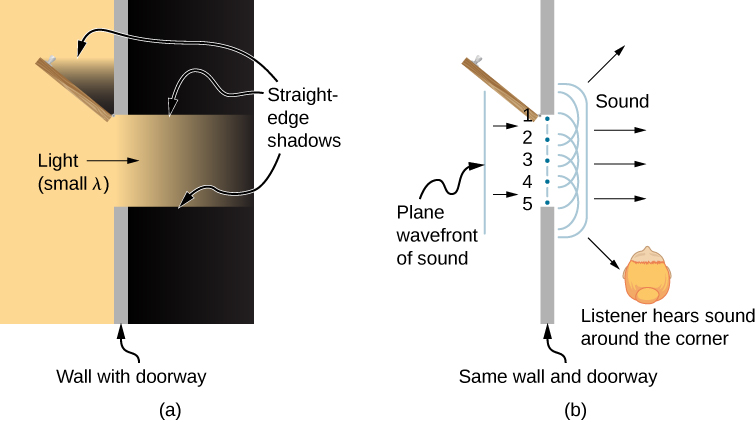
    Figure a is a view from above of a diagram of a wall in which there is an open doorway. The wall extends from the bottom of the diagram to the top, and the doorway forms a gap in the wall. The door itself is opened to the left and is positioned about forty five degrees from the wall on which it pivots. Light, labeled small lambda, is incident from the left side of the wall. Some of the light passes through the open doorway. The light that passes through the door has sharp edges, corresponding to straight edge shadows above and below. The open door also creates a straight edge shadow between it and the wall. Part b of the figure shows a similar diagram. A line parallel to the wall approaches the wall from the left and is labeled plane wave front of sound. There are five dots evenly spaced across the open doorway, labeled one through five. Semicircles appear to the right of these dots entering the room to the right of the wall. Bracketing all these semicircles is a line that has the form of closing square bracket with rounded corners. This line is labeled sound. There are five rays shown pointing from the bracketing line into the room to the right of the wall. Three of these rays point horizontally to the right, one ray points upward and to the right, and the last ray points downward and to the right. This last ray points to the ear of a person who we see from above and who is labeled listener hears sound around the corner.
    Figure \(\PageIndex{6}\): (a) Light passing through a doorway makes a sharp outline on the floor. Since light’s wavelength is very small compared with the size of the door, it acts like a ray. (b) Sound waves bend into all parts of the room, a wave effect, because their wavelength is similar to the size of the door.

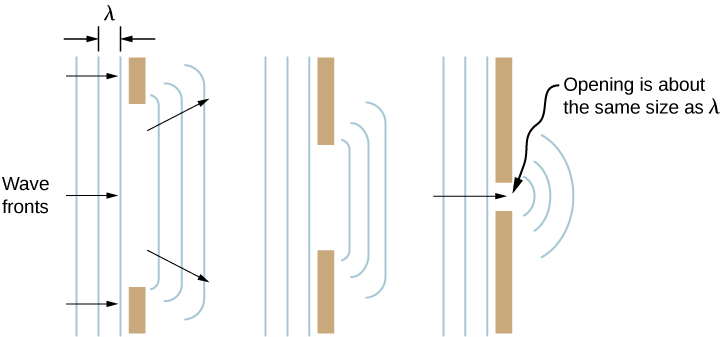
    If we pass light through smaller openings such as slits, we can use Huygens’s principle to see that light bends as sound does (Figure \(\PageIndex{7}\)). The bending of a wave around the edges of an opening or an obstacle is called diffraction. Diffraction is a wave characteristic and occurs for all types of waves. If diffraction is observed for some phenomenon, it is evidence that the phenomenon is a wave. Thus, the horizontal diffraction of the laser beam after it passes through the slits in Figure \(\PageIndex{7}\) is evidence that light is a wave.

    The figure shows three diagrams illustrating waves spreading out when passing through various-size openings. Each illustration is a top view, and the incident plane wave fronts are represented by vertical lines. The wavelength, lambda, is the distance between adjacent lines and is the same in all three diagrams. The first diagram shows wave fronts passing through an opening that is wide compared to the wavelength. The wave fronts that emerge on the other side of the opening have minor bending at the edges. The second diagram shows wave fronts passing through a smaller opening. The waves experience more bending but still have a straight part. The third diagram shows wave fronts passing through an opening that has is about the same size as the wavelength. These waves show significant bending and, in fact, look circular rather than straight.
    Figure \(\PageIndex{7}\): Huygens’s principle applied to a plane wave front striking an opening. The edges of the wave front bend after passing through the opening, a process called diffraction. The amount of bending is more extreme for a small opening, consistent with the fact that wave characteristics are most noticeable for interactions with objects about the same size as the wavelength.

    This page titled 1.7: Huygens’s Principle is shared under a CC BY 4.0 license and was authored, remixed, and/or curated by OpenStax via source content that was edited to the style and standards of the LibreTexts platform.