Physics LibreTexts

32.4: Procedures

  • Page ID
    29303
  • \( \newcommand{\vecs}[1]{\overset { \scriptstyle \rightharpoonup} {\mathbf{#1}} } \)

    \( \newcommand{\vecd}[1]{\overset{-\!-\!\rightharpoonup}{\vphantom{a}\smash {#1}}} \)

    \( \newcommand{\id}{\mathrm{id}}\) \( \newcommand{\Span}{\mathrm{span}}\)

    ( \newcommand{\kernel}{\mathrm{null}\,}\) \( \newcommand{\range}{\mathrm{range}\,}\)

    \( \newcommand{\RealPart}{\mathrm{Re}}\) \( \newcommand{\ImaginaryPart}{\mathrm{Im}}\)

    \( \newcommand{\Argument}{\mathrm{Arg}}\) \( \newcommand{\norm}[1]{\| #1 \|}\)

    \( \newcommand{\inner}[2]{\langle #1, #2 \rangle}\)

    \( \newcommand{\Span}{\mathrm{span}}\)

    \( \newcommand{\id}{\mathrm{id}}\)

    \( \newcommand{\Span}{\mathrm{span}}\)

    \( \newcommand{\kernel}{\mathrm{null}\,}\)

    \( \newcommand{\range}{\mathrm{range}\,}\)

    \( \newcommand{\RealPart}{\mathrm{Re}}\)

    \( \newcommand{\ImaginaryPart}{\mathrm{Im}}\)

    \( \newcommand{\Argument}{\mathrm{Arg}}\)

    \( \newcommand{\norm}[1]{\| #1 \|}\)

    \( \newcommand{\inner}[2]{\langle #1, #2 \rangle}\)

    \( \newcommand{\Span}{\mathrm{span}}\) \( \newcommand{\AA}{\unicode[.8,0]{x212B}}\)

    \( \newcommand{\vectorA}[1]{\vec{#1}}      % arrow\)

    \( \newcommand{\vectorAt}[1]{\vec{\text{#1}}}      % arrow\)

    \( \newcommand{\vectorB}[1]{\overset { \scriptstyle \rightharpoonup} {\mathbf{#1}} } \)

    \( \newcommand{\vectorC}[1]{\textbf{#1}} \)

    \( \newcommand{\vectorD}[1]{\overrightarrow{#1}} \)

    \( \newcommand{\vectorDt}[1]{\overrightarrow{\text{#1}}} \)

    \( \newcommand{\vectE}[1]{\overset{-\!-\!\rightharpoonup}{\vphantom{a}\smash{\mathbf {#1}}}} \)

    \( \newcommand{\vecs}[1]{\overset { \scriptstyle \rightharpoonup} {\mathbf{#1}} } \)

    \( \newcommand{\vecd}[1]{\overset{-\!-\!\rightharpoonup}{\vphantom{a}\smash {#1}}} \)

    \(\newcommand{\avec}{\mathbf a}\) \(\newcommand{\bvec}{\mathbf b}\) \(\newcommand{\cvec}{\mathbf c}\) \(\newcommand{\dvec}{\mathbf d}\) \(\newcommand{\dtil}{\widetilde{\mathbf d}}\) \(\newcommand{\evec}{\mathbf e}\) \(\newcommand{\fvec}{\mathbf f}\) \(\newcommand{\nvec}{\mathbf n}\) \(\newcommand{\pvec}{\mathbf p}\) \(\newcommand{\qvec}{\mathbf q}\) \(\newcommand{\svec}{\mathbf s}\) \(\newcommand{\tvec}{\mathbf t}\) \(\newcommand{\uvec}{\mathbf u}\) \(\newcommand{\vvec}{\mathbf v}\) \(\newcommand{\wvec}{\mathbf w}\) \(\newcommand{\xvec}{\mathbf x}\) \(\newcommand{\yvec}{\mathbf y}\) \(\newcommand{\zvec}{\mathbf z}\) \(\newcommand{\rvec}{\mathbf r}\) \(\newcommand{\mvec}{\mathbf m}\) \(\newcommand{\zerovec}{\mathbf 0}\) \(\newcommand{\onevec}{\mathbf 1}\) \(\newcommand{\real}{\mathbb R}\) \(\newcommand{\twovec}[2]{\left[\begin{array}{r}#1 \\ #2 \end{array}\right]}\) \(\newcommand{\ctwovec}[2]{\left[\begin{array}{c}#1 \\ #2 \end{array}\right]}\) \(\newcommand{\threevec}[3]{\left[\begin{array}{r}#1 \\ #2 \\ #3 \end{array}\right]}\) \(\newcommand{\cthreevec}[3]{\left[\begin{array}{c}#1 \\ #2 \\ #3 \end{array}\right]}\) \(\newcommand{\fourvec}[4]{\left[\begin{array}{r}#1 \\ #2 \\ #3 \\ #4 \end{array}\right]}\) \(\newcommand{\cfourvec}[4]{\left[\begin{array}{c}#1 \\ #2 \\ #3 \\ #4 \end{array}\right]}\) \(\newcommand{\fivevec}[5]{\left[\begin{array}{r}#1 \\ #2 \\ #3 \\ #4 \\ #5 \\ \end{array}\right]}\) \(\newcommand{\cfivevec}[5]{\left[\begin{array}{c}#1 \\ #2 \\ #3 \\ #4 \\ #5 \\ \end{array}\right]}\) \(\newcommand{\mattwo}[4]{\left[\begin{array}{rr}#1 \amp #2 \\ #3 \amp #4 \\ \end{array}\right]}\) \(\newcommand{\laspan}[1]{\text{Span}\{#1\}}\) \(\newcommand{\bcal}{\cal B}\) \(\newcommand{\ccal}{\cal C}\) \(\newcommand{\scal}{\cal S}\) \(\newcommand{\wcal}{\cal W}\) \(\newcommand{\ecal}{\cal E}\) \(\newcommand{\coords}[2]{\left\{#1\right\}_{#2}}\) \(\newcommand{\gray}[1]{\color{gray}{#1}}\) \(\newcommand{\lgray}[1]{\color{lightgray}{#1}}\) \(\newcommand{\rank}{\operatorname{rank}}\) \(\newcommand{\row}{\text{Row}}\) \(\newcommand{\col}{\text{Col}}\) \(\renewcommand{\row}{\text{Row}}\) \(\newcommand{\nul}{\text{Nul}}\) \(\newcommand{\var}{\text{Var}}\) \(\newcommand{\corr}{\text{corr}}\) \(\newcommand{\len}[1]{\left|#1\right|}\) \(\newcommand{\bbar}{\overline{\bvec}}\) \(\newcommand{\bhat}{\widehat{\bvec}}\) \(\newcommand{\bperp}{\bvec^\perp}\) \(\newcommand{\xhat}{\widehat{\xvec}}\) \(\newcommand{\vhat}{\widehat{\vvec}}\) \(\newcommand{\uhat}{\widehat{\uvec}}\) \(\newcommand{\what}{\widehat{\wvec}}\) \(\newcommand{\Sighat}{\widehat{\Sigma}}\) \(\newcommand{\lt}{<}\) \(\newcommand{\gt}{>}\) \(\newcommand{\amp}{&}\) \(\definecolor{fillinmathshade}{gray}{0.9}\)

    You will mimic the reflection of a photon and observe reflective properties of materials.

    Law of Reflection Test

    1. Draw a table in which to record your law of reflection data.  Do not fill in data until you have read the instructions for obtaining that data.

    Table \(\PageIndex{1}\): Law of Reflection Data
     

    Same Center (Yes or No)

    \(\Delta \) Size

    1st Ramp Height


    2nd Ramp Height

       
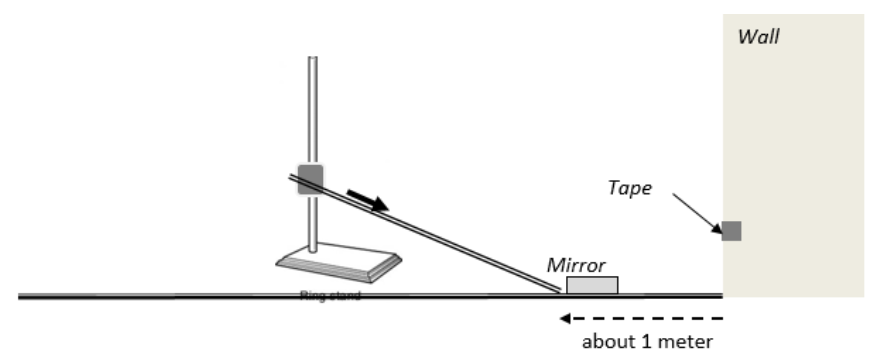
    1. Set-up the ramp such that the bottom end of the ramp is about one meter from a wall.  The height of the ramp at the top end is not important.  Rest the flashlight on the ramp, at the top of the ramp, and position the mirror on the floor where the light beam is shining.  The light should be reflected from the mirror to the wall.  Use a piece of masking tape to mark the center of the light shape on the wall.
    clipboard_e6a2e38bb44cdecddf5bb7a6f9fb01003.png
    Figure \(\PageIndex{1}\)
    1. Slide the flashlight down along the ramp, closer to the mirror, while observing the light shape on the wall.  Make sure the light from the flashlight continues to hit the mirror as you slide the flashlight down the ramp, and adjust the position of the mirror if needed.  Record whether the light shape remained centered on the tape, in your law of reflection data table.  Also record how the size of the light shape changed (larger, smaller, or unchanged). 

    clipboard_e27e9ff5e35c96ef941826bf6cc1559d0.png
    Figure \(\PageIndex{2}\)
    1. Change the height of your ramp, to change the angle of incidence.  Repeat processes you completed for the lower ramp.  Record whether the light shape remained centered on the tape.  Also record how the size of the light circle changed (larger, smaller, or unchanged). 

    The Bounce Test

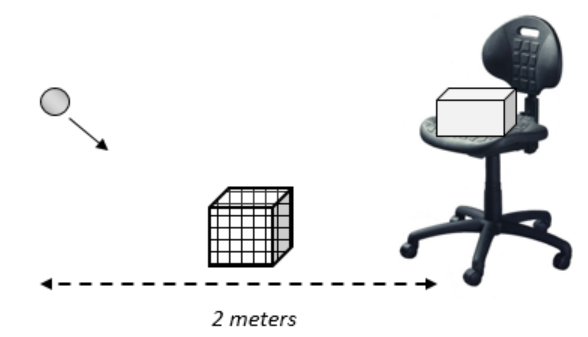
    1. Place the basket or box on a chair.  Stand about 2 meters from the chair, and make 3 attempts to bounce the tennis ball from the floor into the basket or box that is on the chair, while you observe the motion of the ball.  Record the general motion of the ball; did the ball tend to bounce toward the chair or in random directions.  

    clipboard_e2911bf2166f01a739c49f9951a48f551.png
    Figure \(\PageIndex{3}\)
    1. Place milk crate upside down on the floor between you and the chair, and make 3 attempts to bounce the tennis ball off the milk crate into the basket or box that is on the chair, while you observe the motion of the ball.  Record the general motion of the ball; did the ball tend to bounce toward the chair or in random directions.  
    clipboard_e2bc03bdb187dc51ac900a379d1995ca9.png
    Figure \(\PageIndex{4}\)

    Comparing Reflectivity

    1. Draw a table in which to record your reflective surfaces data.  Read the instructions for obtaining that data.

    Table \(\PageIndex{2}\): Reflective Surfaces Data

    Object

    Predicted Ranking

    Observed Ranking

    Mirror


    Wood


    Smooth Foil


    Crinkled Foil


    White Paper

       
    1. Predict the rank order from most reflective (1) to least reflective (5).  

    2. Place each of the reflective surfaces on your table.  Alternately bounce light from each surface to the ceiling and observe the amount of reflected light on the ceiling, from each surface.  Record the observed rank order of the listed reflective surfaces from most reflective (1) to least reflective (5), in your reflective surfaces data table.  

    3. Stand about 2 meters from a wall and turn on the flashlight.  Shine the flashlight through the air toward the wall.  Observe the light from the flashlight and compare the light in the air to the light on the wall.  Record where the most light is seen, in the air or on the wall.

    Mirrors

    1. Draw a table in which to record information about each mirror image.  Read the instructions for obtaining the data. 

    Table \(\PageIndex{3}\): Mirror Images Data

    Type of Mirror

    Apparent Size

    Apparent Distance

    Orientation

    Flat Mirror


    Concave Mirror


    Convex Mirror


    Spoon-Concave side


    Spoon-Convex side

         
    1. Use your aluminum foil to create a candle stand and place your candle on the table.  Light the candle with a match.  Use each type of mirror (concave and convex) and each side of the spoon to view an image of the candle; you will need to position each reflective surface on the opposite side of the candle from where you are located.    

    clipboard_ede232eecf99f82e2452c37b9695c2b04.png
    Figure \(\PageIndex{5}\): Candle light reflection

    Observe and record the following data for each reflective surface used to view the candle.

    • Apparent size of the image (same, smaller, or larger) compared to the size of the candle
    • Apparent distance of the image from the mirror (same, nearer, further) as compared to the candle distance from the mirror
    • Apparent orientation of the image (same or upside down)
    1. Use the two flat mirrors to create an “infinity mirror”.  Describe or sketch the positioning of the mirrors that results in the greatest number of images, the most reflections of the candle. 

    2. Hold one of the flat mirrors upright on the line identified as “mirror line” with the shiny side facing the letters in the boxes below.  Sketch what the letters look like in the mirror; use large block letters. 

    clipboard_e604ca025b9fd488e043463cdab6f06bb.png
    Figure \(\PageIndex{6}\)
    1. Hold one of the flat mirrors upright with the shiny side facing the letters you sketched in the previous step.  Record a description of what you observe.

    2. Draw a table in which to record your observations of your image in the Mega Mirrors.  Read the instructions for obtaining the information.

    Table \(\PageIndex{4}\): Mega Mirror Image Data

    Type of Mirror

    Apparent Size

    Abrupt Change

    Convex Mega Mirror


    Concave Mega Mirror

       
    1. Locate the Mega Mirrors in your classroom.  View an image of yourself in the convex mega mirror.  Record whether the apparent size of the image (same, smaller, or larger) than you.  Move to within a few inches of the mirror and the then slowly back away from the mirror, while observing your image.  Record any abrupt change in the image (change in size or image flips).  Repeat the process for the concave mega mirror.

    Clean-up

    • Remove tape from the wall and throw it away
    • Dispose of all aluminum foil

    Contributors and Attributions


    32.4: Procedures is shared under a CC BY license and was authored, remixed, and/or curated by LibreTexts.

    • Was this article helpful?