Physics LibreTexts

21.2: Inclined Block and Vertical Block

  • Page ID
    92215
  • \( \newcommand{\vecs}[1]{\overset { \scriptstyle \rightharpoonup} {\mathbf{#1}} } \)

    \( \newcommand{\vecd}[1]{\overset{-\!-\!\rightharpoonup}{\vphantom{a}\smash {#1}}} \)

    \( \newcommand{\id}{\mathrm{id}}\) \( \newcommand{\Span}{\mathrm{span}}\)

    ( \newcommand{\kernel}{\mathrm{null}\,}\) \( \newcommand{\range}{\mathrm{range}\,}\)

    \( \newcommand{\RealPart}{\mathrm{Re}}\) \( \newcommand{\ImaginaryPart}{\mathrm{Im}}\)

    \( \newcommand{\Argument}{\mathrm{Arg}}\) \( \newcommand{\norm}[1]{\| #1 \|}\)

    \( \newcommand{\inner}[2]{\langle #1, #2 \rangle}\)

    \( \newcommand{\Span}{\mathrm{span}}\)

    \( \newcommand{\id}{\mathrm{id}}\)

    \( \newcommand{\Span}{\mathrm{span}}\)

    \( \newcommand{\kernel}{\mathrm{null}\,}\)

    \( \newcommand{\range}{\mathrm{range}\,}\)

    \( \newcommand{\RealPart}{\mathrm{Re}}\)

    \( \newcommand{\ImaginaryPart}{\mathrm{Im}}\)

    \( \newcommand{\Argument}{\mathrm{Arg}}\)

    \( \newcommand{\norm}[1]{\| #1 \|}\)

    \( \newcommand{\inner}[2]{\langle #1, #2 \rangle}\)

    \( \newcommand{\Span}{\mathrm{span}}\) \( \newcommand{\AA}{\unicode[.8,0]{x212B}}\)

    \( \newcommand{\vectorA}[1]{\vec{#1}}      % arrow\)

    \( \newcommand{\vectorAt}[1]{\vec{\text{#1}}}      % arrow\)

    \( \newcommand{\vectorB}[1]{\overset { \scriptstyle \rightharpoonup} {\mathbf{#1}} } \)

    \( \newcommand{\vectorC}[1]{\textbf{#1}} \)

    \( \newcommand{\vectorD}[1]{\overrightarrow{#1}} \)

    \( \newcommand{\vectorDt}[1]{\overrightarrow{\text{#1}}} \)

    \( \newcommand{\vectE}[1]{\overset{-\!-\!\rightharpoonup}{\vphantom{a}\smash{\mathbf {#1}}}} \)

    \( \newcommand{\vecs}[1]{\overset { \scriptstyle \rightharpoonup} {\mathbf{#1}} } \)

    \( \newcommand{\vecd}[1]{\overset{-\!-\!\rightharpoonup}{\vphantom{a}\smash {#1}}} \)

    \(\newcommand{\avec}{\mathbf a}\) \(\newcommand{\bvec}{\mathbf b}\) \(\newcommand{\cvec}{\mathbf c}\) \(\newcommand{\dvec}{\mathbf d}\) \(\newcommand{\dtil}{\widetilde{\mathbf d}}\) \(\newcommand{\evec}{\mathbf e}\) \(\newcommand{\fvec}{\mathbf f}\) \(\newcommand{\nvec}{\mathbf n}\) \(\newcommand{\pvec}{\mathbf p}\) \(\newcommand{\qvec}{\mathbf q}\) \(\newcommand{\svec}{\mathbf s}\) \(\newcommand{\tvec}{\mathbf t}\) \(\newcommand{\uvec}{\mathbf u}\) \(\newcommand{\vvec}{\mathbf v}\) \(\newcommand{\wvec}{\mathbf w}\) \(\newcommand{\xvec}{\mathbf x}\) \(\newcommand{\yvec}{\mathbf y}\) \(\newcommand{\zvec}{\mathbf z}\) \(\newcommand{\rvec}{\mathbf r}\) \(\newcommand{\mvec}{\mathbf m}\) \(\newcommand{\zerovec}{\mathbf 0}\) \(\newcommand{\onevec}{\mathbf 1}\) \(\newcommand{\real}{\mathbb R}\) \(\newcommand{\twovec}[2]{\left[\begin{array}{r}#1 \\ #2 \end{array}\right]}\) \(\newcommand{\ctwovec}[2]{\left[\begin{array}{c}#1 \\ #2 \end{array}\right]}\) \(\newcommand{\threevec}[3]{\left[\begin{array}{r}#1 \\ #2 \\ #3 \end{array}\right]}\) \(\newcommand{\cthreevec}[3]{\left[\begin{array}{c}#1 \\ #2 \\ #3 \end{array}\right]}\) \(\newcommand{\fourvec}[4]{\left[\begin{array}{r}#1 \\ #2 \\ #3 \\ #4 \end{array}\right]}\) \(\newcommand{\cfourvec}[4]{\left[\begin{array}{c}#1 \\ #2 \\ #3 \\ #4 \end{array}\right]}\) \(\newcommand{\fivevec}[5]{\left[\begin{array}{r}#1 \\ #2 \\ #3 \\ #4 \\ #5 \\ \end{array}\right]}\) \(\newcommand{\cfivevec}[5]{\left[\begin{array}{c}#1 \\ #2 \\ #3 \\ #4 \\ #5 \\ \end{array}\right]}\) \(\newcommand{\mattwo}[4]{\left[\begin{array}{rr}#1 \amp #2 \\ #3 \amp #4 \\ \end{array}\right]}\) \(\newcommand{\laspan}[1]{\text{Span}\{#1\}}\) \(\newcommand{\bcal}{\cal B}\) \(\newcommand{\ccal}{\cal C}\) \(\newcommand{\scal}{\cal S}\) \(\newcommand{\wcal}{\cal W}\) \(\newcommand{\ecal}{\cal E}\) \(\newcommand{\coords}[2]{\left\{#1\right\}_{#2}}\) \(\newcommand{\gray}[1]{\color{gray}{#1}}\) \(\newcommand{\lgray}[1]{\color{lightgray}{#1}}\) \(\newcommand{\rank}{\operatorname{rank}}\) \(\newcommand{\row}{\text{Row}}\) \(\newcommand{\col}{\text{Col}}\) \(\renewcommand{\row}{\text{Row}}\) \(\newcommand{\nul}{\text{Nul}}\) \(\newcommand{\var}{\text{Var}}\) \(\newcommand{\corr}{\text{corr}}\) \(\newcommand{\len}[1]{\left|#1\right|}\) \(\newcommand{\bbar}{\overline{\bvec}}\) \(\newcommand{\bhat}{\widehat{\bvec}}\) \(\newcommand{\bperp}{\bvec^\perp}\) \(\newcommand{\xhat}{\widehat{\xvec}}\) \(\newcommand{\vhat}{\widehat{\vvec}}\) \(\newcommand{\uhat}{\widehat{\uvec}}\) \(\newcommand{\what}{\widehat{\wvec}}\) \(\newcommand{\Sighat}{\widehat{\Sigma}}\) \(\newcommand{\lt}{<}\) \(\newcommand{\gt}{>}\) \(\newcommand{\amp}{&}\) \(\definecolor{fillinmathshade}{gray}{0.9}\)

    Now let's generalize the previous problem by placing block \(m_{1}\) on an upward inclined plane that makes an angle \(\theta\) to the horizontal (Figure \(\PageIndex{1}\)). We'll begin with the case where the inclined plane is frictionless. The forces on mass \(m_{1}\) are the upward tension \(T\) as before, plus a downward acceleration \(m_{1} g \sin \theta\) down the inclined plane.

    clipboard_ef17d3c1452ae6e7a302ef402bc2935a1.png
    Figure \(\PageIndex{1}\): Inclined block and vertical block.

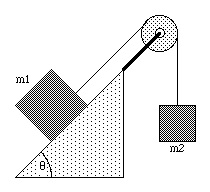
    Taking upslope as positive and downslope as negative, Newton's second law for \(m_{1}\) is then

    \[\Sigma_{i} F_{i}=m_{1} a \quad \Rightarrow \quad T-m_{1} g \sin \theta=m_{1} a\]

    Newton's second law for \(m_{2}\), in the vertical (downward) direction, is the same as before:

    \[\Sigma_{i} F_{i}=m_{2} a \quad \Rightarrow \quad m_{2} g-T=m_{2} a\]

    As before, we add these two equations to eliminate the tension \(T\) and solve for the acceleration \(a\). We find

    \[a=\frac{m_{2}-m_{1} \sin \theta}{m_{1}+m_{2}} g\]

    and then solving for the tension \(T\), we find

    \[T=\frac{m_{1} m_{2}(1+\sin \theta)}{m_{1}+m_{2}} g\]

    Notice that these equations reduce to the equations for \(m_{1}\) on a horizontal surface (Section 18.1) when we set \(\theta=0\), as expected.

    Note particularly how we chose the signs in this problem. When the system is released, the vertical block will fall downward; we'll choose to call this the positive \((+a)\) direction. Since this will result in the block on the plane accelerating upslope, this means we must choose upslope to be the positive direction to keep the signs consistent.

    Now let's generalize this even further by adding friction to the inclined plane. In this case, mass \(m_{1}\) will experience an upslope force equal to the tension \(T\) and a downslope force \(m_{1} g \sin \theta\). In addition, there will be a frictional force \(f=\mu n=\mu m_{1} g \cos \theta\) acting opposite the direction of motion (downslope). Thus

    \[\Sigma_{i} F_{i}=m_{1} a \quad \Rightarrow \quad T-m_{1} g \sin \theta-\mu m_{1} g \cos \theta=m_{1} a\]

    Newton's second law for \(m_{2}\), in the vertical (downward) direction, is the same as before:

    \[\Sigma_{i} F_{i}=m_{2} a \quad \Rightarrow \quad m_{2} g-T=m_{2} a\]

    As before, we add these two equations to eliminate the tension \(T\) and solve for the acceleration \(a\) :

    \[a=\frac{m_{2}-m_{1}(\mu \cos \theta+\sin \theta)}{m_{1}+m_{2}} g\]

    and we find the tension to be

    \[T=\frac{m_{1} m_{2}(1+\mu \cos \theta+\sin \theta)}{m_{1}+m_{2}} g\]

    The last two equations are generalizations of all the previous problems. Setting \(\theta=0\) recovers the equations for \(m_{1}\) on a horizontal surface, and setting \(\mu=0\) recovers the frictionless formulas. Furthermore, setting \(\mu=0\) and \(\theta=90^{\circ}\) produces the equations for the acceleration and tension for the Atwood's machine discussed in Chapter 18.


    21.2: Inclined Block and Vertical Block is shared under a CC BY-NC-SA 4.0 license and was authored, remixed, and/or curated by LibreTexts.

    • Was this article helpful?