4.6: Multiple Optical Devices
- Last updated
- Nov 8, 2022
- Save as PDF
- Page ID
- 27776
( \newcommand{\kernel}{\mathrm{null}\,}\)
Image Becomes Object
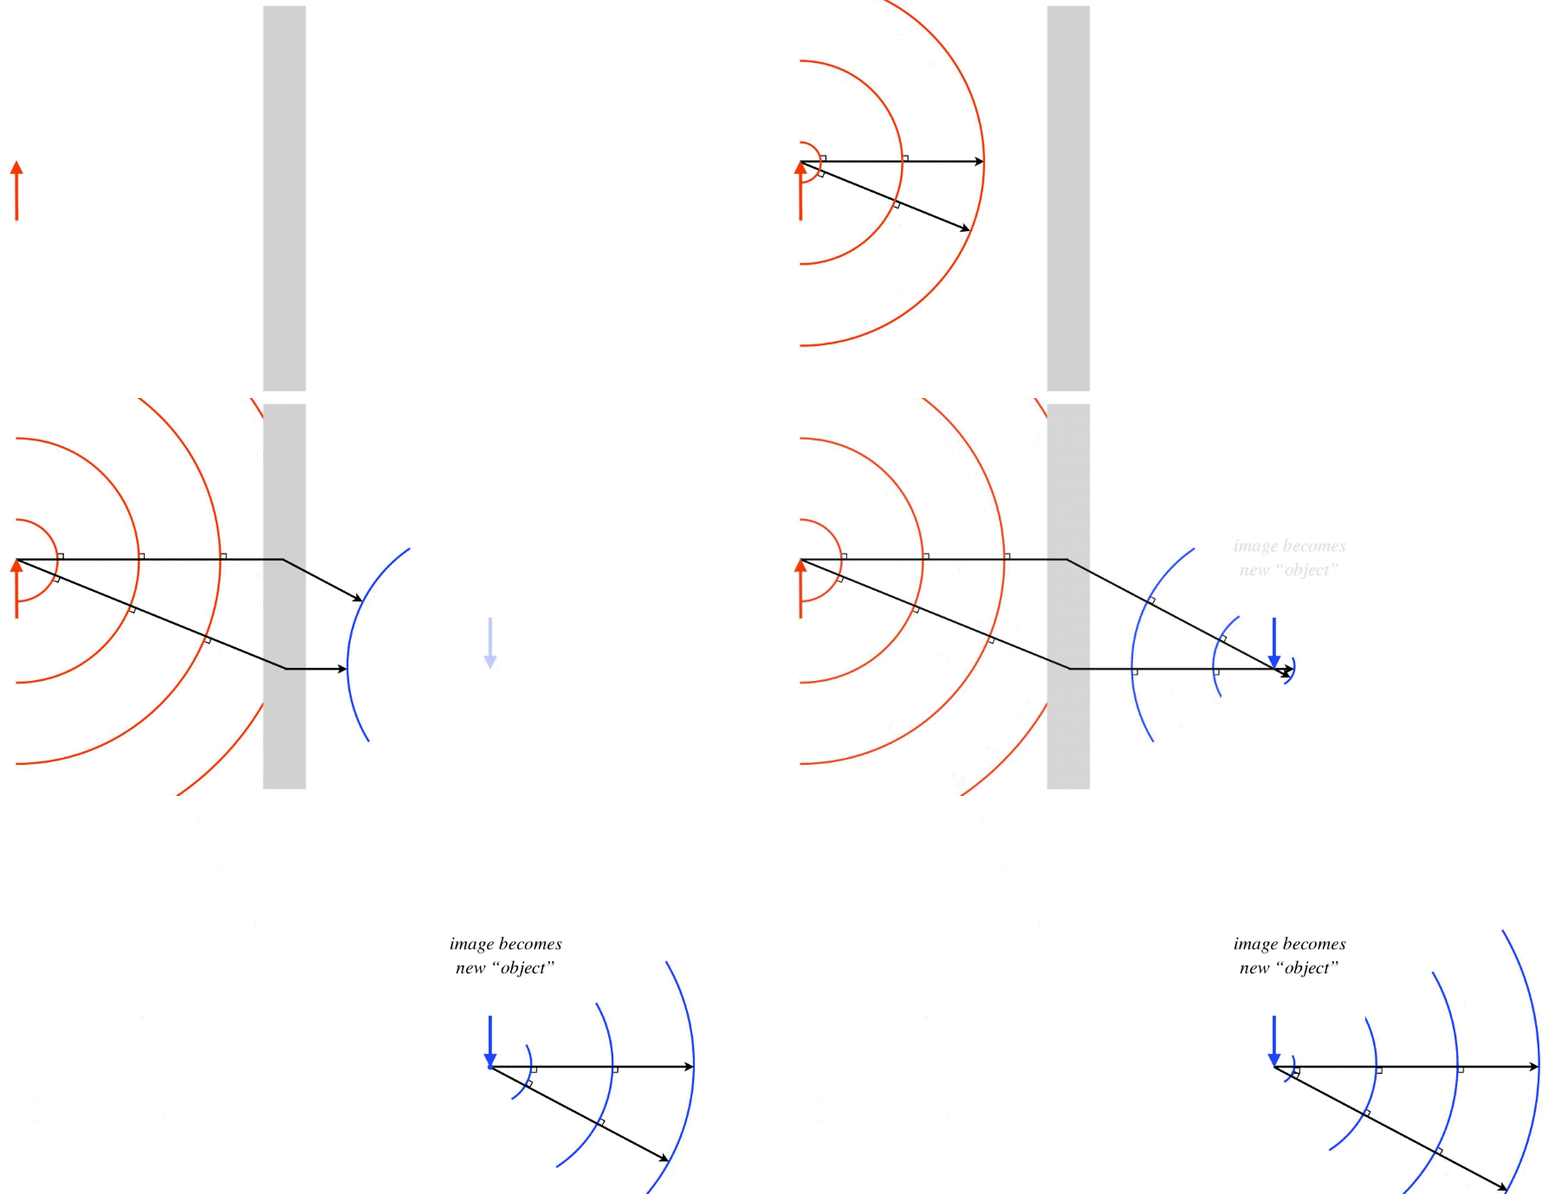
In the previous section we built a lens from two successive spherical refractions. The trick we used to get the lensmaker equation can be extended to many more applications. Indeed, anytime light is affected by more than one optical device on its way from the object to the observer, the image that results from the first optical device in the path is effectively the source for the second optical device. The location of this first image can then be used to compute an "object" distance for the second device. As usual, the best way to visualize the physical basis for this assumption is to think about what is happening to the light waves as it exits the original object, is affected by the first device (which can be a mirror, a lens, or even just a single surface interface between two media), and eventually converges to the image.
Figure 4.6.1 – Image Becomes Object

Alert
Clearly "image becomes object" does not mean that an item suddenly materializes in empty space! Rather, as the light continues past the convergence point, the waves that emerge are indistinguishable from light waves that leave an actual object, which means that the image can subsequently be used as an "object" for further adventures of that light, such as passing through a lens or bouncing off a mirror.
It should be noted that the image-used-as-an-object has an important difference with an actual object. The light that leaves the tip of an actual object arrow propagates out in all directions. The light that leaves the image can only be light that took a path from the original object and was altered by the optical device. This limits the outgoing light of the image to a specific cone. In the figure above, the optical device is clearly a converging lens, and the cone of light that leaves the image represents the region where one is able to look at the object through the lens. If one does not look through the lens, of course this image cannot be seen.
Example 4.6.1
A vessel, the bottom of which is a flat mirror, contains water that is 30.0cm deep. Someone looks down into the container at their reflection, from a height of 50.0cm from the surface of the water. Find how far the image they see is from their actual face. The index of refraction of water is 1.33.
- Solution
-
This problem includes an extra level of thought that has not yet been introduced in this text, but which will play an important role later, so you should not be discouraged if you found this especially challenging. To see how this works, one has to track what happens to the light, and what the "apparent" source of the light is every time that the light encounters a change (reflection or refraction). We will keep track of where images and objects are throughout the calculation, so there will be no need to track the signs of the values (we will use absolute values throughout).
First, the light leaves the face of the person, on its way to the mirror. We know that the mirror will send back the light in a manner exactly symmetric to how it came into the mirror, but the apparent source of the light for the mirror is not positioned where the person's face is, because the water refracts the light before it gets to the mirror. We therefore need to compute the distance from the surface of the water that the face appears to be, according to the mirror. In essence, the position of the image created by the light passing from the air into the water becomes the position of the object for the mirror. The light is coming from air (n=1 into the water, so according the the mirror the image of the face is farther away from the surface of the water than the actual face is:
s′=1.331(50.0cm)=66.5cm
The "object distance" to the mirror equals the apparent distance of the face to the surface of the water, plus the depth of the water:
s=66.5cm+30.0cm=96.5cm
Now after the light reflects, it behaves as if it is coming from the other side of the mirror, making the apparent source of light a distance of 96.5cm+30.0cm=126.5cm from the surface of the water.
This light passes back through the surface of the water and is refracted into the air, which means that the apparent source of the light for the person observing it is closer to the water surface than the 126.5cm computed above:
s′=11.33(126.5cm)=95.1cm
This is the distance from the surface of the water of the image seen by the person. Adding this to the distance of the face from the water gives our answer – the distance between the face and its image: 145cm.
If the water had not been present, then because it is 80.0cm from the mirror, the image of the face would have been on the opposite side of the mirror, 160cm from the face. So the presence of the water has the effect of bringing the image closer.
Example 4.6.2
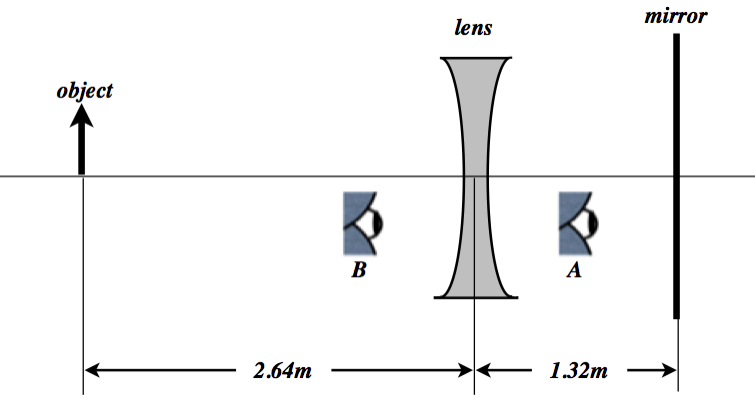
A diverging lens is placed in front of a plane mirror as in the diagram to the right. The separation of the lens and the mirror exactly equals the magnitude of the lens’s focal length, which is −1.32m. An object is placed twice this distance (2.64m) on the other side of the lens (see the diagram below).

- Find the position of the image seen by eye A (which is looking into the mirror). Express your answer as a distance measured from the mirror, and indicate which side of the mirror the image appears on (left or right).
- Find the lateral magnification (relative to the original object) of the image seen by eye A. Indicate whether the image is upright or inverted.
- Repeat (a) and (b) for the image seen by eye B (which is looking through the lens into the mirror).
- Solution
-
a. The object distance is positive, so it is –2 times the focal length of the diverging, negative-focal-length lens. Plugging this into the lens equation gives the position of the first image:
1−2f+1s′=1f⇒s′=23f
The image distance is the same sign as the focal length, so it is negative, placing it on the left side of the lens. This image becomes the object for the next stage, which is reflection off the plane mirror. The distance of this new object to the plane mirror is the distance to the lens (remember it is to the left of the lens), plus the distance between the lens and the mirror, which is given to be the focal length. Therefore the distance of the first image to the mirror is:
s=53f
The image formed by the plane mirror is exactly the same distance behind it as the object is in front of it, so the image viewed by eye A is 53f behind the mirror. Plugging in for f gives the result: The image seen by eye A is 2.2m to the right of the mirror.
b. The only lateral magnification comes from the lens, because plane mirrors provide no lateral magnification (i.e. M=+1. This is easily calculated:
M=−s′s=−23f−2f=+13
The positive value indicates that it is upright, and plane mirrors don’t invert images, so the image seen by eye A is upright.
c. We use the result for eye A, as the image for the previous refraction and reflection becomes the object for the second refraction. The distance of the reflected image from the lens is the distance it is behind the mirror plus the focal length of the lens (since that is the separation between the lens and the mirror). Note that the object distance is positive and the focal length negative, so we need to include the minus sign as before. Using this value and the lens equation gives the position of the image seen by eye B relative to the lens:
1−83f+1s′=1f⇒s′=811f
This is the distance from the lens, so the distance from the mirror is 311f=0.36m to the left of the mirror. The lateral magnification is the product of the three lateral magnifications (the second one being that of the plane mirror, which is just 1), so we just need to calculate the final lateral magnification:
M3=−s′s=−811f−83f=+311⇒M=M1M2M3=(+13)(+1)(+311)=+111
The magnification is positive and smaller than 1, which means the final image is upright and diminished.
Virtual Objects
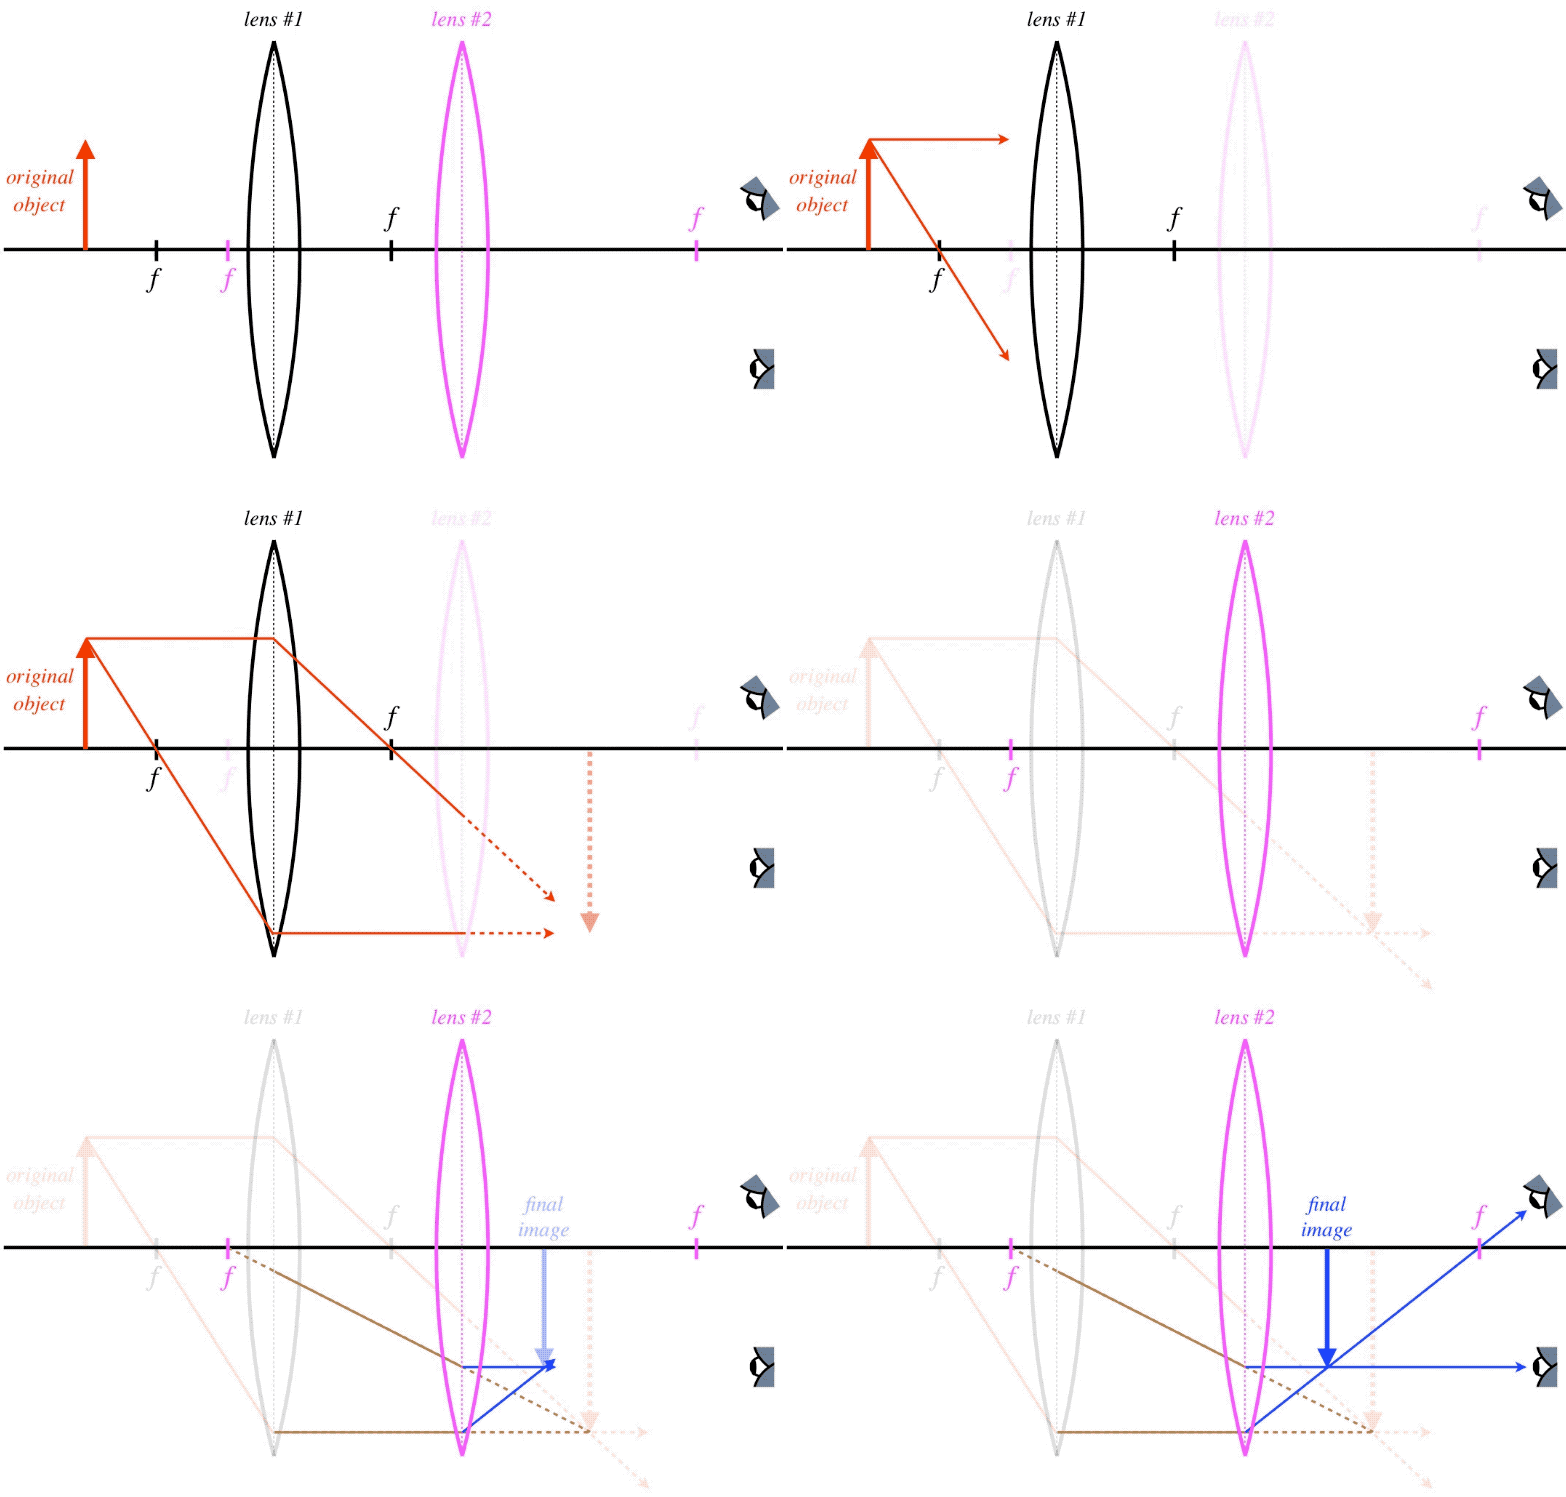
Another thing that came up in our derivation of the lensmaker equation was the possibility that the light could pass through a second surface before it was able to converge due to the first surface. The same can happen with two devices. This seems to cause a problem with the idea of the image the first optical device being an object for the next optical device, but mathematically we get around this by giving the object distance for the second device a negative value, in accordance with our sign conventions. While this mathematics does the trick and worked perfectly for the lensmaker equation, it is somehow not as satisfying as seeing how it works with a ray trace. While it is a bit tricky to do, this can be achieved as well. Here is the method:
- Ignore the second device and use a couple of principal rays for the original object and the first optical device to locate the image of the first device.
- Keep in mind that these are not the only two rays that we can sketch from the object. All of the rays that leave the object converge toward the first image, even if the light doesn't actually make it there. Of all these rays, select two that start at the first device and are principal rays for the second device. Note that one of these may be a principal ray of the first device (the one that emerges parallel to the optical axis), but others will not be.
- Use two of these principal rays of the second device to sketch the rays that converge to the final image.
The trick here is that the virtual object is not the origin of rays for the second device, but rather is the target of rays emerging from the first device before they reach the second device. Let's see an example of how this would work for two converging lenses, where the real image of the first converging lens lands behind the second.
Figure 4.6.2 – Ray Trace with a Virtual Object

Note that there is an infinite number of rays coming from the first lens, all of them heading for the first image. We just happen to choose two that conveniently happen to be principal rays for the second lens.
Stacking Thin Lenses (Again)
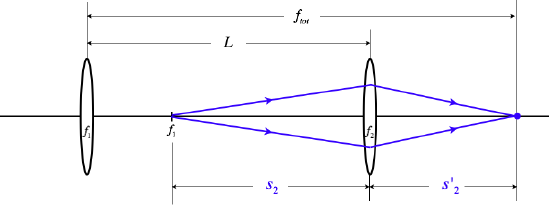
In Section 4.5 we used the lensmaker equation to deduce that multiple thin lenses placed back-to-back result in a single lens with a diopter strength that is the sum of the diopter strengths of the individual lenses (Equation 4.5.4). Here we will show this same equation follows from the first-image-becomes-second-object idea. We start with two lenses (for the sake of this discussion, we will use converging lenses, but this is not required) that are separated by a large distance l. We'll define the "total focal length" ftot as the distance from the first lens to the image of parallel rays after the second lens.
Figure 4.6.3a – Deriving the Lens-Stacking Formula

To get the parallel incoming rays, we follow the usual method of placing a point object on the axis very far away from the first lens (just a single point is all we need to get distances we are looking for, no arrow is necessary). According to the thin lens equation, this will result in the image point landing at the focal point of the first lens.
Figure 4.6.3b – Deriving the Lens-Stacking Formula

This image point of the first lens now becomes the object for the second lens, and we can compute the image distance for the second lens.
Figure 4.6.3c – Deriving the Lens-Stacking Formula

Now we need to use the thin lens equation and do a bit of math to write ftot in terms of the other variables:
1s2+1s′2=1f2s2=L−f1s′2=ftot−L}1L−f1+1ftot−L=1f2
Now to get the stacked thin lens result, all we need to do is take the limit where the separation of the lenses goes to zero (L→0), and sure enough, Equation 4.5.4 is the result.


