11.2: Torque and Angular Momentum
- Page ID
- 32990
\( \newcommand{\vecs}[1]{\overset { \scriptstyle \rightharpoonup} {\mathbf{#1}} } \)
\( \newcommand{\vecd}[1]{\overset{-\!-\!\rightharpoonup}{\vphantom{a}\smash {#1}}} \)
\( \newcommand{\id}{\mathrm{id}}\) \( \newcommand{\Span}{\mathrm{span}}\)
( \newcommand{\kernel}{\mathrm{null}\,}\) \( \newcommand{\range}{\mathrm{range}\,}\)
\( \newcommand{\RealPart}{\mathrm{Re}}\) \( \newcommand{\ImaginaryPart}{\mathrm{Im}}\)
\( \newcommand{\Argument}{\mathrm{Arg}}\) \( \newcommand{\norm}[1]{\| #1 \|}\)
\( \newcommand{\inner}[2]{\langle #1, #2 \rangle}\)
\( \newcommand{\Span}{\mathrm{span}}\)
\( \newcommand{\id}{\mathrm{id}}\)
\( \newcommand{\Span}{\mathrm{span}}\)
\( \newcommand{\kernel}{\mathrm{null}\,}\)
\( \newcommand{\range}{\mathrm{range}\,}\)
\( \newcommand{\RealPart}{\mathrm{Re}}\)
\( \newcommand{\ImaginaryPart}{\mathrm{Im}}\)
\( \newcommand{\Argument}{\mathrm{Arg}}\)
\( \newcommand{\norm}[1]{\| #1 \|}\)
\( \newcommand{\inner}[2]{\langle #1, #2 \rangle}\)
\( \newcommand{\Span}{\mathrm{span}}\) \( \newcommand{\AA}{\unicode[.8,0]{x212B}}\)
\( \newcommand{\vectorA}[1]{\vec{#1}} % arrow\)
\( \newcommand{\vectorAt}[1]{\vec{\text{#1}}} % arrow\)
\( \newcommand{\vectorB}[1]{\overset { \scriptstyle \rightharpoonup} {\mathbf{#1}} } \)
\( \newcommand{\vectorC}[1]{\textbf{#1}} \)
\( \newcommand{\vectorD}[1]{\overrightarrow{#1}} \)
\( \newcommand{\vectorDt}[1]{\overrightarrow{\text{#1}}} \)
\( \newcommand{\vectE}[1]{\overset{-\!-\!\rightharpoonup}{\vphantom{a}\smash{\mathbf {#1}}}} \)
\( \newcommand{\vecs}[1]{\overset { \scriptstyle \rightharpoonup} {\mathbf{#1}} } \)
\( \newcommand{\vecd}[1]{\overset{-\!-\!\rightharpoonup}{\vphantom{a}\smash {#1}}} \)
\(\newcommand{\avec}{\mathbf a}\) \(\newcommand{\bvec}{\mathbf b}\) \(\newcommand{\cvec}{\mathbf c}\) \(\newcommand{\dvec}{\mathbf d}\) \(\newcommand{\dtil}{\widetilde{\mathbf d}}\) \(\newcommand{\evec}{\mathbf e}\) \(\newcommand{\fvec}{\mathbf f}\) \(\newcommand{\nvec}{\mathbf n}\) \(\newcommand{\pvec}{\mathbf p}\) \(\newcommand{\qvec}{\mathbf q}\) \(\newcommand{\svec}{\mathbf s}\) \(\newcommand{\tvec}{\mathbf t}\) \(\newcommand{\uvec}{\mathbf u}\) \(\newcommand{\vvec}{\mathbf v}\) \(\newcommand{\wvec}{\mathbf w}\) \(\newcommand{\xvec}{\mathbf x}\) \(\newcommand{\yvec}{\mathbf y}\) \(\newcommand{\zvec}{\mathbf z}\) \(\newcommand{\rvec}{\mathbf r}\) \(\newcommand{\mvec}{\mathbf m}\) \(\newcommand{\zerovec}{\mathbf 0}\) \(\newcommand{\onevec}{\mathbf 1}\) \(\newcommand{\real}{\mathbb R}\) \(\newcommand{\twovec}[2]{\left[\begin{array}{r}#1 \\ #2 \end{array}\right]}\) \(\newcommand{\ctwovec}[2]{\left[\begin{array}{c}#1 \\ #2 \end{array}\right]}\) \(\newcommand{\threevec}[3]{\left[\begin{array}{r}#1 \\ #2 \\ #3 \end{array}\right]}\) \(\newcommand{\cthreevec}[3]{\left[\begin{array}{c}#1 \\ #2 \\ #3 \end{array}\right]}\) \(\newcommand{\fourvec}[4]{\left[\begin{array}{r}#1 \\ #2 \\ #3 \\ #4 \end{array}\right]}\) \(\newcommand{\cfourvec}[4]{\left[\begin{array}{c}#1 \\ #2 \\ #3 \\ #4 \end{array}\right]}\) \(\newcommand{\fivevec}[5]{\left[\begin{array}{r}#1 \\ #2 \\ #3 \\ #4 \\ #5 \\ \end{array}\right]}\) \(\newcommand{\cfivevec}[5]{\left[\begin{array}{c}#1 \\ #2 \\ #3 \\ #4 \\ #5 \\ \end{array}\right]}\) \(\newcommand{\mattwo}[4]{\left[\begin{array}{rr}#1 \amp #2 \\ #3 \amp #4 \\ \end{array}\right]}\) \(\newcommand{\laspan}[1]{\text{Span}\{#1\}}\) \(\newcommand{\bcal}{\cal B}\) \(\newcommand{\ccal}{\cal C}\) \(\newcommand{\scal}{\cal S}\) \(\newcommand{\wcal}{\cal W}\) \(\newcommand{\ecal}{\cal E}\) \(\newcommand{\coords}[2]{\left\{#1\right\}_{#2}}\) \(\newcommand{\gray}[1]{\color{gray}{#1}}\) \(\newcommand{\lgray}[1]{\color{lightgray}{#1}}\) \(\newcommand{\rank}{\operatorname{rank}}\) \(\newcommand{\row}{\text{Row}}\) \(\newcommand{\col}{\text{Col}}\) \(\renewcommand{\row}{\text{Row}}\) \(\newcommand{\nul}{\text{Nul}}\) \(\newcommand{\var}{\text{Var}}\) \(\newcommand{\corr}{\text{corr}}\) \(\newcommand{\len}[1]{\left|#1\right|}\) \(\newcommand{\bbar}{\overline{\bvec}}\) \(\newcommand{\bhat}{\widehat{\bvec}}\) \(\newcommand{\bperp}{\bvec^\perp}\) \(\newcommand{\xhat}{\widehat{\xvec}}\) \(\newcommand{\vhat}{\widehat{\vvec}}\) \(\newcommand{\uhat}{\widehat{\uvec}}\) \(\newcommand{\what}{\widehat{\wvec}}\) \(\newcommand{\Sighat}{\widehat{\Sigma}}\) \(\newcommand{\lt}{<}\) \(\newcommand{\gt}{>}\) \(\newcommand{\amp}{&}\) \(\definecolor{fillinmathshade}{gray}{0.9}\)
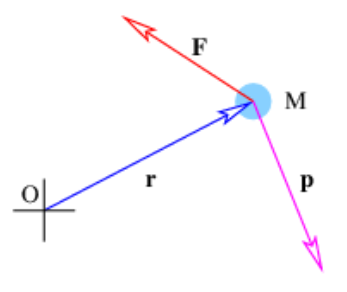
Torque is the action of a force F on a mass M which induces it to revolve about some point, called the origin. It is defined
\[\tau=\mathbf{r} \times \mathbf{F}\label{11.5}\]
where r is the position of the mass relative to the origin, as illustrated in Figure \(\PageIndex{2}\):.
Notice that the torque is zero in a number of circumstances. If the force points directly toward or away from the origin, the cross product is zero, resulting in zero torque, even though the force is non-zero. Likewise, if r = 0, the torque is zero. Thus, a force acting at the origin produces no torque. Both of these limits make sense intuitively, since neither induces the mass to revolve around the origin.
The angular momentum of a mass M relative to a point O is
\[\mathbf{L}=\mathbf{r} \times \mathbf{p}\label{11.6}\]
where p is the ordinary kinetic momentum of the mass. The angular momentum is zero if the motion of the object is directly towards or away from the origin, or if it is located at the origin.
If we take the cross product of the position vector and Newton’s second law, we obtain an equation that relates torque and angular momentum:
\[\mathbf{r} \times \mathbf{F}=\mathbf{r} \times \frac{d \mathbf{p}}{d t}=\frac{d}{d t}(\mathbf{r} \times \mathbf{p})-\frac{d \mathbf{r}}{d t} \times \mathbf{p}\label{11.7}\]
The second term on the right side of the above equation is zero because \(d \mathbf{r} / d t\) equals the velocity of the mass, which is parallel to its momentum and the cross product of two parallel vectors is zero. This equation can therefore be written
\[\tau=\frac{d \mathbf{L}}{d t} \quad \text { (Newton's second law for rotation). }\label{11.8}\]
It is the rotational version of Newton’s second law.
For both torque and angular momentum the location of the origin is arbitrary, and is generally chosen for maximum convenience. However, it is necessary to choose the same origin for both the torque and the angular momentum.

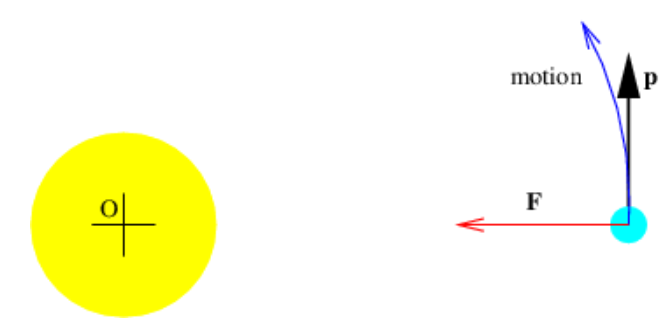
For the case of a central force, i. e., one which acts along the line of centers between two objects (such as gravity), there often exists a particularly convenient choice of origin. Imagine a planet revolving around the sun, as illustrated in Figure \(\PageIndex{3}\):. If the origin is placed at the center of the sun (which is assumed not to move under the influence of the planet’s gravity), then the torque exerted on the planet by the sun’s gravity is zero, which means that the angular momentum of the planet about the center of the sun is constant in time. No other choice of origin would yield this convenient result.
We already know about two fundamental conservation laws — those of energy and linear momentum. We believe that angular momentum is similarly conserved in isolated systems. In other words, particles can exchange angular momentum between themselves, but the vector sum of the angular momentum of all the particles in a system isolated from outside influences must remain constant.

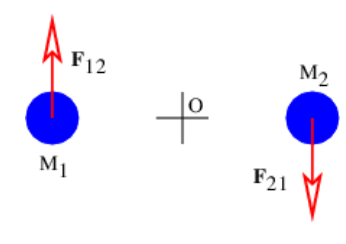
Conservation of angular momentum is not an automatic consequence of the conservation of linear momentum, even though the governing equation (\ref{11.8}) for angular momentum is derived from Newton’s second law. As an example, Figure \(\PageIndex{4}\): shows a hypothetical situation in which the force F21 of M1 on M2 is equal in magnitude but opposite in sign to the force F12 of M2 on M1, i. e., Newton’s third law holds, and the sum of the momenta of the two masses is conserved. However, because the forces are non-central, the angular momentum of the masses is not conserved. This scenario is impossible if the forces are central.